
User`s manual

33
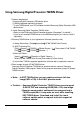
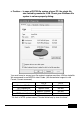
(3) Capture Status
Once You've started recording, status lamp turns on red light and capturing time
displays below status lamp.
(4) Flip image vertical
According to digital presenter lens position, preview images can be reversed. So,
using Flip image vertical option, you can capture the right direction image
(5) Frame rate per second
The Frame rate per second choices let you specify how many movie frames per
second will be recorded. We recommend 20 frames/sec. If your computer is not
fast enough to capture and compress images, you must lower Frame rate per
second as your condition.
✔
Note : For example, if you capture 1 minute AVI file using Capture
Time Limits option,but playback movie is recoded 30 sec AVI
file (default : 20 frames/sec), you must lower Frame rate to 10
frames/sec (20 x (30/60) = 10) for capturing real time movie.
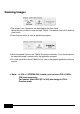
(6) Display local time in AVI file
You can display local time in top-left of AVI playback file by this option.
(7) Display user caption in AVI file
You can display user caption (up to 50 characters) in top-left of AVI playback file
by this option.
(8) Capture
After setting all the parameters for your AVI file, you may start recording by clicking
Capture button. Specify the file name and file path. Then, click Save in the Save
As dialog box. The capture process will be stated as a selected file.