Contact SAMSUNG WORLDWIDE If you have any questions or comments relating to Samsung products, please contact the SAMSUNG customer care center. Contate a SAMSUNG EM TODO O MUNDO Caso tenha dúvidas ou comentários sobre os produtos da Samsung, entre em contato com o centro de atendimento ao cliente da SAMSUNG. Country Customer Care Center Web Site ARGENTINA 0800-333-3733 www.samsung.com/ar BRAZIL 0800-124-421 4004-0000 www.samsung.com/br CHILE 800-SAMSUNG(726-7864) www.samsung.
❑ Precautions When Displaying a Still Image A still image may cause permanent damage to the TV screen ● Do not display a still image on the LED panel for more than 2 hours as it can cause screen image retention. This image retention is also known as screen burn. To avoid such image retention, reduce the degree of brightness and contrast of the screen when displaying a still image.
Media Play (USB & DLNA) Setting up Your TV ■ List of Features................................................................................... 2 ■ Accessories........................................................................................ 2 ■ Viewing the Control Panel.................................................................. 3 ■ Viewing the Remote Control............................................................... 4 ■ Installing Batteries in the Remote Control..........................
Setting up Your TV To use your TV, you first have to set it up to suit your environment. N Figures and illustrations in this User Manual are provided for reference only and may differ from actual product appearance. Product design and specifications may be changed without notice in order to enhance product performance. ¦ List of Features ● ● ● ● ● ● ● ● Adjustable picture settings that can be stored in the TV’s memory. Automatic timer to turn the TV on and off. A special sleep timer.
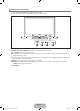
¦ Viewing the Control Panel N The product color and shape may vary depending on the model. N The front panel buttons can be activated by touching them with your finger. 1 2 7 7 6 5 4 3 1 REMOTE CONTROL SENSOR: Aim the remote control towards this spot on the TV. 2 P (POWER): Press to turn the TV on and off. 3 z: Press to change channels. In the on-screen menu, use the z buttons as you would use the ▼ and ▲ buttons on the remote control. 4 y: Press to increase or decrease the volume.
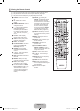
¦ Viewing the Remote Control N You can use the remote control up to a distance of about 23 feet from the TV. N The performance of the remote control may be affected by bright light. N The product color and shape may vary depending on the model. 1 POWER : Turns the TV on and off. 2 TV : Selects the TV mode directly. 3 NUMERIC BUTTONS : Press to change the channel. 4 _: Press to select additional channels (digital) being broadcast by the same station.
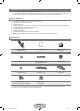
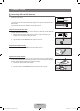
¦ Installing Batteries in the Remote Control 1. Lift the cover at the back of the remote control upward as shown in the figure. 2. Install two AAA size batteries. N Make sure to match the ‘+’ and ‘–’ ends of the batteries with the diagram inside the compartment. 3. Replace the cover. N Remove the batteries and store them in a cool, dry place if you won’t be using the remote control for a long time. (Assuming typical TV usage, the batteries should last for about one year.
4. Then press the ENTERE button to access the icon’s sub-menu. 6. Press the ◄ or ► button to decrease or increase the value of a particular item. The adjustment OSD may differ depending on the selected menu. Mode Picture 5. Press the ▲ or ▼ button to select the icon’s submenu. : Standard Backlight :7 Contrast Brightness Sharpness Color Tint (G/R) Advanced Settings Picture Options : 95 : 45 : 50 : 50 : G50/R50 ▲ Backlight ▼ ▶ 7 U Move L Adjust E Enter R Return Help icon 7.
¦ Plug & Play Feature When the TV is initially powered on, basic settings proceed automatically and subsequently. 1. Press the POWERP button on the remote control. N You can also use the POWERP button on the TV. N The message Select Language of the OSD. is displayed. 2. Press the ENTERE button. Press the ▲ or ▼ button to select the language, then press the ENTERE button. The message Select ‘Home Use’ when installing this TV in your home. is displayed. Plug & Play Select Language of the OSD. 3.
Connections ¦ Connecting VHF and UHF Antennas If your antenna has a set of leads that look like the diagram to the right, see ‘Antennas with 300 Ω Flat Twin Leads’ below. If your antenna has one lead that looks like the diagram to the right, see ‘Antennas with 75 Ω Round Leads’. If you have two antennas, see ‘Separate VHF and UHF Antennas’.
¦ Connecting Cable TV To connect to a cable TV system, follow the instructions below. ANT IN Cable without a Cable Box Plug the incoming cable into the ANT IN terminal on the back of the TV. N Because this TV is cable-ready, you do not need a cable box to view unscrambled cable channels. Connecting to a Cable Box that Descrambles All Channels 1. Find the cable that is connected to the ANT OUT terminal on your cable box. N This terminal might be labeled ‘ANT OUT’, ‘VHF OUT’ or simply, ‘OUT’.
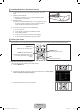
¦ Viewing the Connection Panel N The product color and shape may vary depending on the model. 1 4 or 2 3 or Cable Television Network 1 POWER INPUT Connects the supplied power cord. N The location of the POWER INPUT may be different depending on its model. 2 LAN Connect a LAN cable to this port to connect to the Network. 3 ANT IN Connects to an antenna or cable TV system. N Use an antenna cable which is smaller than 14 mm (0.55 inch).
5 7 8 R W R W R B G 6 or G 5 KENSINGTON LOCK The Kensington Lock (optional) is a device used to physically fix the system when used in a public place. If you want to use a locking device, contact the dealer where you purchased the TV. N The location of the Kensington Lock may be different depending on its model. 6 COMPONENT IN / AV IN Connects Component video / audio. The COMPONENT IN jack is also used as the AV IN jack. N When connecting, match the color of the connector to the jack.
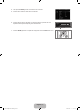
9 ! W R 0 0 @ 9 EX-LINK Connector for service only. 0 USB1(HDD) / USB2 Connector for software upgrades and Media Play, etc. N For USB HDD, use the USB1(HDD) port. N Turning on or off the TV while a USB device is connected may damage the files on the USB device. ! AUDIO OUT Connects to the audio input jacks on your Amplifier/Home theater. N When connecting, use the appropriate connector (sold separately).
CHANNEL You can configure various settings for your TV channels with features such as Auto Program, Favorite Channels, and Signal Strength. ¦ Channel Menu ❑ Antenna → Air / Cable ❑ Auto Program ■ Channel Before your television can begin memorizing the available channels, you must specify the type of signal source that is connected to the TV (i.e. an Air or a Cable system). T Press the TOOLS button to display the Tools menu.
¦ Managing Channels ■ All Channels Shows all currently available channels. ■ Added Channels Shows all added channels. Added Channels Using this menu, you can add / delete or set favorite channels and use the program guide for digital broadcasts. Air 2 Air 4 Air 4-2 8 13 13-1 Antenna TV #8 Air Air * TV #3 * Zoom Alice’s Adventures in Wonderland Select T Tools ■ Favorite Shows all favorite channels. O To select the favorite channels you have set up, press the FAV.
■ Add to Favorite / Delete from Favorite You can set channels you watch frequently as Favorite. T Press the TOOLS button to display the Tools menu. You can also set the add to (or delete from) Favorites by selecting Tools → Add to Favorite (or Delete from Favorite). N The ‘*’ symbol will be displayed and the channel will be set as a favorite. N All favorite channels will be shown on Favorite menu.
PICTURE You can configure various picture options such as the picture mode, aspect ratio, and color to suit your personal preferences. ¦ Configuring the Picture Menu ❑ Mode ■ Dynamic Selects the picture for increased definition in a bright room. ■ Standard Selects the picture for the optimum display in a normal environment. ■ Natural Selects the picture for an optimum and eye-comfortable display. N Natural is not available in PC mode. ■ Movie Selects the picture for viewing movies in a dark room.
■ Dynamic Contrast → Off / Low / Medium / High You can adjust the screen contrast so that the optimal contrast is provided. ■ Gamma You can adjust the primary color (red, green, blue) intensity. ■ Color Space Color space is a color matrix composed of red, green and blue colors. Select your favorite color space to experience the most natural color. ● Auto: Auto color space automatically adjusts to the most natural color tone based on program sources.
❑ Picture Options N In PC mode, you can only make changes to the Color Tone and Size from among the items in Picture Options. ■ ■ Color Tone → Cool / Normal / Warm1 / Warm2 / Warm3 N Warm1, Warm2 or Warm3 is only activated when the picture mode is Movie. N Settings can be adjusted and stored for each external device you have connected to an input of the TV.
■ Digital NR → Off / Low / Medium / High / Auto If the broadcast signal received by your TV is weak, you can activate the Digital Noise Reduction feature to help reduce any static and ghosting that may appear on the screen. N When the signal is weak, select one of the other options until the best picture is displayed. ■ HDMI Black Level → Normal / Low You can select the black level on the screen to adjust the screen depth.
¦ Viewing Picture-in-Picture Main picture Component HDMI1/DVI, HDMI2, HDMI3, HDMI4 PC Light Effect Energy Saving Setup You can use the PIP feature to simultaneously watch the TV tuner and one external video source. This product has one built-in tuner, which does not allow PIP to function in the same mode. Please see ‘PIP Settings’ below for details. T Press the TOOLS button to display the Tools menu. You can also configure PIP related settings by selecting Tools → PIP.
¦ Using Your TV as a Computer (PC) Display Setting Up Your PC Software (Based on Windows XP) The Windows display-settings for a typical computer are shown below. The actual screens on your PC will probably be different, depending upon your particular version of Windows and your particular video card. However, even if your actual screens look different, the same basic set-up information will apply in almost all cases. (If not, contact your computer manufacturer or Samsung Dealer.) 1.
¦ Setting up the TV with your PC N Preset: Press the SOURCE button to select PC mode. ❑ Auto Adjustment Brightness Sharpness Picture Use the Auto Adjust function to have the TV automatically adjust the video signals it receives. The function also automatically fine-tunes the settings and adjusts the frequency values and positions. T Press the TOOLS button to display the Tools menu. You can also set the Auto Adjustment by selecting Tools → Auto Adjustment.
SOUND You can configure the sound mode, volume, multi-track sound options, etc. ¦ Configuring the Sound Menu ❑ Mode → Standard / Music / Movie / Clear Voice / Custom Sound T Press the TOOLS button to display the Tools menu. You can also set the sound mode by selecting Tools → Sound Mode. ● Standard: Selects the normal sound mode. ● Music: Emphasizes music over voices. ● Movie: Provides the best sound for movies. ● Clear Voice: Emphasizes voice over other sounds.
❑ Auto Volume → Off / On Each broadcasting station has its own signal conditions, and so it is not easy to adjust the volume every time the channel is changed. This feature lets you automatically adjust the volume of the desired channel by lowering the sound output when the modulation signal is high or by raising the sound output when the modulation signal is low.
SETUP You can set up additional functions. ¦ Configuring the Setup Menu ❑ Language Plug & Play Setup You can set the menu language. ❑ Time For detailed procedures on setting up options, refer to the ‘Setting the Time’ instructions.
■ V-Chip Lock → Off / On You can block rated TV Programs. ■ TV Parental Guidelines You can block TV programs depending on their rating. This function allows you to control what TV Parental Guidelines your children are watching. ALL FV V S L D Allow All ● TV-Y: Young children / TV-Y7: Children 7 and over / TV-G: General audience / TV-PG: TV-Y Block All TV-Y7 Parental guidance / TV-14: Viewers 14 and over / TV-MA: Mature audience TV-G ● ALL: Lock all TV ratings.
■ The number of all rating information Downloadable U.S. Rating The number of current rating information Parental restriction information can be used while watching DTV channels Rating title N If information is not downloaded from the broadcasting station, the Downloadable U.S. Downloadable U.S. Rating rating menu is deactivated. Humor Level ► 1/2 N Parental restriction information is automatically downloaded while watching DTV Allow All DH channels. It may take several seconds.
● ● N N N N N Background Opacity: This option consists of Default, Transparent, Translucent, Solid and Flashing. You can change the background opacity of the caption. Return to Default: This option sets each of Size, Font Style, Foreground Color, Background Color, Foreground Opacity and Background Opacity to its default. Digital Caption Options are available only when Default and Service1 ~ Service6 can be selected in Caption Mode. The availability of captions depends on the program being broadcast.
■ Time Zone Select your time zone. N This function is only available when Clock Mode is set to Auto. ■ DST (Daylight Saving Time) → Off / On / Auto Switches the Daylight Saving Time function on or off. N This function is only available when Clock Mode is set to Auto. ❑ Sleep Timer The sleep timer automatically shuts off the TV after a preset time (30, 60, 90, 120, 150 and 180 minutes). T Press the TOOLS button to display the Tools menu. You can also set the sleep timer by selecting Tools → Sleep Timer.
¦ Network Connection You can set up the Internet Protocol so that you can communicate with various connected networks. ❑ Network Connection - Cable ■ LAN Connection for a DHCP Environment The procedures to set up the network using Dynamic Host Configuration Protocol (DHCP) are described below. Since an IP address, subnet mask, gateway, and DNS are automatically allocated when DHCP is selected, you do not have to enter them manually. 1.
■ LAN Connection for Static IP Environment The procedures to set up the network using a static IP address are described below. You have to manually enter the IP address, subnet mask, gateway, and DNS that are provided by your Internet Service Provider (ISP). 1. Connect the LAN port on the rear panel of the TV and the LAN port on the wall using the LAN cable. The LAN Port on the Wall TV Rear Panel 1 LAN Cable You can connect the LAN via a Sharer (Router).
¦ Setting the Network ❑ Network Setup ■ Setup Game Mode : Off Cable Network Setup BD Wise : On N Please check if the LAN cable is connected. Network Setup ▶ ● Internet Protocol Setup → Auto Setup / Manual Setup V-Chip Caption ● Network Test: You can test or confirm the network connection status after setting up the Melody : Medium Light Effect : Watching TV network.
INPUT / SUPPORT ¦ Input Menu ❑ Source List ■ TV / AV / Component / PC / HDMI /DVI / HDMI / HDMI / HDMI / USB N You can choose only those external devices that are connected to the TV. In the Source List, connected inputs will be highlighted and sorted to the top. Inputs that are not connected will be sorted to the bottom. N If USB devices are connected to the USB (HDD) and USB jacks, they are displayed as USB1 and USB2 in order. N PC always stays activated.
■ Sound Test If you think you have a sound problem, please perform the sound test. You can check the sound by playing a built-in melody sound through the TV. N If you hear no sound from the TV’s speakers, before performing the sound test, make sure Speaker Select is set to TV speaker in the Sound menu. N The melody will be heard during the test even if Speaker Select is set to External Speaker or the sound is muted by pressing the MUTE button.
Media Play (USB & DLNA) ¦ Connecting a USB Device 1. Press the POWER button to turn the TV on. 2. Connect a USB device containing photo, music and/or movie files to the USB1(HDD) or USB2 jack on the side of the TV. TV Rear Panel 3. When the Application selection screen is displayed, press the ENTERE button or to select Media Play (USB & DLNA). N MTP (Media Transfer Protocol) is not supported. N The file system supports FAT16, FAT32 and NTFS.
Using the Remote Control Button in Media Play Menu Button ▲/▼/◄/► ENTERE ∂/∑ RETURN TOOLS ∫ π/μ INFO MEDIA.P z, EXIT, TV Operations Move the cursor and select an item. Select the currently selected item. While playing a slide show, movie, or music file: - Pressing the ENTERE button during play pauses the play. - Pressing the ENTERE button during pause resumes the play. Play or pause the Slide Show, music or movie. Return to the previous menu. Run various functions from the Photo, Music and Movie menus.
Removing a USB Memory Device Safely You can remove the device safely from the TV. 1. Press the TOOLS button in the Media Play file list screen, or while a Slide Show, music or movie is being played. Color Folder Preference 2. Press the ▲ or ▼ button to select Safe Remove, then press the ENTERE button. 3. Remove the USB device from the TV. 5/15 1231.jpg SUM 1232.jpg 1233.jpg Device 1234.jpg Basic View Timeline Slide Show Play Current Group Information Safe Remove 1235.jpg 1236.jpg 1237.
¦ Sorting the Photo List You can sort photos in the Photo List by a particular standard. Color 1. Press the MEDIA.P button. Folder Preference Basic View Timeline 2. Press the ◄ or ► button to select Photo, then press the ENTERE button. 5/15 3. Press the ▲ button to move to the Sort key Section. 4. Press the ◄ or ► button to select a sorting standard. (Basic View, Timeline, Color, Folder, Preference) N The photos are sorted according to the newly selected sorting standard. 1231.jpg 1232.jpg 1233.
¦ Photo List Option Menu 1. Press the MEDIA.P button. Basic View 2. Press the ◄ or ► button to select Photo, then press the ENTERE button. 3. Press the ◄ or ► button to select the desired photo file. N Selecting Multiple Photos Press the ◄ or ► button to select the desired photo file. Then press the Yellow button. Repeat the above operation to select multiple photo files. The mark c appears to the selected photo file. 4. Press the TOOLS button.
¦ Viewing a Photo or Slide Show Viewing a Slide Show 1. Press the ▼ button to select the File List Section. Color Folder 2. Press the TOOLS button. 3. Press the ▲ or ▼ button to select Slide Show, then press the ENTERE button. N All files in the File List Section will be used for the Slide Show. N During the slide show, files are displayed in order from the currently shown file. N The Slide Show progresses in the order sorted in the File List Section.
To perform a Slide Show with only the selected files 1. Press the ▼ button to select the File List Section. 2. Press the ◄ or ► button to select the desired photo in the File List Section. 3. Press the Yellow button. 4. Repeat the above operation to select multiple photos. N The c mark appears to the left of the selected photo. N If you select one file, the Slide Show will not be performed. N To deselect all selected files, press the TOOLS button and select Deselect All. 5. Press the ∂ (Play)/ENTERE button.
❑ Zoom You can magnify photos saved on a USB memory device. (x1 → x2 → x4) N To move the enlarged photo image, press the ENTERE button, then press the ▲/▼/◄/► buttons. Note that when the enlarged picture is smaller than the original screen size, the location change function doesn’t work. N The enlarged file is not saved. ❑ Background Music You can select background music when watching a Slide Show. N To use this feature, there must be music and photo files stored on the USB device.
¦ Sorting the Music List You can sort music files in the Music List by a particular standard. Genre 1. Press the MEDIA.P button. Folder Preference Basic View Title 2. Press the ◄ or ► button to select Music, then press the ENTERE button. Energetic 3. Press the ▲ button to move to the Sort key Section. 4. Press the ◄ or ► button to select a sorting standard. (Basic View, Title, Artist, Mood, Genre, Folder, Preference) N The Music files are sorted according to the newly selected sorting standard.
¦ Music List Option Menu 1. Press the MEDIA.P button. 2. Press the ◄ or ► button to select Music, then press the ENTERE button. 3. Press the ◄ or ► button to select the desired Music file. N Selecting Multiple Music Files Press the◄ or ► button to select the desired music file. Then press the Yellow button. Repeat the above operation to select multiple music files. The mark c appears to the selected music file. 4. Press the TOOLS button. N The option menu changes according to the current status.
¦ Playing Music Playing a music file 1. Press the ▼ button to select the File List Section. ▶ 00:00:04 / 00:04:04 3/37 2. Press the ◄ or ► button to select a music file to be played. Way I Love You HaHaHa 3. Press the ∂ (Play)/ENTERE button. N This menu only shows files with the MP3 file extension. Files with other file extensions are not displayed, even if they are saved on the same USB device.
¦ Music Play option Menu Music Play Option Menu Tools ❑ Repeat Mode → On / Off Repeat Mode ◀ On ▶ Picture Setting You can play music files repeatedly. Sound Setting Information Safe Remove ❑ Picture Setting / Sound Setting You can configure the picture and sound settings. U Move L Adjust e Exit ❑ Information The music file information is displayed. ❑ Safe Remove You can remove the device safely from the TV.
¦ Movie List Option Menu 1. Press the MEDIA.P button. Title 2. Press the ◄ or ► button to select Movie, then press the ENTERE button. 3. Press the ◄ or ► button to select the desired Movie file. N Selecting Multiple Movie Files Press the◄ or ► button to select the desired movie file. Then press the Yellow button. Repeat the above operation to select multiple movie files. The mark c appears to the selected movie file. 4. Press the TOOLS button.
N Supported Subtitle Formats Name MPEG-4 time-based text SAMI SubRip SubViewer Micro DVD File extension .ttxt .smi .srt .sub .sub or .txt Format XML HTML string-based string-based string-based N Supported Movie Formats File extension *.avi Container AVI Audio codec Resolution Divx 3.11 / 4.x / 5.1 / 6.0 Video Decoder 720x576 XviD MP3 AC3 LPCM ADPCM 1920x1080 H.264 BP / MP / HP MPEG4 SP / ASP Motion JPEG *.mkv MKV 800x600 720x576 XviD 1920x1080 H.
N Video Play Control Buttons Button ENTERE ∂ ∑ TOOLS ∫ ◄/► ▲/▼ μ Operations Play/Pause the movie file Play the movie file Pause the movie file Run various functions from the Movie menus. Exit play mode and return to the movie list. Skip forwards or backwards through the movie file. Move to the first/last of the file. Play the file at double speed. This function may not be supported depending on the movie file. Playing the movie group 1. Press the ▲ button to move to the Sort key Section. 2.
¦ Movie Play Option Menu Movie Play Option Menu Tools Repeat Mode ❑ Repeat Mode → On / Off ◀ On ▶ Picture Setting Sound Setting Picture Size You can play movie files repeatedly. : Fit Caption Setting Information Safe Remove ❑ Picture Setting / Sound Setting U Move L Adjust e Exit You can configure the picture and sound settings. ❑ Picture Size ■ Fit Play video at the TV screen size. ■ Original Play video at the original size.
¦ Using the Setup Menu Setup displays the user settings of the Media Play menu. SUM 1. Press the MEDIA.P button. 2. Press the ◄ or ► button to select Setup, then press the ENTERE button. 851.86MB/993.02MB Free SETUP 3. Press the ▲ or ▼ button to select the desired option. 4. Press the ◄ or ► button to select the desired option. N To exit Media Play mode, press the MEDIA.P button on the remote control. ■ Use Color View → On / Off You can select sorting photos by Color.
Media Play-DLNA ¦ Setting the DLNA Network DLNA allows you to watch pictures, musics and videos saved on your PC or on your TV through a network connection in Media Play mode. This removes the need to copy them to a USB storage device and then connect the device to your TV. To use DLNA, the TV must be connected to the network and the DLNA application must be installed on your PC. Network Connection Diagram-Cable TV PC LAN LAN External Modem (ADSL/VDSL/Cable TV) 1.
¦ Installing the DLNA Application To play content on the PC on the TV, you have to first install the application. To use the DLNA function smoothly, use the program in the CD-ROM supplied with the TV or use the Samsung PC Share Manager program corresponding to the TV model that can be downloaded from the Samsung web site. System Requirements 1. Insert the Program CD supplied with this TV into your PC. 2. 30MB of free hard disk space is needed for the program installation.
¦ Using the DLNA Application The Program Screen Layout 1 2 3 4 5 6 7 1. Menus: The following application menus are provided : File, Share, Server, and Help. 2. Click to share the selected PC server folder. 3. Click to cancel sharing. 4. Click to refresh the PC folder and files. 5. Click to synchronize the share status. 6. The folders and files of the PC to be shared are listed. 7. Folders shared by the user are listed. ❑ File ■ Property Shows information on the selected file or folder.
❑ Share ■ Sharing a Folder You can share a folder from your PC to the TV. The maximum number of folders that can be shared is 32. N Your PC will operate as a server to the TV. ● Method 1: Select a folder in My Computer, select the Share menu and then select the Share Folder sub-menu. ● Method 2: Select a folder in My Computer, right-click over the selected folder and then select Share Folder from the popup menu.
■ Setting the Access Permission To enable the TV to find your PC, the TV must be set to Set Device Policy in the Access Permission Settings window. In addition, the PC server and the TV must be on the same subnet. ● Method: Select the Share menu and select Set Device Policy. Rejected items are represented in gray. You can change the access permissions by using the Allow Accept / Deny button. To delete an item, select the item and select Delete Item.
ANYNET+ ¦ Connecting Anynet+ Devices What is Anynet+? Anynet+ is a function that enables you to control all connected Samsung devices that support Anynet+ with your Samsung TV’s remote. The Anynet+ system can be used only with Samsung devices that have the Anynet+ feature. To be sure your Samsung device has this feature, check if there is an Anynet+ logo on it. To connect to a TV TV Anynet+ Device HDMI . Cable Anynet+ Device HDMI . Cable Anynet+ Device HDMI .
¦ Setting Up Anynet+ Media Play (USB & DLNA) Application T Press the TOOLS button to display the Tools menu. You can also display Anynet+ menu by selecting Tools → Anynet+ (HDMI-CEC). Anynet+ (HDMI-CEC) ❑ Setup ■ ■ Anynet+ (HDMI-CEC) → Off / On To use the Anynet+ Function, Anynet+ (HDMI-CEC) must be set to On. N When the Anynet+ (HDMI-CEC) function is disabled, all the Anynet+ related operations are deactivated.
TV Remote Control Buttons Available in Anynet+ Mode Device Type Operating Status Available Buttons Anynet+ Device After switching to the device, when the menu of the corresponding device is displayed on the screen.
¦ Troubleshooting for Anynet+ Problem Anynet+ does not work. ● ● ● ● ● ● ● ● ● I want to start Anynet+. ● ● ● I want to exit Anynet+. ● ● ● The message ‘Connecting to Anynet+ device...’ appears on the screen. The Anynet+ device does not play. The connected device is not displayed. ● ● ● ● Check whether or not the device supports Anynet+ functions. Check whether or not the HDMI 1.3 cable is properly connected. Check whether Anynet+ (HDMI-CEC) is set to On in the Anynet+ setup menu.
RECOMMENDATIONS ¦ Troubleshooting If the TV seems to have a problem, first try this list of possible problems and solutions. If none of these troubleshooting tips apply, call your nearest Samsung service center. Problem Possible Solution Poor picture. Try another channel. / Adjust the antenna. / Check all wire connections. Poor sound quality. Try another channel. / Adjust the antenna. No picture or sound. Try another channel. / Press the SOURCE button. Make sure the TV is plugged in.
Problem Possible Solution Image is not stable and may appear to vibrate when you have a computer connected to the PC input. If the setting is not correct, use your computer utility program to change the display settings. Your TV supports multiscan display functions within the following frequency domain: - Horizontal frequency (KHz): 30~60 - Vertical frequency (Hz): 60~75 - PC Maximum refresh rate (at 60 Hz): 1920 x 1080 Image is not centered on the screen. Adjust the horizontal and vertical position.
¦ Assembling the Cables ❑ Stand Type N Enclose the cables in the Holder-Wire Cable so that the cables are not visible through the transparent stand. 1 1 2 2 3 3 ❑ Wall-Mount Type 1 1 English - [6000-SA]BN68-01985B-Eng.
¦ Wall Mount Kit Specifications (VESA) Install your wall mount on a solid wall perpendicular to the floor. When attaching to other building materials, please contact your nearest dealer. If installed on a ceiling or slanted wall, it may fall and result in severe personal injury. N Standard dimensions for wall mount kits are shown in the table above. N When purchasing our wall mount kit, a detailed installation manual and all parts necessary for assembly are provided.
¦ Preparing before installing Wall-Mount To install a wall-mount from another manufacturer, use the Holder-Ring 1. 1 ¦ Anti-Theft Kensington Lock The Kensington Lock is a device used to physically fix the system when using it in a public place. The appearance and locking method may differ from the illustration depending on the manufacturer. Refer to the manual provided with the Kensington Lock for proper use. N The locking device has to be purchased separately.
¦ Securing the TV to a Wall [ Caution: Pulling, pushing, or climbing on the TV may cause the TV to fall. In particular, ensure your children do not hang over or destabilize the TV; doing so may cause the TV to tip over, causing serious injuries or death. Follow all safety precautions provided on the included Safety Flyer. For added stability, install the anti-fall device for safety purposes, as follows. To prevent the TV from falling: 1.
¦ Specifications Model Name UN32B6000 Screen Size (Diagonal) 32 inches (31.5 inches measured diagonally) PC Resolution (Optimum) 1920 x 1080 @ 60 Hz Sound (Output) Dimensions (WxDxH) Body With stand 10W x 2 31.5 x 1.2 x 20.5 (inch) / 799 x 29.9 x 520.9 (mm) 31.5 x 10.0 x 22.8 (inch) / 799 x 255 x 579.9 (mm) Weight Without Stand With Stand 21.9 lbs / 9.95 Kg 30.3 lbs / 13.
Model Name UN46B6000 Screen Size (Diagonal) 46 inches (46.0 inches measured diagonally) PC Resolution (Optimum) 1920 x 1080 @ 60 Hz Sound (Output) Dimensions (WxDxH) Body With stand 10W x 2 43.9 x 1.2 x 27.8 (inch) / 1129 x 29.9 x 705 (mm) 43.9 x 10.8 x 30.0 (inch) / 1129 x 275 x 763 (mm) Weight Without Stand With Stand 39.7 lbs / 18.0 Kg 50.3 lbs / 22.
● This product uses parts of the software from the Independent JPEG Group. ● This product uses parts of the software owned by the Freetype Project (www.freetype.org). ● This product uses some software programs which are distributed under the GPL/LGPL license. Accordingly, the following GPL and LGPL software source codes that have been used in this product can be provided after asking to vdswmanager@ samsung.com.
1. 2. 3. 4. 5. To “convey” a work means any kind of propagation that enables other parties to make or receive copies. Mere interaction with a user through a computer network, with no transfer of a copy, is not conveying.
– c) You must license the entire work, as a whole, under this License to anyone who comes into possession of a copy. This License will therefore apply, along with any applicable section 7 additional terms, to the whole of the work, and all its parts, regardless of how they are packaged. This License gives no permission to license the work in any other way, but it does not invalidate such permission if you have separately received it.
8. 9. 10. 11. When you convey a copy of a covered work, you may at your option remove any additional permissions from that copy, or from any part of it. (Additional permissions may be written to require their own removal in certain cases when you modify the work.) You may place additional permissions on material, added by you to a covered work, for which you have or can give appropriate copyright permission.
12. 13. 14. 15. 16. Each contributor grants you a non-exclusive, worldwide, royalty-free patent license under the contributor’s essential patent claims, to make, use, sell, offer for sale, import and otherwise run, modify and propagate the contents of its contributor version.
17. Interpretation of Sections 15 and 16. If the disclaimer of warranty and limitation of liability provided above cannot be given local legal effect according to their terms, reviewing courts shall apply local law that most closely approximates an absolute waiver of all civil liability in connection with the Program, unless a warranty or assumption of liability accompanies a copy of the Program in return for a fee.
¦ GNU Lesser General Public License (LGPL) Version 3, 29 June 2007 Copyright (C) 2007 Free Software Foundation, Inc. Everyone is permitted to copy and distribute verbatim copies of this license document, but changing it is not allowed. Preamble The GNU General Public License is a free, copyleft license for software and other kinds of works. The licenses for most software and other practical works are designed to take away your freedom to share and change the works.
1. Source Code. The “source code” for a work means the preferred form of the work for making modifications to it. “Object code” means any non-source form of a work. A “Standard Interface” means an interface that either is an official standard defined by a recognized standards body, or, in the case of interfaces specified for a particular programming language, one that is widely used among developers working in that language.
A compilation of a covered work with other separate and independent works, which are not by their nature extensions of the covered work, and which are not combined with it such as to form a larger program, in or on a volume of a storage or distribution medium, is called an “aggregate” if the compilation and its resulting copyright are not used to limit the access or legal rights of the compilation’s users beyond what the individual works permit.
8. 9. 10. 11.
12. 13. 14. 15. 16. 17.
¦ END OF TERMS AND CONDITIONS How to Apply These Terms to Your New Programs If you develop a new program, and you want it to be of the greatest possible use to the public, the best way to achieve this is to make it free software which everyone can redistribute and change under these terms. To do so, attach the following notices to the program.
¦ LICENSE ISSUES The OpenSSL toolkit stays under a dual license, i.e. both the conditions of the OpenSSL License and the original SSLeay license apply to the toolkit. See below for the actual license texts. Actually both licenses are BSD-style Open Source licenses. In case of any license issues related to OpenSSL please contact openssl-core@openssl.org. OpenSSL License Copyright (c) 1998-2007 The OpenSSL Project. All rights reserved.
❑ Precauciones al mostrar en la pantalla una imagen fija La imagen fija puede causar daños permanentes en la pantalla del televisor. ● No deje una imagen fija en la pantalla LED durante más de dos horas ya que se podría producir una retención de la imagen en la pantalla. Este fenómeno de retención de imágenes también se denomina quemadura de pantalla. Para evitar que se produzca esa persistencia de la imagen, reduzca el nivel de brillo y de contraste de la pantalla cuando muestre imágenes fijas.
Contenido Media Play (USB & DLNA) Configuración del televisor ■ Listado de características................................................................... 2 ■ Accesorios.......................................................................................... 2 ■ Aspecto general del panel de control................................................. 3 ■ Aspecto general del mando a distancia.............................................. 4 ■ Instalación de las pilas en el mando a distancia..................
Configuración del televisor Para usar el televisor, en primer lugar debe configurarlo para que se adapte a su entorno. N Las ilustraciones de este manual se proporcionan sólo como referencia y pueden ser diferentes del producto real. El diseño y las especificaciones del producto se pueden cambiar sin previo aviso para mejorar el rendimiento del producto. ¦ Listado de características ● ● ● ● ● ● ● ● Valores ajustables de la imagen que se pueden almacenar en la memoria del televisor.
¦ Aspecto general del panel de control N El color y la forma del producto pueden variar según el modelo. N Los botones del panel frontal se pueden activar al tacto. 1 2 7 7 6 5 4 3 1 SENSOR DEL MANDO A DISTANCIA: El mando a distancia debe dirigirse hacia este punto del televisor. 2 P (ENCENDIDO): Púlselo para encender o apagar el TV. 3 z: Permiten cambiar de canal. En el menú de la pantalla, utilice los botones z del mismo modo que los botones ▼ y ▲ del mando a distancia.
¦ Aspecto general del mando a distancia N Puede utilizar el mando a una distancia del televisor de hasta 7 metros. N El exceso de luz puede influir en el rendimiento del mando a distancia. N El color y la forma del producto pueden variar según el modelo. 1 POWER: Enciende o apaga el TV. 2 TV: Selecciona directamente el modo TV. 3 BOTONES NUMÉRICOS: Permiten cambiar de canal. 4 _: Pulse este botón para seleccionar canales adicionales (digitales) emitidos por la misma emisora.
¦ Instalación de las pilas en el mando a distancia 1. Levante la tapa de la parte posterior del mando a distancia, como se muestra en la ilustración. 2. Coloque dos pilas de tamaño AAA. N Respete los extremos ‘+’ y ‘–’ de las pilas que se indican en el diagrama del interior del compartimiento. 3. Vuelva a poner la tapa. N Saque las pilas y guárdelas en un lugar fresco y seco si no va a utilizar el mando a distancia durante un período de tiempo prolongado.
4. Después pulse el botón ENTERE para acceder al submenú del icono. 6. Pulse el botón ◄ o ► para aumentar o reducir el valor de un elemento en concreto. La visualización en pantalla de ajuste puede variar según el menú seleccionado. Modo Imagen 5. Pulse el botón ▲ o ▼ para seleccionar el submenú del icono.
¦ Función Plug & Play Cuando el televisor se enciende por primera vez, los valores se inician correlativamente de forma automática. 1. Pulse el botón POWERP del mando a distancia. N También puede usar el botón POWERP del televisor. N Aparece el mensaje Select Language of the OSD. 2. Pulse el botón ENTERE. Pulse el botón ▲ o ▼ para seleccionar el idioma y, a continuación, pulse el botón ENTERE. Se muestra el mensaje Seleccione ‘Uso domiciliario’ para instalar este TV en su casa.
Conexiones ¦ Conexión de las antenas de VHF y UHF Si la antena tiene un conjunto de cables como el que se muestra en el diagrama de la derecha, consulte ‘Antenas de par de cables planos de 300 Ω’ a continuación. Si la antena tiene un cable como el que se muestra en el diagrama de la derecha, consulte ‘Antenas con cables coaxiales de 75 Ω’. Si dispone de dos antenas, consulte ‘Antenas de VHF y UHF independientes’.
¦ Conexión de TV por cable Para conectar a un sistema de TV por cable, siga estas instrucciones. ANT IN TV por cable sin decodificador Conecte el cable de entrada en el terminal ANT IN de la parte posterior del televisor. N Dado que el TV está preparado para la televisión por cable, no se necesita un decodificador para ver canales de cable no codificados. Conexión al decodificador que decodifica todos los canales 1. Busque el cable conectado al terminal ANT OUT del decodificador.
¦ Aspecto general del panel de conexiones N El color y la forma del producto pueden variar según el modelo. Panel posterior 1 4 o 2 3 o Red de televisión por cable 1 ENTRADA ALIMENTACIÓN Conecta el cable de alimentación suministrado. N La ubicación de la entrada de alimentación puede variar según los modelos. 2 LAN Conecte un cable LAN a este puerto para conectarse a la red. 3 ANT IN Permite conectar a una antena o un sistema de TV por cable. N Utilice un cable de antena inferior a 14 mm (0.
5 7 8 R W R W R B G 6 o G 5 BLOQUEO KENSINGTON El bloqueo Kensington es un dispositivo que se usa para fijar físicamente el sistema cuando se usa en un lugar público. Si desea usar un dispositivo de bloqueo, póngase en contacto con el distribuidor donde adquirió el televisor. N La ubicación del bloqueo Kensington puede variar según los modelos. 6 COMPONENT IN / AV IN Permite conectar el vídeo/audio de componentes. El terminal COMPONENT IN también se usa como terminal AV IN.
9 0 W R ! 0 @ 9 EX-LINK Conector sólo para servicio. 0 USB1(HDD) / USB2 Conector para actualizaciones de software, Media Play, etc. N Para el disco duro de USB, use el puerto USB1(HDD). N Si enciende o apaga el televisor mientras un dispositivo USB está conectado puede dañar los archivos que éste contiene. ! AUDIO OUT Permite conectar los terminales de la entrada de audio del amplificador/sistema de Cine en casa. N En la conexión, utilice el conector apropiado (se vende por separado).
CANAL Puede configurar diversas opciones para los canales de televisión con funciones como Prog. Auto, Canales Favoritos e Intensidad de Señal. ¦ Menú del canal ❑ Antena → Aire / Cable ❑ Prog. Auto ■ Canal Antes de empezar a memorizar los canales disponibles, debe indicar el tipo de origen de la señal conectada al TV (es decir, antena o sistema de cable). T Pulse el botón TOOLS para ver el menú Herramientas. También puede configurar la antena con Herramientas → Cambiar a Cable (o Cambiar a Aire).
¦ Gestión de los canales ■ Todos los canales Muestra todos los canales disponibles actualmente. ■ Canales agregados Muestra todos los canales añadidos. Canales agregados Con este menú puede agregar y borrar los canales o configurarlos como favoritos y usar la guía de programas de las emisoras digitales.
■ Agregar a Favoritos / Borrar de Favoritos Puede configurar como favoritos los canales que vea con más frecuencia. T Pulse el botón TOOLS para ver el menú Herramientas. También puede añadir o borrar canales favoritos seleccionando Herramientas → Agregar a Favoritos (o Borrar de Favoritos). N Se mostrará el símbolo ‘*’ y el canal se configurará como favorito. N Todos los canales favoritos se mostrarán en el menú Favoritos. ■ Visualiz. con temporiz.
IMAGEN Puede configurar diversas opciones de imágenes tales como el modo de imagen, el formato y el color para fijar sus preferencias personales. ¦ Configuración del menú de imagen ❑ Modo ■ Dinámico Selecciona la visualización con una definición mejorada, en una habitación luminosa. ■ Normal Selecciona la visualización óptima de la imagen, en un entorno normal. ■ Natural Selecciona la visualización óptima y más confortable de la imagen. N Natural no está disponible en los modo PC.
■ Contraste Dinám. → Apagado / Bajo / Medio / Alto Se puede ajustar el contraste de la pantalla para conseguir un contraste óptimo. ■ Gamma Se puede ajustar la intensidad de los colores primarios (rojo, verde y azul). ■ Espacio de color El espacio de color es una matriz compuesta por los colores rojo, verde y azul. Seleccione su espacio de color favorito y disfrute de unos colores auténticamente naturales.
❑ Opciones de imagen N En el modo PC sólo se pueden hacer cambios en los elementos Tono Color y Tamaño del menú Opciones de imagen. ■ ■ Tono Color → Frío / Normal / Tibio1 / Tibio2 / Tibio3 N Tibio1, Tibio2 o Tibio3 sólo están disponibles cuando el modo de imagen está configurado en Cine. N La configuración de cada dispositivo externo conectado a una entrada del televisor se puede ajustar y guardar. Opciones de imagen Tono Color : Normal Tamaño : 16:9 Digital NR : Auto N.
■ Digital NR → Apagado / Bajo / Medio / Alto / Auto Si la señal de emisión que recibe el televisor es débil, puede activarse la función Digital Noise Reduction para reducir la estática y las imágenes superpuestas que pueden aparecer en la pantalla. N Cuando la señal sea débil, seleccione alguna de las otras opciones hasta que se vea una imagen de mejor calidad. ■ N.neg HDMI → Normal / Bajo Se puede seleccionar el nivel de negro en la pantalla para ajustar la profundidad de ésta.
¦ Visualización PIP (Imagen en imagen) Imagen principal Componente HDMI1/DVI, HDMI2, HDMI3, HDMI4 PC Efecto de luz Ahorro energía Configuración Puede usar la función PIP para ver simultáneamente la televisión y una fuente de vídeo externa. Este producto lleva un sintonizador incorporado que no permite la función PIP en el mismo modo. En el apartado ‘Configuración de PIP’ encontrará más detalles. T Pulse el botón TOOLS para ver el menú Herramientas.
¦ Uso del televisor como una pantalla de ordenador (PC) Configuración del software del PC (basado en Windows XP) A continuación se muestra la configuración de pantalla de Windows para un ordenador típico. Probablemente la pantalla real de su PC sea distinta, según la versión concreta de Windows y de la tarjeta de vídeo que tenga. Aunque las pantallas reales sean diferentes, la información de configuración básica que se aplica en casi todos los casos es la misma.
¦ Ajuste del televisor con el ordenador N Preselección: Pulse el botón SOURCE para seleccionar el modo PC. ❑ Ajuste Automático Brillo Definición Imagen Mediante la función de ajuste automático se puede establecer que el televisor se ajuste automáticamente de acuerdo con las señales de vídeo que reciba. La función también ajusta automáticamente con más configuración y ajusta los valores y las posiciones de la frecuencia. T Pulse el botón TOOLS para ver el menú Herramientas.
SONIDO Puede configurar el modo de sonido, el volumen, las opciones de sonido para varias pistas, etc. ¦ Configuración del menú de sonido ❑ Modo → Normal / Música / Cine / Voz clara / Favorito Sonido T Pulse el botón TOOLS para ver el menú Herramientas. También puede configurar el modo del sonido seleccionando Herramientas → Sonido Modo. ● Normal: Selecciona el modo de sonido normal. ● Música: Realza la música respecto de las voces. ● Cine: Proporciona el mejor sonido para ver películas.
❑ Vol.Auto → Apagado / Encendido Cada emisora tiene sus propias condiciones de señal y resulta incómodo ajustar el volumen cada vez que se cambia de canal. Esta función permite ajustar automáticamente el volumen de un canal disminuyendo la salida de sonido cuando la señal de modulación es alta o aumentando la salida de sonido cuando la señal de modulación es baja.
CONFIGURACIÓN Puede ajustar las funciones adicionales del televisor. ¦ Configuración del menú de configuración ❑ Idioma Plug & Play ❑ Tiempo Para conocer el procedimiento detallado sobre las opciones de configuración, consulte la instrucciones de ‘Configuración de la hora’. (consulte la páginas 28~29) ❑ Modo Juego → Apagado / Encendido Configuración Puede configurar el idioma del menú.
■ Bloqueo V-Chip → Apagado / Encendido Puede bloquear los programas de TV clasificados. ■ Guías pater. TV Puede bloquear los programas de TV según su clasificación. Esta función permite controlar lo Guías pater. TV que los niños pueden ver. ALL FV V S L D ● TV-Y: Niños pequeños / TV-Y7: Niños de más de 7 años / TV-G: Todos los públicos / TV-Y TV-Y7 TV-PG: Supervisión paterna / TV-14: Mayores de 14 años / TV-MA: Para adultos TV-G ● Todos: Bloquea todas las clasificaciones de TV.
■ El número de todos los títulos de clasificación actual Clasificación U.S. Descargable La información de la restricción de bloqueo se puede usar mientras se ven los Título de clasificación El número del título de clasificación actual canales DTV. Clasificación U.S. Descargable N Si la información no se descarga desde la emisora, el menú Clasificación Humor Level ► 1/2 U.S. Descargable está desactivado. Perm. todo DH N La información de la restricción de bloqueo se puede descargar Bloq.
● ● N N N N N Opacidad de fondo: Esta opción consta de Programado, Transparente, Traslúcido, Sólido e Intermitente. Puede cambiar la opacidad del fondo de los subtítulos. Regresar al Predeterminado: Esta opción reajusta las opciones Tamaño, Estilo fuente, Color de primer plano, Color de fondo, Opacidad de primer plano y Opacidad de fondo a sus valores predeterminados. Opciones - Subtítulos Dig. sólo están disponibles cuando Default y Servicio1 ~ Servicio6 se pueden seleccionar en el Modo de Subtítulo.
■ Zona Tiempo Seleccione su zona horaria. N Esta función sólo está disponible si Modo Reloj está configurado como Auto. ■ DST (Horario de verano) → Apagado / Encendido / Auto Activa o desactiva la función Horario de Verano. N Esta función sólo está disponible si Modo Reloj está configurado como Auto. ❑ Temporizador El temporizador de desconexión apaga automáticamente el televisor después de un período prefijado (30, 60, 90, 120, 150 y 180 minutos). T Pulse el botón TOOLS para ver el menú Herramientas.
¦ Conexión de la red Puede configurar el protocolo de Internet para que se pueda comunicar con diversas redes conectadas. ❑ Conexión de la red - Cable ■ Conexión LAN para un entorno DHCP A continuación se describe el procedimiento para configurar la red mediante el protocolo de configuración dinámica de host (DHCP). Dado que la dirección IP, la máscara de subred, la puerta de enlace y el DNS se asignan automáticamente cuando se selecciona DHCP, no es necesario introducirlos manualmente. 1.
■ Conexión LAN para un entorno IP estático A continuación se describe el procedimiento para configurar la red con una dirección IP estática. Se debe introducir manualmente la dirección IP, la máscara de subred, la puerta de enlace y el DNS proporcionados por el proveedor de servicios de Internet (ISP). 1. Conecte el puerto LAN del panel posterior del televisor y el puerto LAN de la pared con un cable LAN.
¦ Configuración de la red ❑ Configuración de red ■ Configuración Modo Juego : Apagado Configuración red cableada BD Wise : Encendido N Compruebe si el cable LAN está conectado. Configuración de red ▶ ● Config. protocolo Internet → Config. automática / Config. manual V-Chip Subtítulo ● Prueba de red: Puede comprobar o confirmar el estado de conexión de la red después de Melodía : Medio Efecto de luz : Modo vis. act. configurarla.
ENTRADA / AYUDA ¦ Menú de entrada ❑ Lista de Entradas ■ TV / AV / Componente / PC / HDMI /DVI / HDMI / HDMI / HDMI / USB N Puede elegir solamente los dispositivos externos que estén conectados al televisor. En Lista de Entradas, las entradas conectadas se resaltan y se ordenan en la parte superior. Las entradas que no están conectadas se ordenan en la parte inferior. N Si hay dispositivos USB conectados a los terminales USB (HDD) y USB , aparecen como USB1 y USB2 en orden. N PC siempre está activado.
■ Prueba de sonido Si cree que tiene un problema con el sonido, efectúe la prueba de sonido. Puede comprobar el sonido reproduciendo el sonido de una melodía incorporada a través del televisor. N Si no oye sonido a través de los altavoces del televisor, antes de realizar la prueba de sonido compruebe que Seleccionar altavoz está configurado como Altavoz de TV en el menú Sonido.
Media Play (USB & DLNA) ¦ Conexión de un dispositivo USB 1. Pulse el botón POWER para encender el televisor. 2. Conecte un dispositivo USB que contenga archivos de fotos, música o películas al terminal USB1(HDD) o USB2 del lateral del televisor. Panel posterior del TV 3. Cuando se muestre la pantalla de selección Aplicaciones, pulse el botón o ENTERE para seleccionar Media Play (USB & DLNA). N MTP (Protocolo de transferencia de recursos) no se admite. N El sistema de archivos admite FAT16, FAT32 y NTFS.
Uso de los botones del mando a distancia en el menú Media Play. Botón ▲/▼/◄/► ENTERE ∂/∑ RETURN TOOLS ∫ π/μ INFO MEDIA.P z, EXIT, TV Función Mover el cursor y seleccionar una opción. Seleccionar la opción marcada. Mientras se está reproduciendo una presentación de diapositivas, una película o un archivo de música: - Pulsando el botón ENTERE durante la reproducción se hace una pausa en ésta. - Pulsando el botón ENTERE durante la reproducción se reanuda ésta.
Extracción segura del dispositivo de memoria USB Se puede quitar el dispositivo del televisor con seguridad. Color 1. Pulse el botón TOOLS en la pantalla de la lista de archivos del reproductor multimedia o mientras se está reproduciendo un presentación de diapositivas, música o una película. 2. Pulse el botón ▲ o ▼ para seleccionar Retirar con seg y, a continuación, pulse el botón ENTERE. Carpeta Preferencias 5/15 1231.jpg 1232.jpg 1233.jpg Vista básica Fecha Secuencia Repr.
¦ Clasificación de la lista de fotos Se pueden clasificar las fotos de la Lista de fotos según una norma particular. Color 1. Pulse el botón MEDIA.P. Carpeta Preferencias 2. Pulse el botón ◄ o ► para seleccionar Photo y, a continuación, pulse el botón ENTERE. 3. Pulse el botón ▲ para ir a la sección de las teclas de clasificación. Vista básica Fecha 5/15 1231.jpg 4. Pulse los botones ◄ o ► para seleccionar una norma de clasificación.
¦ Menú de opciones de la lista de fotos 1. Pulse el botón MEDIA.P. Vista básica Fecha 2. Pulse el botón ◄ o ► para seleccionar Photo y, a continuación, pulse el botón ENTERE. 3. Pulse el botón ◄ o ► para seleccionar el archivo de fotos deseado. N Selección de varias fotos Pulse el botón ◄ o ► para seleccionar el archivo de fotos deseado. A continuación pulse el botón amarillo. Repita el proceso anterior para seleccionar varios archivos de fotos.
¦ Visualización de una foto o una presentación Visualización de una presentación 1. Pulse el botón ▼ para seleccionar la sección de la lista de archivos. Color Carpeta 2. Pulse el botón TOOLS. 3. Pulse el botón ▲ o ▼ para seleccionar Secuencia y, a continuación, pulse el botón ENTERE. N En la presentación se usan todos los archivos de la sección de la lista de archivos. Botón ENTERE ∂ ∑ ∫ π/μ TOOLS Vista básica 1231.jpg 1232.jpg 1233.jpg 1235.jpg 1234.jpg 1237.jpg 1234.
Para ver una presentación sólo con los archivos seleccionados 1. Pulse el botón ▼ para seleccionar la sección de la lista de archivos. 2. Pulse los botones ◄ o ► para seleccionar la foto que desee en la sección de la lista de archivos. 3. Pulse el botón amarillo. 4. Repita el proceso anterior para seleccionar varias fotos. N La marca c aparece a la izquierda de la foto seleccionada. N Si selecciona sólo un archivo, la presentación no se efectuará.
❑ Zoom Puede ampliar las fotos guardadas en el dispositivo de memoria USB. (x1 → x2 → x4) N Para mover una foto ampliada, pulse el botón ENTERE y, a continuación, los botones ▲/▼/◄/►. Tenga en cuenta que si una imagen ampliada es menor que el tamaño de la pantalla original, la función de cambio de ubicación no está operativa. N El archivo ampliado no se guarda. ❑ Música de fondo Puede seleccionar una música de fondo para la presentación.
¦ Clasificación de la lista de música Se pueden clasificar los archivos de música de la lista según una norma particular. Género 1. Pulse el botón MEDIA.P. Carpeta 2. Pulse el botón ◄ o ► para seleccionar Music y, a continuación, pulse el botón ENTERE. 3. Pulse el botón ▲ para ir a la sección de las teclas de clasificación. 4. Pulse el botón ◄ o ► para seleccionar una norma de clasificación.
¦ Menú de opciones de la lista de música 1. Pulse el botón MEDIA.P. 2. Pulse el botón ◄ o ► para seleccionar Music y, a continuación, pulse el botón ENTERE. 3. Pulse el botón ◄ o ► para seleccionar el archivo de música que desee. N Selección de varios archivos de música Pulse el botón ◄ o ► para seleccionar el archivo de música que desee. A continuación pulse el botón amarillo. Repita el proceso anterior para seleccionar varios archivos de música.
¦ Reproducción de música Reproducción de un archivo de música 1. Pulse el botón ▼ para seleccionar la sección de la lista de archivos. 2. Pulse el botón ◄ o ► para seleccionar el archivo de música que desee. ▶ 00:00:04 / 00:04:04 3/37 Way I Love You HaHaHa 3. Pulse el botón ∂ (reproducir)/ENTERE. N Este menú sólo muestra archivos con la extensión MP3. Los archivos con otras extensiones no se muestran, aunque se hayan guardado en el mismo dispositivo USB.
¦ Menú de opciones de la reproducción de música Menú de opciones de la reproducción de música Herramientas ❑ Modo rep. → Encendido / Apagado Modo rep. ◀ Encendido ▶ Configuración de la imagen Puede reproducir archivos de música repetidamente. Configuración del sonido Información Retirar con seg ❑ Configuración de la imagen / Configuración del sonido Puede ajustar la configuración de la imagen y del sonido.
¦ Menú de opciones de la lista de películas 1. Pulse el botón MEDIA.P. Título 2. Pulse los botones ◄ o ► para seleccionar Movie y, a continuación, pulse el botón ENTERE. 3. Pulse los botones ◄ o ► para seleccionar el archivo de película que desee. N Selección de varios archivos de películas Pulse los botones ◄ o ► para seleccionar el archivo de película que desee. A continuación pulse el botón amarillo. Repita el proceso anterior para seleccionar varios archivos de películas.
N Formatos de subtítulo admitidos Nombre Texto basado en tiempo MPEG-4 SAMI SubRip SubViewer Micro DVD Extensión del archivo .ttxt .smi .srt .sub .sub o .txt Formato XML HTML basado en cadenas basado en cadenas basado en cadenas N Formatos de película compatibles Extensión del archivo *.avi Contenedor AVI Decodificador de vídeo Códec de audio Resolución Divx 3.11 / 4.x / 5.1 / 6.0 720x576 XviD MP3 AC3 LPCM ADPCM 1920x1080 H.264 BP / MP / HP MPEG4 SP / ASP Motion JPEG *.
N Botones de control de la reproducción de vídeo Botón ENTERE ∂ ∑ TOOLS ∫ ◄/► ▲/▼ μ Función Reproducir/hacer una pausa en el archivo de película. Reproducir el archivo de película. Hacer una pausa en el archivo de película. Ejecutar varias funciones de los menús de películas. Salir del modo de reproducción y volver a la lista de películas. Saltar hacia adelante o hacia atrás en el archivo de película. Ir al principio o al final del archivo. Reproducir el archivo a doble velocidad.
¦ Menús de opciones de la reproducción de películas Menús de opciones de la reproducción de películas ❑ Modo rep. → Encendido / Apagado Puede reproducir archivos de película repetidamente. ❑ Configuración de la imagen / Configuración del sonido Puede ajustar la configuración de la imagen y del sonido. Herramientas Modo rep.
¦ Uso del menú de configuración Muestra la configuración del usuario del menú Media Play. SUM 1. Pulse el botón MEDIA.P. 2. Pulse los botones ◄ o ► para seleccionar Setup y, a continuación, pulse el botón ENTERE. 851.86MB/993.02MB libre SETUP 3. Pulse el botón ▲ o ▼ para seleccionar la opción deseada. 4. Pulse el botón ◄ o ► para seleccionar la opción deseada. N Para salir del modo Media Play, pulse el botón MEDIA.P del mando a distancia.
Reproductor multimedia - DLNA ¦ Configuración de la red DLNA DLNA permite reproducir en el televisor imágenes, música y vídeos guardados en el ordenador a través de una conexión de red en modo Media Play. De esta forma se elimina la necesidad de copiarlos en un dispositivo de almacenamiento USB y después conectar éste al televisor. Para utilizar DLNA, es necesario conectar el televisor a la red e instalar la aplicación DLNA en el ordenador.
¦ Instalación de la aplicación DLNA Para reproducir contenidos del ordenador en el televisor, primero hay que instalar la aplicación. Para usar correctamente la función DLNA, use el programa del CD-ROM que se suministra con el televisor o use el programa Samsung PC Share Manager que se corresponda con el modelo de televisor que se puede descargar del sitio web de Samsung. Requisitos del sistema 1. Inserte en el ordenador el CD del programa suministrado con el televisor. 2.
¦ Uso de la aplicación DLNA Diseño de la pantalla del programa 1 2 3 4 5 6 7 1. Menús: La aplicación incluye los menús siguientes: Archivo, Compartición, Servidor y Ayudar. 2. Haga clic para compartir la carpeta del servidor PC. 3. Haga clic para cancelar el acceso compartido. 4. Haga clic para actualizar la carpeta y los archivos del ordenador. 5. Haga clic para sincronizar el estado de acceso compartido. 6. Se mostrarán las carpetas y los archivos del ordenador que se compartirán. 7.
❑ Compartición ■ Compartición Carpeta Se pueden compartir carpetas entre el ordenador y el televisor. El número máximo de carpetas que se pueden compartir es de 32. N El ordenador actuará como servidor del televisor. ● Método 1: Seleccione una carpeta desde Mi ordenador, seleccione el menú Compartición y, a continuación, seleccione el submenú Compartición Carpeta.
■ Ajuste de los permisos de acceso Para permitir que el televisor encuentre el ordenador, es necesario ajustar aquél en Configurar Dispositivo Póliza en la ventana de configuración de los permisos de acceso. Además, es necesario que el ordenador servidor y el televisor se encuentren en la misma subred. ● Método: Seleccione el menú Compartición y seleccione Configurar Dispositivo Póliza. Los elementos rechazados se representan en color gris.
ACERCA DE ANYNET+ ¦ Conexión de dispositivos Anynet+ ¿Qué es Anynet+? Anynet+ es una función que permite controlar todos los dispositivos de Samsung conectados que sean compatibles con Anynet+ con el mando a distancia del televisor Samsung. El sistema Anynet+ sólo se puede usar con dispositivos de Samsung que tengan la función Anynet+. Para asegurarse de que el dispositivo de Samsung tenga dicha función, compruebe si lleva el logotipo Anynet+.
¦ Configuración de Anynet+ ❑ Configuración ■ ■ Anynet+ (HDMI-CEC) → Apagado / Encendido Para usar la función Anynet+, Anynet+ (HDMI-CEC) debe estar configurado como Encendido. N Cuando la función Anynet+ (HDMI-CEC) está desactivada, todas las operaciones relacionadas con Anynet+ se desactivan. Apagado Automático → No / Sí Configuración de un dispositivo Anynet+ para que se desactive automáticamente cuando el televisor se apaga.
Botones del mando a distancia del televisor disponibles en el modo Anynet+ Tipo de dispositivo Dispositivo Anynet+ Dispositivo con sintonizador incorporado Dispositivo de audio Estado de funcionamiento Botones disponibles Después de cambiar al dispositivo, cuando el menú de éste aparece en la pantalla.
¦ Solución de problemas de Anynet+ Problema Anynet+ no funciona. ● ● ● ● ● ● ● ● ● Deseo iniciar Anynet+. ● ● ● Deseo salir de Anynet+. ● ● ● En la pantalla aparece el mensaje ‘Conectando al dispositivo Anynet+…’. ● ● El dispositivo Anynet+ no ● funciona. El dispositivo conectado no se ● muestra. ● ● ● ● ● El programa de televisión no ● se puede grabar. El sonido del televisor no sale ● a través del receptor. Posible solución Compruebe si el dispositivo es un dispositivo Anynet+.
RECOMENDACIONES ¦ Identificación de problemas Si cree que el televisor tiene un problema, compruebe primero esta lista de posibles problemas y soluciones. Si no funciona ninguno de estos consejos, llame al centro de servicio más cercano. Problema Posible solución Imagen deficiente. Intente sintonizar otro canal. / Ajuste la antena. / Compruebe todas las conexiones de cable. Calidad de sonido deficiente. Intente sintonizar otro canal. / Ajuste la antena. No hay imagen ni sonido.
Problema Posible solución La imagen no es estable y parece vibrar cuando se conecta el ordenador en la entrada de PC. Si el ajuste no es correcto, use la utilidad del ordenador para cambiar los ajustes de pantalla. El televisor admite funciones de visualización multiscan dentro del siguiente rango de frecuencias: - Frecuencia horizontal (kHz): 30~60 - Frecuencia vertical (Hz): 60~75 - Índice de barrido máximo del PC (a 60 Hz): 1920 x 1080 La imagen no está centrada en la pantalla.
¦ Montaje de los cables ❑ Tipo soporte N Sujete los cables con el soporte de cables para que éstos no sean visibles a través del soporte transparente. 1 1 2 2 3 3 ❑ Tipo montaje mural 1 1 Español - [6000-SA]BN68-01985B-Spa.
¦ Especificaciones del equipo de montaje en la pared (VESA) Instale el montaje mural en una pared sólida, perpendicular al suelo. Para colocarlo en otros materiales de construcción, póngase en contacto con el distribuidor más cercano. Si se instala en el techo o en una pared inclinada, puede caerse y causar graves lesiones personales. N Las dimensiones estándar de los equipos de montaje mural se muestran en la tabla anterior.
¦ Preparación para instalar el montaje mural Para instalar el montaje mural de otro fabricante utilice el soporte de anillo 1. 1 ¦ Bloqueo antirrobo Kensington El bloqueo Kensington es un dispositivo que se utiliza para fijar físicamente el sistema cuando se utiliza en un sitio público. La apariencia y el método de bloqueo pueden diferir de la ilustración según los fabricantes. Consulte el manual que acompaña al bloqueo Kensington para utilizarlo correctamente.
¦ Fijación del televisor a la pared [ Precaución: Tirar del televisor, empujarlo o colgarse de él puede provocar su caída. En especial, procure que los niños no se cuelguen del televisor ni lo desestabilicen; éste podría caerse sobre ellos y causarles lesiones graves o incluso la muerte. Siga las precauciones de seguridad del folleto de seguridad incluido con el producto. Para mejorar la estabilidad instale un dispositivo antivuelco, como se explica a continuación.
¦ Especificaciones Nombre del Modelo UN32B6000 Tamaño de pantalla (Diagonal) 32 pulg (31.5 pulgadas medidas diagonalmente) Resolución de PC (Óptima) 1920 x 1080 a 60 Hz Sonido (Salida) Dimensiones (An x Pr x Al) Sin el soporte Con el soporte 10 W x 2 31.5 x 1.2 x 20.5 (pulgadas) / 799 x 29.9 x 520.9 (mm) 31.5 x 10.0 x 22.8 (pulgadas) / 799 x 255 x 579.
Nombre del Modelo UN46B6000 Tamaño de pantalla (Diagonal) 46 pulg (46.0 pulgadas medidas diagonalmente) Resolución de PC (Óptima) 1920 x 1080 a 60 Hz Sonido (Salida) Dimensiones (An x Pr x Al) Sin el soporte Con el soporte 10W x 2 43.9 x 1.2 x 27.8 (pulgadas) / 1129 x 29.9 x 705 (mm) 43.9 x 10.8 x 30.
Esta página se ha dejado intencionadamente en blanco. [6000-SA]BN68-01985B-Spa.