
User Manual

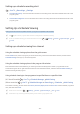


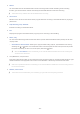
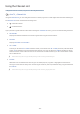
Table Of Contents
- English
- Quick Guides
- Connections
- Remote Control and Peripherals
- About the Samsung Smart Remote (QLED TV)
- About the Samsung Smart Remote (UHD TV)
- About the Samsung Smart Remote (THE FRAME)
- Connecting to the Samsung Smart Remote
- Controlling External Devices with the Samsung Smart Remote - Using the Universal Remote
- Using Anynet+ (HDMI-CEC)
- Controlling the TV with a Keyboard or Mouse
- Entering Text using the On-Screen Virtual Keyboard
- Smart Features
- TV Viewing
- Picture and Sound
- System and Support
- Using the Time Functions and the Timers
- Using the Auto Protection Time and Energy Saving Functions
- Updating the TV’s Software
- Protecting the TV from Hacking and Malicious Code
- Using Other Functions
- Running the accessibility functions
- Running Accessibility Shortcuts
- Enabling voice guides for the visually impaired
- Enabling audio for the video description function
- White text on black background (high contrast)
- Setting the screen to black and white
- Inverting the screen color
- Enlarging the font (for the visually impaired)
- Learning about the remote control (for the visually impaired)
- Learning about the TV menu
- Showing captions
- Listening to the TV through Bluetooth devices (for the hearing impaired)
- Configuring advanced system settings
- Restoring the TV to the factory settings
- Troubleshooting
- Getting Support
- Diagnosing TV operational issues
- There Is a Problem with the Picture
- I Can't Hear the Sound Clearly
- There Is a Problem with the Broadcast
- My Computer / Game Console Won't Connect
- The TV Won't Connect to the Internet
- The Schedule Recording/Timeshift Function Isn't Working
- Anynet+ (HDMI-CEC) Isn't Working
- I Have Trouble Launching/Using Apps
- My File Won't Play
- I Want to Reset the TV
- Other Issues
- Precautions and Notes
- Before Using the Recording and Timeshift Functions
- Read Before Using APPS
- Read Before Using the Internet Function
- Read Before Playing Photo, Video, or Music Files
- Limitations to the use of photo, video, and music files Try Now
- Supported external subtitles
- Supported internal subtitles
- Supported image formats and resolutions
- Supported music formats and codecs
- Video codecs supported by Q900R model series
- Video codecs supported by NU7100 model series or higher
- Video codecs supported by NU7090 model series or lower
- Read After Installing the TV
- Supported Resolutions for UHD Input Signals
- Resolutions for 8K Input Signals supported by Q900R model series
- Supported Resolutions for FreeSync
- Read Before Connecting a Computer (Supported Resolutions)
- Supported Resolutions for Video Signals
- Read Before Using Bluetooth Devices
- Blocking programs based on their TV Rating
- Buttons and functions available while playing multimedia content
- License
- Accessibility Guidance

- 89 -
Viewing and selecting channels on Favorites lists only
Live TV Channel List
1.
Press the right directional button on your remote control.
2.
Select Favorites.
3.
Select the desired list among the five favorites lists on the screen.
The channels in the selected favorites list appear.
" Only favorites lists that contain registered channels will display channels.
Editing a Favorites List
Edit a favorites channel list.
Live TV Channel List
After pressing the right directional button on your remote control, select Favorites Favorites 1 - Favorites 5 Edit
Favorites. The Edit Favorites screen appears.
Adding channels to a favorites list
Select channels to add, and then select the icon. The selected channels are added to the favorites list.
Removing channels from a favorites list
Select channels in a favorites list, and then select the icon.
Rearranging a favorites list
Select one or more channels, and then select Change order. The Change order highlight appears. Press the up/down
directional buttons to indicate the new location for the channels. Press the Select button to set the channels into
their new location.
Renaming a favorites list
Select the favorites list you want to rename, and then select Rename Favorites. Enter a new name using the on-
screen keyboard that appears, and then select Done.