SU33 SERIES Vacuum Cleaner user manual ✻ Before operating this unit, please read the instructions carefully. ✻ For indoor use only. imagine the possibilities Thank you for purchasing a Samsung product. To receive a more complete service, please register your product at www.samsung.
Safety information IMpORTANT SAFETY INSTRUcTIONS Thank you for purchasing a Samsung vacuum cleaner. When using an electrical appliance, basic precautions should always be followed, including the following : PLEASE READ ALL WARNINGS AND INSTRUCTIONS BEFORE USING THIS VACUUM CLEANER. WARNING : T o reduce the risk of fire, electric shock, or injury. • Do not leave vacuum cleaner unattended when it is plugged in. • Unplug from outlet when not in use and before servicing.
Safety information • Avoid picking up hard, sharp objects with the cleaner. They may damage the cleaner. • Always turn off this appliance before connecting or disconnecting the hose, removing the bottom plate for maintenance. • Use only on dry, indoor surfaces, never change the plug in any way. • Do not modify the polarized plug to fit a non-polarized outlet or extension cord. • Do not touch the brush roller when it is rotating. • Keep suction away from your face when using nozzles and pipe.
Safety information SAFETY INFORMATION WARNING WARNING • Before operating the appliance, please read this manual thoroughly and retain it for your reference. • Because these following operating instructions cover various models, the characteristics of your vacuum cleaner may differ slightly from those described in this manual. CAUTION/WARNING SYMBOLS USED WARNING CAUTION CAUTION CAUTION Indicates that a danger of death or serious injury exists.
Contents assembling the cleaner 06 OpeRATING The CleANeR 08 06. Product View 07. Attach Handle to Vacuum 07. Attach Dust Bin to Vacuum 07. Attach Vacuum Hose and Tools 08. Power Switch 08. Handle Positions 08. Height Adjustment 08. Transporting Cleaner 09. Special On-Board Tools 09. Power Cord Storage maintenance 10 10. Empty Dust Bin 10. Cleaning the Grille 11. Cleaning the Pre-motor Filter 11. Replacing the Post-Motor Filter 12. Check Rotating Brush and Drive Belt 12. Replace Drive Belt 13.
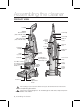
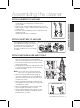
Assembling the cleaner Product View Handle *option Bracket Brush (Select Models Only) Cord Clip Hose Clip *option Mini Turbo Brush (Select Models Only) Quick Release Cord Wrap Power Cord Carrying Handle Power Switch Grille Cyclone Dust Bin Post-Motor Filter (Post-Motor Filter is located behind the door.
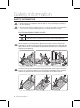
Attach Handle To Vacuum 1. S tand the vacuum upright and slide the base of the handle firmly into the grooves at the top of the vacuum body. 2. C heck to be sure the handle is fitted to the vacuum body. If there is a gap, continue to push firmly until the handle is flush. 3. I nsert the screw provided from the screw packet into the existing hole. Tighten securely with a screwdriver.
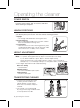
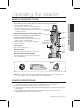
Operating the cleaner pOwer Switch he Power Switch is located on the side of the vacuum. T Push the rocker switch "ON" to vacuum, and "OFF" when cleaning is complete. hANdle Positions Press the handle release pedal, located on the lower left side of the vacuum, with your foot to place your vacuum into one of three cleaning positions. 1. Upright – For storage and above floor cleaning with tools. 2. Normal Cleaning – Press handle release pedal once.
Operating the cleaner Special on-board tools Hose Wand Base Extension Wand: Use with desired attachment for a longer reach. Mini Turbo Brush (Select Models): Use rotating brush action for small areas such as stairs and upholstery. *option Select Models Only Note: Press gently when using Mini Turbo Brush to gain maximum cleaning. Too much pressure could cause the brush to stop rotating. Power Cord Storage 1. T o use your vacuum, remove the cord and plug it into an electrical outlet.
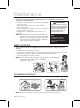
Maintenance To maintain maximum cleaning performance, the following maintenance steps must be performed: 1. Empty the Dust Bin when the dirt reaches the “MAX” line on the side. 2. Cleaning the Grille Cyclone when the Dust Bin become clogged. 3. Check the Pre-Motor Filter at least once a month and clean or replace as needed. 4. Replace the Post-Motor Filter every three to six months.
Maintenance cleanINg the Pre-Motor Filter 03 Maintenance Sponge Filter Micro Filter < Washable > . Unplug the Vacuum Cleaner from electrical outlet. 1 2. T he Pre-Motor Filter(Sponge Filter, Micro Filter) protects the motor from dirt particles. It is located underneath the Dust Bin. If the Pre-Motor Filter becomes dirty, remove and clean it. Note: T he Pre-Motor Filter may be hand washed in cold water with mild detergent. Rinse well and air dry thoroughly before re-installing.
Maintenance Check Rotating Brush and Drive Belt You should check your vacuum cleaner’s Rotating Floor Brush and Drive Belt regularly for wear or damage. You should also clean the brush and brush ends of strings, hair, and carpet fibers. These can wrap around the brush and hamper its ability to effectively clean your carpet. Also remove any debris that has accumulated under the brush cover. 1. Unplug the Vacuum Cleaner from electrical outlet. 2.
Maintenance Mini Turbo Brush Brushbar Replacement 03 Maintenance 1. R emove the tool from the hose, and turn upside down. Slide the switch to unlock position and remove bottom plate. 2. U nscrew the one screw and remove belt guard. 3. R emove brushbar including end plates and discard. 4. I nspect belt to ensure that it is in good condition. If broken or cracked, please replace. (See below for details.) 5. W ith the curved ends facing down, slide end plates of brushbar into slots on the tool. 6.
Troubleshooting heck this list of possible problems and solutions before bringing your vacuum to a C service center.
Memo memo _15
If you have any questions or comments relating to Samsung products, please contact the SAMSUNG customer care center. country call or visit us online at u.k 0845 SAMSUNG (7267864) www.samsung.com/uk south africa 0860 7267864 (SAMSUNG) www.samsung.com/za Code No. DJ68-00450A REV(0.