
Quick Start Guide


VERACITY COLDSTORE | CSTORE15-3U QUICK START GUIDE | REV 3.0.3 | October 2018 | 13
sent to the COLDSTORE. The COLDSTORE will now automatically reboot and will have the
network settings you specified. Continue as follows:
a Wait until the Status LED of the COLDSTORE is flashing again.
b On the COLDSTORE front panel menu, initiate a shutdown of the COLDSTORE.
The LCD display will update to show the shutdown process.
Wait until the LCD display shows the Power Off message.
c Power off the COLDSTORE.
d Disconnect the network cable from the computer to the COLDSTORE or private network
switch. Reconnect the network cable from the installation’s network switch.
e Power on the COLDSTORE.
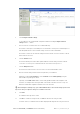
11 Click the Site link in the left-hand panel.
The My Site window is displayed in the right-hand panel.
12 Select the COLDSTORE entry added previously.
13 Click Remove selected items.
The COLDSTORE entry is removed from My Site.
14 Close the SITESCAPE application.
If other COLDSTORE devices require initial network settings configuration, repeat the Getting Connected
part of section K) until all COLDSTOREs have been given network settings suitable for the installation.
Once all the COLDSTORE devices have been configured, if necessary, change the network settings of
the computer to the values suited for the installation and re-attach the computer to the installation’s
network switch.
The SITESCAPE application can then be used to search for and add all the COLDSTORE devices on the
installation’s network to My Site. SITESCAPE can then be used to fully manage all aspects of
COLDSTORE configuration, operation and retrieve diagnostic information.
For full details on how to use SITESCAPE with COLDSTORE, refer to the COLDSTORE User’s Guide.
M) Disk Management – Adding & Removing Disks
Further disks may be added to the array at any time, and these may be added with the system either on
or off. The new disks will be incorporated into the array automatically. No disk configuration is required.
Simply slide the disk & tray in the first empty drive slot and close the disk tray lever, ensuring the tray is
fully inserted and that the disk is engaged with the backplane connector.
Removal of disks requires a simple, yet specific, procedure. Please refer to the COLDSTORE User’s
Guide.
To remove a disk from the array, follow the proper procedure as described in the COLDSTORE User’s
Guide. Specifically, do not remove disks when COLDSTORE is switched off. Failure to follow proper
procedure will not result in data loss, but disks removed in this way will require some manual intervention
before they will be readable in DISKPLAY or other USB docking station.
N) Troubleshooting
No power
The green LEDs on the front panel and the LCD backlight will illuminate when power is present. If these
are not on, check the unit power switch is on. Check the power cable is fully inserted into the PSU.