
Quick Start Guide


VERACITY COLDSTORE | CSTORE15-3U QUICK START GUIDE | REV 3.0.3 | October 2018 | 11
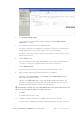
12 Click Done.
The My Site window is shown.
If a COLDSTORE entry is shown, you have successfully added the COLDSTORE and it is ready for
configuration. Skip to section L).
If no COLDSTORE entry is shown, ensure that you selected the COLDSTORE in the Discovery
window, specified correct credentials for the COLDSTORE in the Selected Devices window, that
you clicked Add to site and were shown the Complete! confirmation window before you clicked
Done.
L) System Configuration
This section assumes you have installed SITESCAPE and have added your COLDSTORE to My Site. If
you have not done this, please complete section K) before continuing.
Aside for using SITESCAPE to make changes to the COLDSTORE network settings required for your
installation, some other changes that should be considered are: enter the address of the primary NTP
server on the network, and set the correct time zone for the geographical location of the COLDSTORE.
Also, SITESCAPE can be used to query the COLDSTORE’s array and disk status e.g. checking the
loaded disks are visible, correct and are writable.
See COLDSTORE User’s Guide gives full details of all operations possible with SITESCAPE.
Correct time-sync may be essential for correct operation, depending upon application. It is strongly
recommended that a master NTP time server system be added to the network. Veracity’s TIMENET PRO is a
suitable hardware device – see www.veracityglobal.com for full details.
If the network settings of the COLDSTORE are to be changed, this should be the last operation done
using SITESCAPE. After changing the network settings, it will be necessary to re-add the COLDSTORE to My
Site to interact with the COLDSTORE. Also, depending on the network settings changes made, it may be
necessary to change the computer’s network settings in order to communicate fully with the COLDSTORE.
To configure the network address of your COLDSTORE proceed as follows:
1 Using the Windows Start Menu, navigate to All Apps>Veracity. Click SITESCAPE.
If Window User Account Control is enabled, click Yes when prompted.
The SITESCAPE splash screen is shown momentarily then, later, the SITESCAPE application main
window is displayed.
2 Click the Site tools link in the left-hand panel.
Site tools expands to show a number of tools.
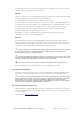
3 Click COLDSTORE configuration.
The COLDSTORE Configuration window is displayed in the right-hand panel.