WAM750/WAM751 WAM550/WAM551 WAM350/WAM351 Wireless Audio - Multiroom M7/M5/M3 User Manual imagine the possibilities Thank you for purchasing this Samsung product. To receive more complete service, please register your product at www.samsung.
Contents Getting Started Connecting to Wi-Fi...................................17 Connecting to Wi-Fi automatically (Android/iOS)...17 Accessories.................................................4 Connecting to Wi-Fi manually (Android)...............19 Top Panel.....................................................5 Connecting to Wi-Fi manually (iOS).....................21 Rear Panel...................................................6 Connecting with a HUB (Not Included).......
Appendix Connecting TV to the speaker....................40 Connecting to TV via Bluetooth (TV SoundConnect)............................................40 Troubleshooting.........................................65 Open Source License Notice......................67 Connecting to TV via Wi-Fi..................................42 Listening to music from other devices in network..............................................................42 Licences....................................................
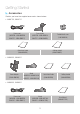
Getting Started AA Accessories Confirm you have the supplied accessories shown below.
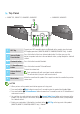
AA Top Panel • WAM750, WAM751, WAM550, WAM551 • WAM350, WAM351 q VOLU VOLU ME ME wer t y 1 NFC Tag 2 Internet Radio Preset button 3 4 Bluetooth button TV SoundConnect button 5 Volume Control button 6 Mute button Connect your NFC compatible device via Bluetooth to the product using the simple NFC tagging procedure. (WAM750, WAM751, WAM550, WAM551 Only) - Android Press this button to listen to an Internet radio station.
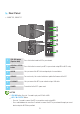
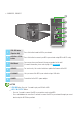
AA Rear Panel • WAM750, WAM751 SPK ADD SPK ADD WPS / Wi-Fi SETUP AUX IN WPS / Wi-Fi SETUP SERVICE q w ETHERNET e POWER AUX IN SERVICE r SPK ADD t WPS / Wi-Fi SETUP AUX IN SERVICE ETHERNET ETHERNET y POWER POWER 1 SPK ADD button (Speaker Add) Press this button to add an M7 to your network. WPS/Wi-Fi SETUP button Press this button to connect your M7 to your network using WPS or Wi-Fi setup. AUX IN Lets you connect the M7 to the analog output of a smart device.
• WAM550, WAM551 q SPK ADD WPS Wi-Fi SETUP SPK ADD w WPS Wi-Fi SETUP e r SERVICE SERVICE ETHERNET t POWER DC 14V 2.5A ETHERNET y POWER DC 14V 2.5A 1 SPK ADD button (Speaker Add) Press this button to add an M5 to your network. 2 WPS/Wi-Fi SETUP button 3 Wall Mount You can purchase a wall-mount to hang your product on the wall. (For more information, please refer to page 14.) Click here. 4 SERVICE For service only. Lets service technicians update the firmware of the M5.
• WAM350, WAM351 q SPK ADD WPS Wi-Fi SETUP w WPS SPK ADD Wi-Fi SETUP e r SERVICE SERVICE ETHERNET t POWER ETHERNET y POWER 1 SPK ADD button (Speaker Add) Press this button to add an M3 to your network. 2 WPS/Wi-Fi SETUP button 3 Wall Mount You can purchase a wall-mount to hang your product on the wall. (For more information, please refer to page 14.) Click here. 4 SERVICE For service only. Lets service technicians update the firmware of the M3.
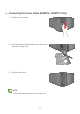
AA Connecting the Power Cable (WAM750, WAM751 Only) 1 Remove the rear cover. SPK ADD WPS / Wi-Fi SETUP AUX IN SERVICE ETHERNET POWER SPK ADD WPS / Wi-Fi SETUP AUX IN 2 3 Insert the power cable through the rear cover hole into the M7 power port. SERVICE ETHERNET POWER Close the rear cover. SPK ADD WPS / Wi-Fi SETUP AUX IN SERVICE ETHERNET POWER NOTE 99 When completing network setup, close the rear cover.
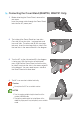
AA Connecting the Cover-Stand (WAM750, WAM751 Only) The inside of the Cover-Stand has two sides. One side (A) has four tabs - two large tabs and two small tabs. The other side (B) has two large tabs only. Insert the two large tabs on side A into the two slots in the area marked A in the diagram. 3 4 Turn the M7 so the side marked B in the diagram is facing you.
❚❚ Separating the Cover-Stand (WAM750, WAM751 Only) Locate the Cover-Stand's handle. See the diagram on the right. 2 Push the Cover-Stand's handle while applying force to the Cover-Stand in the direction of the arrow. Important : Push the Cover-Stand straight ahead, parallel to the surface of the M7. You may need to use some force. 3 The tabs release and the Cover-Stand separates as shown in the figure. ➡ 1 NOTES 99 Do not lift up the M7 by the stand.
AA Installing on a Wall (WAM750, WAM751 Only) Warning 99 Please have a qualified installer install the Wall Mount Bracket. 99 Check the strength of the wall before you install the Wall Mount Bracket. If the strength is insufficient, make sure to reinforce the wall before installing the Wall Mount Bracket and the M7 on the wall. 99 Samsung Electronics is not liable for any damage to the product due to the product being installed inappropriately.
SPK ADD WPS / Wi-Fi SETUP AA Attaching the toroidal ferrite core to the power cord of the M7 (WAM750, WAM751 Only) AUX IN SERVICE Attaching the Toroidal ferrite core to the power cord of the M7 helps prevent RF interference from radio signals. ETHERNET POWER 1 2 3 Pull the fixing tab of the Toroidal ferrite core to open it. Make a loop around the core with the power cable of the M7. Attach the toroidal ferrite core to the M7 power cord as shown in the figure, and then press it until it clicks.
AA Connecting the Stand (WAM550, WAM551, WAM350, WAM351 Only) ➧ •• Insert the stand into slot A of the M5/M3. ➧ •• Tighten a screw at B. •• The M5/M3 can now be installed vertically. Caution 99 Do not place the M5/M3 on an unstable surface. NOTES 99 Turn the speaker upright using the stand to set the speaker to MONO mode. (WAM550, WAM551 Only) 99 Turning the product upright or laying it down in the middle of playing music may temporarily cause unstable sound.
AA Standby Mode `` In Wi-Fi / Bluetooth / TV SoundConnect mode -- The product switches to Standby mode if there is no operation (music playing, button operation, app use) for 15 minutes. `` In AUX mode (WAM750, WAM751 Only) -- The M7 switches to the Standby mode if there is no button operation (either from the top panel or from the app) for 8 hours. NOTES 99 While playing music in the Wi-Fi, Bluetooth, or TV SoundConnect connection modes, the product will not switch to the Standby mode.
Connecting to the Wi-Fi network AA Preparing connection Internet 1 2 3 Wireless Router Smart Device Requirements: Wireless Router, Smart Device The wireless router should be connected to the Internet. The smart device should be connected to the router via a Wi-Fi connection. ❚❚ Installing the Samsung Multiroom App To use the product, you must download and then install the Samsung Multiroom App by accessing the app through Google play or App Store.
AA Connecting to Wi-Fi ❚❚ Connecting to Wi-Fi automatically (Android/iOS) VOLUM Wireless Router SPK ADD E WPS Wi-Fi SETUP ETHERNET POWER DC 14V 2.5A POWER 1 2 3 4 Plug the product into an electrical outlet. On your Smart device, select the Samsung Multiroom app. Run the Tutorial if you want, and then press Done. Press Connect Now. • It searches for the device available for pairing.
5 6 Once an available device is found, it attempts to connect to the wireless network. In case of secure network, the password prompt appears on the smart device screen. Use the on-screen keyboard to enter the password. • Depending on the network environments, the product(s) may not be automatically connected. In such cases, select the Manual, and then proceed the next steps by referring to pages 19~23. Click here. Press Done. • Network connection is completed.
❚❚ Connecting to Wi-Fi manually (Android) Depending on the network environments, the product(s) may not be automatically connected. In that case, you can set up the product manually to connect to the network. 1 2 If the automatic setup fails, select the Manual. Press and hold the WPS/Wi-Fi SETUP button on the back of your product for more than 5 seconds to configure the Wi-Fi Setup. • The product can wait for 2 minutes in its standby mode until the Wi-Fi connection is established.
3 4 5 On your smart device, press Next. • It searches for the device available for pairing. Once an available device is found, the product tries to connect to the newly found smart device first, then it attempts to connect to the wireless network. In case of secure network, the password prompt appears on the smart device screen. Use the on-screen keyboard to enter the password. Press Done. • Network connection is completed. To connect to another wireless network, press this.
❚❚ Connecting to Wi-Fi manually (iOS) 1 2 If the automatic setup fails, select the Manual. Press and hold the WPS/Wi-Fi SETUP button on the back of your M7/M5/M3 for more than 5 seconds to configure the Wi-Fi Setup. • The M7/M5/M3 can wait for 2 minutes in its standby mode until the Wi-Fi connection is established. VOLUM E Wireless Router WPS/Wi-Fi SETUP button SPK ADD WPS / Wi-Fi SETUP WPS Wi-Fi SETUP SPK ADD WPS Wi-Fi SETUP ETHERNET ETHERNET POWER DC 14V 2.
3 4 5 On your smart device, press Next. • It searches for the device available for pairing. Go to Settings ; Wi-Fi in iOS, and then select the Samsung Wireless Audio. To connect your smart device to the M7/M5/M3, use the keyboard that appears to enter your password. • The default password is 1234567890. • The M7/M5/M3 and the smart device are connected to each other.
6 7 8 9 Go back to the Samsung Multiroom app. Select Next. From the wireless network list, select the desired one for M7/M5/M3 connection. In case of secure network, the password prompt appears on the smart device screen. Use the on-screen keyboard to enter the password. • Once you finish entering, the M7/M5/M3 connects to the network. 10 Go to Settings ; Wi-Fi in iOS, and then select the network which the M7/M5/M3 is connected to.
AA Connecting with a HUB (Not Included) • If the product fails to connect to your network or its network connection operates abnormally, place the product closer to the HUB or your router and try again. • The product is a wireless network device. Its communications with your network may be disrupted because of the distance between it and other devices on the network, obstructions, or interference from other wireless devices.
4 Wait until the LED indicator on the Product stops flashing. If the Product's LED indicator turns solid blue, pairing is complete. NOTES 99 Place each Product at least 20 inches (50 cm) from the HUB when connecting them to the HUB. 99 Your smart device cannot connect to the Product or the HUB if there is no wireless router. 99 To confirm you have a proper connection, check the pairing indicator on the front of the HUB. -- When you turn on the HUB for the first time, there is a 20 minute pairing period.
6 7 8 Download the Samsung Multiroom app from Google Play or the App Store. On your smart device, select the Samsung Multiroom app. Setup starts. If the automatic setup fails, run the App again.
❚❚ Adding a HUB An product and a HUB may not pair successfully if the product and HUB are too far apart or are on different floors. In such cases, you can link two HUBs together by setting the second HUB to Repeater mode. The additional HUB amplifies the signal and lets you pair the product to the closest HUB. 1 2 3 4 Set the HUB that is connected to the wireless router to Pairing mode by pressing its SPK ADD button for 1 second.
AA Adding additional speaker(s) To add additional speaker(s) to an existing speaker connection, use Add Speaker function. 1 Plug the product into an electrical outlet. • If connecting the product into an electrical outlet, the Wi-Fi is automatically switched into standby mode. • The speaker can wait for 2 minutes in its standby mode until the Wi-Fi connection is established. 2 3 4 5 6 Run the Samsung Multiroom app on your smart device. Press Press . to view the list of all speakers.
7 The additional new speaker is completely added.
Connect with Bluetooth function AA Connecting to Bluetooth Devices You can connect the product to a Bluetooth device to enjoy the music stored in your Bluetooth device. 1 2 3 Plug the product into an electrical outlet, and then press the top panel. Bluetooth button on its Turn on the Bluetooth function of your smart device, and then select Search. Select the [Samsung] M7, [Samsung] M5 or [Samsung] M3. The Bluetooth connection between the smart device and the product is made.
AA Connecting with NFC function (WAM750, WAM751, WAM550, WAM551 Only) - Android You can connect the M7(M5) to Bluetooth devices easily by gently touch the smart device to the mark on the top panel of the M7(M5). Connect your NFC compatible device to enjoy music with high quality stereo sound, all without wires. VOLU ME Smart device 1 2 3 4 5 6 Connect Plug the M7(M5) into an electrical outlet.
AA Connecting to the AUX IN (WAM750, WAM751 Only) This section explains how to connect the M7 to an audio device using the AUX IN terminal. SPK ADD WPS / Wi-Fi SETUP SPK ADD WPS / Wi-Fi SETUP AUX IN AUX IN SERVICE SERVICE ETHERNET POWER ETHERNET Audio Cable (not included) Earphones Earphones jack jack POWER Smart device 1 2 3 4 Plug the M7 into an electrical outlet. Connect the audio cable (not included) to the M7's AUX IN and the smart device's AUX OUT.
Using the Samsung Multiroom App AA App at a glance y q w u e i r o t p 1 Check the full list of connected products to either change or setup. 2 Change sound source. 3 Either check the queue or edit the playlist. 4 Rotate while dragging the wheel to select a music from the queue. Release the wheel to play the music. - You can select a piece of music by turning the inside of the wheel. 5 Play menu 6 Enter a keyword to search for the music desired.
AA Playing Music ❚❚ Playing a music file stored in the smart device 1 2 3 Press Source. Select the Songs on Phone (files stored in the smart device). Press , and then select your desired category. • Songs : Lists all the music files by name. • Albums : Lists all the music files by album. • Artists : Lists all the music files by artist. • Genres : Lists all the music files by genre. • Folders : Lists all the music files by stored folder. • Playlists : Lists all the music files by playlist.
❚❚ Listen to the music through the phone speaker 1 Press in the home screen, and the select Phone Speaker. Or 1-1 Select Phone Speaker from the list of All Speakers. 2 You can listen to the music stored in your cellular phone through the Phone Speaker. NOTES 99 If Wi-Fi connection is not established, enjoy music through your Phone Speaker. 99 You can enjoy only the music stored in your cellular phone through the Phone Speaker.
❚❚ Listening to streaming music You can select your desired contents service to listen to music. 1 2 3 4 Press Source. Select More. The entire list of Music Services is displayed. From the Music Services, select your desired service. Drag to change the order of displayed music services. NOTES 99 Depending on your region or manufacturer, supported content services may differ. 99 Some music services may require you to sign up for a membership or log in.
AA Listening to the internet radio 1 2 3 Press Source. Select TuneIn. Select your desired category. • Following : Shows the list of stations added to the preset list or marked as you are following. By default, 3 radio stations are displayed in the preset list. • Browse : Lists all supported Internet radio stations. • Search : Allows you to search for a desired internet radio station using keypad input. 4 Find and select a station.
❚❚ Following a station You can add a channel to the Following list. 1 2 3 Select the desired channel. Press to display a popup menu, and then select + Following. Press Save. • The channel you are currently listening to is added to the Following list.
❚❚ Setting Presets You can add the internet radio channel you are following into the preset list, or rearrange the displaying order in the list. 1 Press , and then press Following. 2 Press Edit. 3 Drag the desired channel from the Following to the Presets. 4 To finish editing, press Done.
AA Connecting TV to the speaker ❚❚ Connecting to TV via Bluetooth (TV SoundConnect) TV SoundConnect function allows you to conveniently connect Samsung TV to external speaker(s) wirelessly and enjoy the TV sound. 1 Plug the product into an outlet, and then press the top panel. TV SoundConnect button on its VOLUME TV Or 1-1 Press Source in the home screen, and the select TV SoundConnect.
2 A message asking whether to proceed with Bluetooth pairing appears. NOTE 99 Set Add New Device to On in the TV's TV SoundConnect Settings menu. (Refer to the TV's user manual for details.) 3 When a message appears to check whether to establish Bluetooth pairing or not, select Yes. The product is paired to the TV. NOTES TV SoundConnect button for more than 5 seconds to reset the TV 99 Press and hold the SoundConnect. 99 Optimal pairing distance is 6.5 feet(2 m) or less.
❚❚ Connecting to TV via Wi-Fi 1 2 3 4 5 Set the TV and speaker to the same Wi-Fi network. Press Source at Home screen and select the TV to connect from Other Music Sources list. A message appears to ask if you want to perform network pairing process to TV. Select Yes to connect TV to the speaker. You can enjoy music on TV through the speaker. ❚❚ Listening to music from other devices in network You can listen to music stored on another device that is connected to the same network. Go to www.samusng.
2 3 From the Nearby Devices, select the desired device. You can play music files stored in your selected device through the product. XX-XXX-XXX Music Services | Amazon Music Milk Music TuneIn More | Nearby Devices Songs on Phone XX-XXX-XXX Other Music Sources TV SoundConnect AA Using playback menu 1 2 Press . When a popup menu appears, select your desired function. • Shuffle : It randomly plays back music files from the standby list.
❚❚ Adjusting Equalizer and DRC You can select one of the presets provided by default in the Equalizer option or create your own settings by adjusting the frequencies manually. In addition, set DRC to On to change volume smoothly. If the volume is turned down, you can listen to the quiet and gentle voice clearly. 1 2 3 4 5 Press . When a popup menu appears, press Equalizer. To adjust the bass or treble frequency ranges, drag the slider up or down. Set DRC, and then press Save.
❚❚ Managing a queue `` Adding music to the queue You can add new music to the current music list or edit the music list. 1 2 3 Press , and then select Songs. Select of the music to add, and then select Add to Queue. (Select Multi Select to save multiple music pieces in the Queue at the same time.) Select the music title at Home screen to check the saved Queue. NOTES 99 You can save up to 360 pieces of music in the queue.
`` Editing the queue 1 2 3 Select the music title at Home screen, and then press Edit. Drag to change the order of music, select your desired music to delete, and then press Done. Press Yes.
❚❚ Managing a playlist `` Creating a Playlist You can create your own playlist to save or edit. , and then select Playlists. 1 Press 2 Select Create Playlist, and then enter a name for the playlist. Press Done. 3 Select Playlists, and then press the created playlist.
4 5 Press Add Songs, and then select Songs. Select your desired music to save in playlist, and then press Add. NOTE 99 You can save up to 360 pieces of music in the playlist.
`` Editing a Playlist 1 Press 2 Select , and then select Playlists. of Playlists or the of the music to use additional menu.
AA Using the Settings menu 1 2 3 On your Smart device, select the Samsung Multiroom app. Press Press . to view the list of all speakers. ❚❚ Add Speaker `` Add Speaker To add additional speaker(s) to an existing speaker connection, refer to "Adding additional speaker(s)" on pages 28~29. Click here.
❚❚ Guide `` Tutorial Select the Tutorial to learn how to use the app. ❚❚ Services Displays a list of available services. NOTES 99 Depending on your region or manufacturer, supported content services may differ. 99 Some music services may require you to sign up for a membership or log in. 99 You may not subscribe to a service using your smart device. To use a for-pay service, first subscribe to the service through your computer.
❚❚ Speaker Mode `` Bluetooth • Off : Turns off the Bluetooth. • On : Turns on the Bluetooth. ❚❚ Device Settings `` Front LED • Off : Turns off the product's Front LED indicators. • On : Turns on the product's Front LED indicators.
`` Sound Feedback Sound Feedback is a function to indicate current status of product through the sound. • Off : Turns off the Sound Feedback. • On : Turns on the Sound Feedback. `` Software Update Shows the product's current software version, and lets you turn auto update on or off. • On : When on, automatically updates the software when new firmware is released. • Off : Turns off the auto update function.
NOTES 99 Auto update is available when your product is connected to a network and the Software Auto Update function is set to On. 99 It is strongly recommended that Software Auto Update settings on all the products used are set to On. Problems with networked functions may otherwise occur due to incompatibility issues when a variety of product software versions is used on linked products. 99 Software Auto Update will only update the speaker when the speaker is in Standby mode.
`` Hub : Wireless Band You can change the wireless band of your HUB depending on the wireless communication environments at home. ❚❚ Clock `` Alarm 1 2 Press Alarm, and then press Add Alarm. Select the alarm date, time, day of the week, alarm volume and duration.
3 Press Music, select Sound or TuneIn to select your desired alarm sound. `` Sleep Timer You can turn off the product by setting sleep time. 1 2 Press Sleep Timer, and then press Off. Drag to On, set your desired time, and then select Start.
❚❚ Support `` Terms & Conditions Lets you check the Terms & Conditions. `` Device ID Lets you check the Device ID. `` Contact Samsung Provides a link to the Samsung website. `` Open Source Licenses Lets you view the Open Source Licenses. ❚❚ Information `` Samsung Multiroom Allows you to check the software version number of the product. `` App Version Allows you to check the Samsung Multiroom app version.
Connecting multiples products AA Setting Groups You can group multiple speakers into one group that plays the same music. Grouping is available only when multiple speakers are connected to the same network. Press 1 to go to the list of all speakers. Press Group. 2 Select other products to add into the group, and then press Done. 3 NOTE 99 Group playback is not available for Bluetooth and TV SoundConnect connections. `` Editing group 1 2 Press Edit. Select the speaker to edit and press Done.
`` Ungrouping Press Ungroup.
AA Setting the Surround Sound Mode You can configure multiple products for surround sound effect. 1 Press to go to the list of all products. 2 Press Surround. 3 Press and hold a product, and drag it to the desired place and then select Next. 1 2 2 1 NOTE 99 If just 2 speakers are connected, press Surround to configure surround sound system automatically.
4 Test products and adjust product volume, and then press Done. NOTES 99 The Surround Mode may be cancelled automatically if the network connection is unstable. 99 When enabling the Surround Sound mode, it is recommended to set the same speakers you assign to Front L and Front R. 99 You can configure 4.1 channel surround sound system with a soundbar and 2 speakers. 99 You cannot configure Surround sound system with a soundbar and one speaker.
Using miscellaneous functions AA Playing Media Content Saved in a PC ❚❚ Samsung Link Install the Samsung Link program for easier playback of music stored in your PC through speaker. Visit http://link.samsung.com and download the Samsung Link application and finish installing it. 1 2 Visit http://link.samsung.com and login with your Samsung account. Follow the instructions shown to install the program. Select the folder to be shared.
❚❚ Wireless Audio - Multiroom for Desktop To play iTunes system and shared PC music files through product, install the Wireless Audio Multiroom for Desktop program. Visit www.samsung.com to download the Wireless Audio - Multiroom for Desktop program and install it. NOTES 99 Note that the PC containing the shared folders and your product must be connected to the same wireless router. 99 If the connected Windows PC or the Mac switches to off-display mode, power saving or hibernation mode, the App will stop.
3 Select the content type and add the selected folder to the shared folders list. After sharing folders, make sure to press the Done button. 1 2 3 4 5 On your Smart device, select the Samsung Multiroom app. Select desired PC on the Samsung Multiroom app, and shared folders and files stored in the PC will be displayed. (For further details, refer to pages 42~43) Click here. NOTE 99 After adding or changing contents of shared folders, make sure to press the button.
Appendix AA Troubleshooting Refer to the table below when this product does not function properly. If the problem you are experiencing is not listed below or if the instructions below do not help, turn off the product, disconnect the power cord, and contact Samsung Electronics at 1-800-SAMSUNG (1-800-7267864). Symptom The unit will not turn on. Hub and product is not paired. A function does not work when the button is pressed. Sound is not produced.
Symptom Check HUB doesn't work properly •• Is the HUB plugged in? •• Is the LAN cable connected to the wireless router and the HUB properly? •• When the Hub is plugged in, do the HUB's front indicators show it's operating properly? Product doesn't work properly •• Is the product plugged in? •• Does the product's front LED indicator remain red 5 minutes after turning on? Remedy •• Plug in the HUB. •• Connect the LAN cable to the ETHERNET SWITCH on the back of the HUB and to your wireless router.
Symptom Check I cannot group products. •• Is the product connected to the network via Wi-Fi? App doesn't work properly •• Does an error occur when accessing the app? Remedy •• If the product is connected to the network via Bluetooth, NFC tagging (WAM750, WAM751, WAM550, WAM551 Only - Android), TV SoundConnect, or AUX IN (WAM750, WAM751 Only), you cannot use the group products function. •• Make sure your smart device is compatible with the app. (See page 75) Click here.
AA Specifications • WAM750, WAM751 General Amplifier Network Power Requirements Power Consumption Weight Dimensions Operating Temperature Range Operating Humidity Range Input sensitivity / Impedance S/N ratio (analog input) Separation(1KHz) Ethernet Wireless LAN Security WPS(PBC/PIN) AC 110-120V ~50/60Hz 24 W 8.
• WAM350, WAM351 General Network Power Requirements Power Consumption Weight Dimensions Operating Temperature Range Operating Humidity Range Ethernet Wireless LAN Security WPS(PBC/PIN) AC110V-120V ~50/60Hz 17 W 4.2 Ibs 9.8 (W) X 5.7 (D) X 4.5 (H) inches +41°F to +95°F 10 % to 75 % 100BASE - TX Terminal Built-in WEP (OPEN) WPA-PSK (TKIP) WPA2-PSK (AES) Supported -- Network speeds equal to or below 10Mbps are not supported. (If using LAN cable, you'd better to use STP type.
AA Regulatory Compliance Statements CAUTION RISK OF ELECTRIC SHOCK DO NOT OPEN The lighting flash and arrowhead within the triangle is a warning sign alerting you to dangerous voltage inside the product. ❚❚ Warning CAUTION: TO REDUCE THE RISK OF ELECTRIC SHOCK, DO NOT REMOVE THE COVER (OR BACK). NO USER SERVICEABLE PARTS INSIDE. REFER SERVICING TO QUALIFIED SERVICE PERSONNEL. The explanation point within the triangle is a warning sign alerting you to important instructions accompanying the product.
FCC Caution: Any changes or modifications not expressly approved by the party responsible for compliance could void the user's authority to operate this equipment. This device complies with Part 15 of the FCC Rules. Operation is subject to the following two conditions: (1) This device may not cause harmful interference, and (2) this device must accept any interference received, including interference that may cause undesired operation.
IMPORTANT NOTE: IC Radiation Exposure Statement: This equipment complies with IC RSS-102 radiation exposure limits set forth for an uncontrolled environment. This equipment should be installed and operated so there is at least 8 inches (20cm) between the radiator and your body. ❚❚ Important Safety Instructions Read these operating instructions carefully before using the unit. Follow all the safety instructions listed below. Keep these operating instructions handy for future reference.
AA Safety precautions ❚❚ Power Supply Precautions • Do not overload outlets or extension cords. -- This may result in abnormal heat or fire. • Do not plug in or unplug the power cord with wet hands. • Do not place the product near heating equipment. • To clean the power plug blades, remove the plug from the wall outlet and wipe the blades with a dry cloth only. • Do not bend the power cord or pull it forcefully. • Do not put heavy objects on the power cord.
❚❚ Usage Precautions • Using for an extended time at high volume may cause serious damage to your hearing. -- If you are exposed to sound louder than 85db for an extended time, you may adversely affect your hearing. The louder the sound is, the more seriously damaged your hearing may become. Note that an ordinary conversation is between 50 to 60 db and road noise is approximately 80 db. • This product contains dangerous high voltage. Do not attempt to disassemble, repair, or modify it yourself.
AA Additional Information ❚❚ About NFC (WAM750, WAM751, WAM550, WAM551 Only) - Android • NFC tagging to establish a Bluetooth connection will not work while the product is being powered on and off. • NFC tagging to establish a Bluetooth connection will not work while the battery indicator on the Bluetooth device is blinking. ❚❚ About the Network Connection • Depending on the wireless router used, some network operations may perform differently.
LIMITED WARRANTY TO ORIGINAL PURCHASER This SAMSUNG brand product, as supplied and distributed by SAMSUNG and delivered new, in the original carton to the original consumer purchaser, is warranted by SAMSUNG against manufacturing defects in materials and workmanship for a limited warranty period of: One (1) Year Parts and Labor* (*90 Days Parts and Labor for Commercial Use) This limited warranty begins on the original date of purchase, and is valid only on products purchased and used in the United States.
Contact SAMSUNG WORLD WIDE If you have any questions or comments relating to Samsung products, please contact the SAMSUNG customer care center. Country U.S.
Country LUXEMBURG NETHERLANDS BELGIUM NORWAY DENMARK FINLAND SWEDEN POLAND HUNGARY SLOVAKIA AUSTRIA Europe SWITZERLAND CZECH CROATIA BOSNIA MONTENEGRO 815 56480 70 70 19 70 030-6227 515 0771 726 7864 (0771-SAMSUNG) 801-172-678* lub +48 22 607-93-33 * * (koszt połączenia według taryfy operatora) 0680SAMSUNG (0680-726-786) 0680PREMIUM (0680-773-648) 0800 - SAMSUNG (0800-726 786) 0800-SAMSUNG (0800-7267864) [Only for Premium HA] 0800-366661 [Only for Dealers] 0810-112233 0800 726 78 64 (0800-SAMSUNG) LI
Country SINGAPORE AUSTRALIA NEW ZEALAND VIETNAM THAILAND S.E.A MYANMAR MALAYSIA INDONESIA PHILIPPINES TAIWAN JAPAN S.W.A INDIA BANGLADESH SRI LANKA EGYPT ALGERIA IRAN SAUDI ARABIA MENA PAKISTAN TUNISIA U.A.
QUESTIONS OR COMMENTS? AREA CALL OR VISIT US ONLINE AT IN THE US 1-800-SAMSUNG (726-7864) www.samsung.com/us/ support WRITE Samsung Electronics America, Inc. 85 Challenger Road Ridgefield Park, NJ 07660 © 2015 Samsung Electronics Co., Ltd. All rights reserved.