WF338* WF339* Washing Machine user manual imagine the possibilities Thank you for purchasing this Samsung product. To receive a more complete service, please register your product at www.samsung.com/register WF338AA-02562A-06_EN.
features of your new silvercare™ washer 1. SilverCare™ Washing in cold water is energy efficient and better for your clothes. 2. Steam Washer Injects steam directly onto your laundry to increase the water temperature and enhance the Soak effect, improving the wash performance. 3. Diamond Drum With inside holes 36% smaller than those of conventional drums, the diamond drum prevents fabrics from sticking out and consequently being damaged. 4.
safety information Congratulations on your new Samsung SilverCare™ Washer. This manual contains important information on the installation, use and care of your appliance. Please take time to read this manual to take full advantage of your Washer’s many benefits and features. WHAT YOU NEED TO KNOW ABOUT SAFETY INSTRUCTIONS Warnings and Important Safety Instructions in this manual do not cover all possible conditions and situations that may occur.
safety information To reduce the risk of fire or explosion: WARNING • Do not wash items that have been washed, soaked, or treated with gasoline, dry cleaning solvents, or other flammable or explosive substances. They give off vapors that could ignite or explode. Rinse by hand any material that has been exposed to cleaning solvent or other flammable liquids or solids before putting in your washer. Be sure that all traces of such liquids, solids, and fumes have been removed.
contents INSTALLING YOUR WASHER 6 OPERATING INSTRUCTIONS 11 WASHING A LOAD OF LAUNDRY 12 MAINTAINING YOUR WASHER 18 TROUBLESHOOTING 21 APPENDIX 25 6 Unpacking your washer 6 Overview of your washer 7 Electrical 7 Grounding 7 Water 8 Drain facility 8 Flooring 8 Location considerations 8 Alcove or closet installation 9 Important note to installer 11 Loading your washer 11 Getting started 12 Overview of the control panel 14 Child lock 14 Garment+ 15 For SilverCare™ was
installing your washer UNPACKING YOUR WASHER Unpack your Washer and inspect it for shipping damage. Make sure you have received all of the items shown below. If your Washer was damaged during shipping, or you do not have all of the items, contact 1-800-SAMSUNG(7267864).
BASIC LOCATION REQUIREMENTS Electrical 120 Volt 60 Hz 15 AMP fuse or circuit breaker • Individual branch circuit serving only your Washer is recommended. • Your Washer is equipped with a power cord. NEVER USE AN EXTENSION CORD. CAUTION Grounding ELECTRICAL GROUNDING IS REQUIRED ON THIS APPLIANCE. This appliance must be grounded. In the event of malfunction or breakdown, grounding will reduce the risk of electric shock by providing a path of least resistance for electric current.
installing your washer Drain facility The recommended height of the standpipe is 18 in/46 cm. The drain hose must be routed through the drain hose clip to the standpipe. The standpipe must be large enough to accept the outside diameter of the drain hose. The drain hose is attached at the factory. Flooring For best performance, your Washer must be installed on a solidly constructed floor. Wood floors may need to be reinforced to minimize vibration and/or unbalanced load situations.
IMPORTANT NOTE TO INSTALLER Please read the following instructions carefully before installing your Washer. These instructions should be retained for future reference. We recommend you hire a professional for installation of this washer. 01 Installing your washer STEP 1 Removing the Shipping Bolts Before using your Washer, you must remove the four shipping bolts from the back of the unit. 1. Loosen all four bolts with the supplied wrench. 2.
installing your washer 2. Check the inlet hose to ensure a washer is inside each fill hose. Thread the inlet hoses to the HOT and COLD faucet connections. On the other end of the hose, check for one rubber washer per hose and install each fill hose to the water valve. Make sure the hose with the Hot printed line is attached to the HOT faucet. Tighten by hand until snug, then two-thirds of a turn with pliers. For correct water use, connect both HOT and COLD water valves.
operating instructions LOADING YOUR WASHER You can fill the tub with dry, unfolded clothes; but DO NOT OVERLOAD the tub. • Overloading may reduce washing efficiency, cause excess wear, and possibly cause creasing or wrinkling of the load. • Wash delicate items such as bras, hosiery, and other lingerie in the Delicates cycle with similar lightweight items.
washing a load of laundry OVERVIEW OF THE CONTROL PANEL 1 1 2 7 2 3 Digital graphic display Temperature selection button 3 Spin selection button 4 Steam Button 5 Soil Level selection button 6 Signal selection button 4 5 6 7 8 10 9 Displays the remaining cycle time, all cycle information, and error messages. Press the button repeatedly to cycle through the different water temperature options. Extra Hot/Cold - Heavily soiled, colorfast items. Only available with the Sanitize cycle.
Press these buttons to select different cycle options. Delay Start - Any cycle can be delayed for up to 24 hours in one-hour increments. Displayed hour indicates the time at which the wash will be started. Extra Wash - Add additional time to the wash cycle for better stain removal. Extra Rinse - Add an additional rinse at the end of the cycle to more thoroughly remove laundry additives and perfumes. 7 Select Cycle Option Extra Spin - Add additional time to remove more water from loads.
washing a load of laundry Child lock A function that prevents children from playing with your washer. ACTIVATING/DEACTIVATING If you want to activate/deactivate the Child Lock function, press the Soil Level and Signal buttons at the same time for 3 seconds. How It Works: 1. “Child Lock” can be activated while your Washer is running. 2. Once you activate “Child Lock”, all controls (except for the Power button) will be locked until you deactivate “Child Lock”. 3.
FOR SILVERCARE™ WASHING Extra delicate blouses, shirts, or even lingerie that can’t be washed in hot water can now be sanitized effectively without the adverse effects of hot water. The silver plates can easily be replaced by a Service Technician if needed. 1. Load the washer. 2. Press the Power button. 3. Select a Cycle by turning the Cycle Selection dial. 4. Press the SilverCare™ button. 5. Add detergent in the dispenser tray for main washing, and add fabric softener up to the marked line. 6.
washing a load of laundry DETERGENT USE Your Washer is designed to use high efficiency (HE) detergents. • For best cleaning results, use a high efficiency detergents such as Tide HE, Wisk HE, Cheer HE or Gain HE*. High efficiency detergents contain suds suppressors that reduce or eliminate suds. When fewer suds are produced, the load tumbles more efficiently and cleaning is maximized. WARNING Regular detergent is NOT recommended. Please use HE detergents only.
Pre wash compartment When using the Pre Wash option, detergent should be added to both the Pre Wash compartment and the detergent compartment. The detergent will automatically be dispensed during Pre Wash. If high efficiency (HE) detergent is used, add 1/3 of the recommended amount to the Pre Wash compartment and 2/3 of the recommended amount to the detergent compartment. Bleach compartment Fabric Softener compartment (Liquid chlorine bleach only) 1. Add chlorine bleach to the bleach compartment.
maintaining your washer CLEANING THE EXTERIOR Turn off the water faucets after finishing the day’s washing. This will shut off the water supply to your Washer and prevent the unlikely possibility of damage from escaping water. Leave the door open to allow the inside of your Washer to dry out. Use a soft cloth to wipe up all detergent, bleach or other spills as they occur. Clean the following as recommended: Control Panel – Clean with a soft, damp cloth. Do not use abrasive powders or cleaning pads.
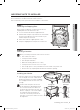
CLEANING THE DEBRIS FILTER We recommend cleaning the debris filter when water does not drain well or the “ND” error message is displayed. 2. Unscrew the drain cap by turning it counterclockwise. Step 1 Step 2 04 Maintaining your washer 1. Open the filter cover by pressing and pulling the handle of the filter cover with your finger. 3. Hold the cap on the end of the drain tube and slowly pull it out about 6 inches (15 cm) and drain off all the water. 4. Remove the debris filter cap. 5.
maintaining your washer CLEANING THE DOOR SEAL/BELLOW 1. Open the washer door and remove any clothing or items from the washer. 2. Inspect the gray colored seal/bellow between the door opening and the basket for stained areas. Pull back the seal/bellow to inspect all areas under the seal/bellow and to check for foreign objects. seal/bellow 3. If stained areas are found, wipe down these areas of the seal/bellow, using the procedure that follows.
troubleshooting CHECK THESE POINTS IF YOUR WASHER… SOLUTION will not start.. • Make sure the door is firmly closed. • Make sure your Washer is plugged in. • Make sure the water source faucets are turned on. • Make sure to press the Start/Pause Button to start your Washer. • Make sure the Child Lock is not activated; see page C4. • Before your Washer starts to fill, it will make a series of clicking noises to check the door lock and do a quick drain.
troubleshooting fills with the wrong temperature water. door locked or will not open. does not drain and/or spin. • Turn both faucets on fully. • Make sure the temperature selection is correct. • Make sure the hoses are connected to the correct faucets. Flush water lines. • Check the water heater. It should be set to deliver a minimum 120° F (49° C) hot water at the tap. Also check the water heater capacity and recovery rate. • Disconnect the hoses and clean the screens.
INFORMATION CODES Information codes may be displayed to help you better understand what is occurring with your Washer. CODE SYMBOL SOLUTION Unbalanced load prevented your Washer from spinning. Redistribute the load, press the Start/Pause Button. Door is unlocked when Washer is running. Press the Power button to turn off your Washer, then restart the cycle. If the code reappears, call for service. Door is open when Washer is running. Close the door tightly and restart the cycle.
troubleshooting Jammed Key. Call for service Motor speed sensor problem. Restart the cycle. If the code reappears, call for service. Temperature sensor problem. Restart the cycle. If the code reappears, call for service. High current detected. Restart the cycle. If the code reappears, call for service. High/Low voltage detected. Restart the cycle. If the code reappears, call for service. Too many suds are detected during the washing session. To prevent it, cut down on detergents.
appendix FABRIC CARE CHART Wash Cycle Special Instructions Warning Symbols for Laundering Normal Line Dry/ Hang to Dry Do Not Wash Permanent Press / Wrinkle Resistant / Wrinkle Control Drip Dry Do Not Wring Gentle/Delicates Dry Flat Do Not Bleach Hand Wash Heat Setting Do Not Tumble Dry High No Steam (added to iron) Hot Medium Do Not Iron Warm Low Cold Any Heat Dry Clean No Heat/Air Do Not Dry Clean Water Temperature** Bleach Any Bleach (when needed) Iron-Dry or Steam Temperatu
appendix HELPING THE ENVIRONMENT • Your Washer is manufactured from recyclable materials. If you decide to dispose of it, please observe local waste disposal regulations. Cut off the power cord so that the appliance cannot be connected to a power source. Remove the door so that animals and small children cannot get trapped inside the appliance. • Do not exceed the detergent quantities recommended in the detergent manufacturers’ instructions.
CYCLE CHART Use this chart to set the best cycle and option for you laundry.
warranty SAMSUNG SILVERCARE™ WASHER LIMITED WARRANTY TO ORIGINAL PURCHASER This SAMSUNG brand product, as supplied and distributed by SAMSUNG ELECTRONICS AMERICA, INC. (SAMSUNG) and delivered new, in the original carton to the original consumer purchaser, is warranted by SAMSUNG against manufacturing defects in materials and workmanship for a limited warranty period of: One (1) year part and labor Two (2) years control panel parts Three (3) years stainless tub parts Five (5) years motor parts.
EXCEPT AS SET FORTH HEREIN, THERE ARE NO WARRANTIES ON THIS PRODUCT EITHER EXPRESS OR IMPLIED, AND SAMSUNG DISCLAIMS ALL WARRANTIES INCLUDING, BUT NOT LIMITED TO, ANY IMPLIED WARRANTIES OF MERCHANTABILITY, INFRINGEMENT OR FITNESS FOR A PARTICULAR PURPOSE. NO WARRANTY OR GUARANTEE GIVEN BY ANY PERSON, FIRM, OR CORPORATION WITH RESPECT TO THIS PRODUCT SHALL BE BINDING ON SAMSUNG.
QUESTIONS OR COMMENTS? Country CALL OR VISIT US ONLINE AT U.S.A 1-800-SAMSUNG(726-7864) www.samsung.com/us MEXICO 01-800-SAMSUNG(726-7864) www.samsung.com/mx Code No. DC68-02562A-06_EN WF338AA-02562A-06_EN.
WF338* WF339* Lavadora Manual del usuario imagina las posibilidades Gracias por comprar este producto Samsung. Para recibir un servicio más completo, registre su producto en www.samsung.com/register WF338AA-02562A-06_MES.
características de su nueva lavadora silvercare™ 1. SilverCare™ Lavar con agua fría ahorra energía y es mejor para su ropa. 2. Lavadora a vapor Inyecta vapor directamente en su ropa para aumentar la temperatura del agua e incrementar el efecto Remojo y de este modo mejorar el desempeño del lavado. 3. Tambor Diamante Con orificios internos un 36% menores que los de los tambores convencionales, el tambor diamante evita que los tejidos se enganchen y como consecuencia se deterioren. 4.
información sobre seguridad Felicitaciones por la compra de la nueva lavadora SilverCare™ de Samsung. Este manual contiene información importante acerca de la instalación, el uso y el cuidado del electrodoméstico. Lea detenidamente estas instrucciones a fin de aprovechar al máximo los múltiples beneficios y funciones de la lavadora.
información sobre seguridad ADVERTENCIA Para reducir el riesgo de incendio o explosión: • No lave prendas que hayan sido lavadas, remojadas o tratadas con gasolina, solventes de limpieza en seco u otras sustancias inflamables o explosivas. Emiten vapores que se pueden prender fuego o explotar. Enjuague a mano todo material que haya estado expuesto a un solvente de limpieza o a líquidos o sólidos inflamables antes de colocarlo en la lavadora.
INSTALACIÓN DE LA LAVADORA 6 MANUAL DE INSTRUCCIONES 11 12 LAVADO DE UNA CARGA DE ROPA MANTENIMIENTO DE LA LAVADORA 18 GUÍA DE SOLUCIÓN DE PROBLEMAS 21 25 APÉNDICE 6 Desembalaje de la lavadora 6 Descripción general de la lavadora 7 Instalación eléctrica 7 Conexión a tierra 7 Agua 8 Drenaje 8 Piso 8 Consideraciones acerca de la ubicación 8 Instalación del electrodoméstico en un gabinete o en un hueco 9 Nota importante para el instalador 11 Cómo cargar la lavadora 11 Cómo come
instalación de la lavadora DESEMBALAJE DE LA LAVADORA Desembale la lavadora e inspecciónela para controlar que no se hayan producido daños durante el transporte. Compruebe que haya recibido todos los elementos que se muestran a continuación. Si la lavadora sufrió daños durante el transporte, o si falta algún elemento, comuníquese con el 1-800SAMSUNG(7267864).
REQUISITOS BÁSICOS ACERCA DE LA UBICACIÓN Instalación eléctrica • Fusible o disyuntor de 120 voltios, 60 Hz, 15 A • Se recomienda contar con un circuito derivado individual destinado únicamente a la lavadora. • La lavadora está equipada con un cable de alimentación. NUNCA UTILICE UN CABLE PROLONGADOR. Conexión a tierra ES PRECISO QUE ESTE ELECTRODOMÉSTICO ESTÉ CONECTADO A TIERRA. Este electrodoméstico debe conectarse a tierra.
instalación de la lavadora Drenaje La altura recomendada de la toma de agua es de 18 pulg. (46 cm). La manguera de drenaje debe colocarse a través del gancho para dicha manguera y dirigirse hacia la toma de agua. La toma de agua debe tener la suficiente longitud como para aceptar el diámetro exterior de la manguera de drenaje. La manguera de drenaje viene conectada de fábrica. Piso Para un mejor desempeño, la lavadora debe estar instalada sobre un piso de construcción sólida.
NOTA IMPORTANTE PARA EL INSTALADOR Lea las siguientes instrucciones con detenimiento antes de instalar la lavadora. Estas instrucciones se deben conservar para consultas futuras. Le recomendamos que contrate a un profesional para la instalación de esta lavadora. 01 Instalación de la lavadora PASO 1 Retirar los tornillos de transporte Antes de utilizar la lavadora, debe quitar los cuatro tornillos de transporte de la parte posterior de la unidad. 1. Afloje los cuatro tornillos con la llave inglesa provista.
instalación de la lavadora 2. Controle la manguera de entrada para asegurarse de que haya una arandela dentro de cada manguera de carga. Enrosque las mangueras de entrada a las conexiones de las llaves de agua CALIENTE y FRÍA. En el otro extremo de la manguera, verifique que haya una arandela de goma por manguera y conecte cada manguera de carga a la válvula de agua. Asegúrese de conectar la manguera con la leyenda impresa que dice “HOT” (Caliente) a la llave de agua CALIENTE.
manual de instrucciones CÓMO CARGAR LA LAVADORA Puede cargar el tambor con ropa seca, sin doblar; pero NO LO SOBRECARGUE. • La sobrecarga puede reducir la eficacia del lavado, causar desgaste adicional y posiblemente causar pliegues o arrugas en las prendas. • Lave prendas delicadas, tales como los brassieres, los calcetines y demás lencería, en el ciclo Delicates (Prendas delicadas) con prendas livianas similares.
lavado de una carga de ropa DESCRIPCIÓN GENERAL DEL PANEL DE CONTROL 1 1 2 3 4 5 6 7 2 Pantalla gráfica digital Botón de selección Temperatura Botón de selección Spin (Centrifugado) Botón Steam (Vapor) Botón de selección Soil Level (Nivel de suciedad) Botón de selección Signal (Señal) 3 4 5 6 7 8 9 10 Muestra el tiempo restante del ciclo, toda la información del ciclo y los mensajes de error.
Opción del ciclo seleccionado 03 Lavado de una carga de ropa 7 Presione estos botones para seleccionar diferentes opciones del ciclo. Delay Start (Inicio retardado): cualquier ciclo puede retardarse hasta 12 horas en incrementos de una hora. La hora en pantalla indica el tiempo en el cual comenzará el lavado. Extra Wash (Lavado extra): agregue tiempo adicional al ciclo de lavado para una mejor remoción de las manchas.
lavado de una carga de ropa Quick Wash (Lavado rápido): para prendas ligeramente sucias que se necesitan con urgencia. Sanitize (Desinfección): para prendas muy sucias y que no destiñen. Este ciclo calienta el agua a 150 °F (65 °C) para eliminar las bacterias. Si selecciona Pause (Pausa) durante la fase de calentamiento del ciclo Sanitize (Desinfección), la puerta de la lavadora permanecerá trabada por su seguridad.
PARA LAVAR CON SILVERCARE™ Las blusas, las camisetas e incluso la lencería extremadamente delicadas que no se pueden lavar con agua caliente ahora se pueden desinfectar con eficacia sin los efectos adversos del agua caliente. Si fuera necesario, un técnico de servicio puede reemplazar fácilmente las láminas de plata. 1. Cargue la lavadora. 2. Presione el botón Power (Encendido). 3. Seleccione un ciclo girando el disco del Selector de ciclos. 4. Presione el botón SilverCare™. 5.
lavado de una carga de ropa USO DEL DETERGENTE La lavadora fue diseñada para usar detergentes de alta eficacia (HE, por su sigla en inglés). • Para obtener un lavado de óptima calidad, use un detergente de alta eficacia, por ejemplo: Tide HE, Wisk HE, Cheer HE o Gain HE*. Los detergentes de alta eficacia contienen supresores de la espuma que reducen o eliminan la espuma. Cuando se produce menos espuma, la carga se mueve con mayor eficacia y el lavado se maximiza.
Compartimiento para prelavado Cuando usa la opción Pre Wash (Prelavado), se debe verter el detergente tanto en el compartimiento para prelavado, como en el compartimiento para el detergente. El detergente se dosificará automáticamente durante el prelavado. Si se usa un detergente de alta eficacia (HE), agregue 1/3 de la cantidad recomendada en el compartimiento para prelavado y 2/3 de la cantidad recomendada en el compartimiento para el detergente.
mantenimiento de la lavadora LIMPIEZA DEL EXTERIOR Cierre las llaves de agua después de finalizar el lavado del día. Esto cerrará el suministro de agua a la lavadora y evitará la improbable posibilidad de que se produzcan daños a causa del derrame de agua. Deje la puerta abierta para permitir que el interior de la lavadora se seque. Use un paño suave para limpiar todo el detergente, la lejía u otros derrames a medida que ocurran.
LIMPIEZA DEL FILTRO DE RESIDUOS Recomendamos limpiar el filtro de residuos cuando el agua no drena correctamente o cuando aparece en la pantalla el mensaje de error “ND”. 2. Desenrosque el tapón de desagüe girándolo en sentido contrario al de las agujas del reloj. Paso 1 Paso 2 3. Mantenga el tapón en el extremo del tubo de desagüe y extráigalo lentamente aproximadamente 6 pulgadas (15 cm) y vacíe todo el agua. 04 Mantenimiento de la lavadora 1.
mantenimiento de la lavadora LIMPIEZA DEL SELLO/FUELLE DE LA PUERTA 1. Abra la puerta de la lavadora y saque la ropa o cualquier otro objeto. 2. Inspeccione el sello/fuelle de color gris entre la apertura de la puerta y la canasta para buscar zonas manchadas. Hale el sello/fuelle para inspeccionar todas las áreas debajo del sello/fuelle y comprobar si hay objetos extraños. Sello/fuelle 3. Si hay manchas en el área del sello/fuelle, límpielas siguiendo este procedimiento.
guía de solución de problemas CONTROLE ESTOS PUNTOS SI SU LAVADORA... SOLUCIÓN no enciende... • • • • • • • no tiene agua o no tiene suficiente agua... • • • • • tiene restos de detergente en el dosificador automático después de que ha finalizado el ciclo de lavado. • vibra o hace demasiado ruido. • • • • • se detiene • • • • • • Asegúrese de que la puerta esté bien cerrada. Verifique que la lavadora esté enchufada. Compruebe que las llaves de salida de agua estén abiertas.
guía de solución de problemas se llena con agua a una temperatura incorrecta. • • • • • • • tiene la puerta trabada o no se abre. • • • no drena y/o no centrifuga. • • • deja la carga demasiado húmeda al finalizar el ciclo. Controle el fusible o reinicie el disyuntor. Enderece las mangueras de drenaje. Elimine las mangueras enroscadas. Si existe alguna restricción en cuanto al drenaje, comuníquese con el servicio técnico. Cierre la puerta y presione el botón Start/Pause (Inicio/Pausa).
CÓDIGOS DE INFORMACIÓN Pueden aparecer códigos de información para ayudarle a comprender mejor qué ocurre con la lavadora. SIGNIFICADO SOLUCIÓN Un desequilibrio en la carga impidió que la lavadora centrifugara. Redistribuya la carga y presione el botón Start/ Pause (Inicio/Pausa). La puerta no queda trabada cuando la lavadora está en funcionamiento. Presione el botón Power (Encendido) para apagar la lavadora, luego reinicie el ciclo. Si el código vuelve a aparecer, comuníquese con el servicio técnico.
guía de solución de problemas La lavadora intentó llenarse pero no lo logró. Asegúrese de que las llaves de agua estén completamente abiertas. Controle que no haya mangueras enroscadas. Controle los filtros interiores de las mangueras de carga. La conexión de la manguera de agua caliente/fría no es correcta. Conecte la manguera de agua caliente/fría correctamente. Problema con el control. Solicite servicio técnico. El servicio eléctrico se interrumpió cuando la lavadora estaba en funcionamiento.
apéndice TABLA DE INDICACIONES DEL TEJIDO Los siguientes símbolos ofrecen indicaciones acerca de las prendas. La etiqueta de indicaciones de la prenda incluye símbolos para lavado, blanqueado, secado y planchado, o limpieza a seco cuando sea necesaria. El uso de símbolos garantiza la consistencia entre los fabricantes textiles de artículos nacionales e importados. Siga las indicaciones de la etiqueta para prolongar la vida útil de la prenda y reducir los problemas del lavado.
apéndice AYUDA AL MEDIOAMBIENTE • Esta lavadora se fabrica con materiales reciclables. Si decide deshacerse de ella, siga la normativa local relacionada con la eliminación de desechos. Corte el cable de alimentación para que el electrodoméstico no pueda conectarse a una fuente de alimentación. Quite la puerta para que los animales y los niños pequeños no puedan quedar atrapados dentro del electrodoméstico. • No utilice cantidades de detergente mayores a las recomendadas por el fabricante del detergente.
TABLA DE CICLOS Use esta tabla para configurar el mejor ciclo y opción para su lavadora. 338AAW, 338AAG, 338AAR, 338AAB, 339AAW Temp.
garantía LAVADORA SAMSUNG SILVERCARE™ GARANTÍA LIMITADA PARA EL COMPRADOR ORIGINAL El presente producto de la marca SAMSUNG, tal como lo provee y distribuye SAMSUNG ELECTRONICS AMERICA, INC.
SALVO LO ESTABLECIDO EN LA PRESENTE GARANTÍA, NO EXISTEN GARANTÍAS SOBRE EL PRESENTE PRODUCTO, YA SEAN EXPRESAS O TÁCITAS, Y SAMSUNG DESCONOCE TODAS LAS GARANTÍAS QUE INCLUYEN, AUNQUE NO EN CARÁCTER TAXATIVO, CUALQUIER GARANTÍA TÁCITA DE QUE EL PRODUCTO SE ENCUENTRA EN CONDICIONES APTAS PARA LA VENTA, DE DEFRAUDACIÓN DE DERECHOS O DE QUE EL PRODUCTO SE ADECUA A LOS FINES ESPECÍFICOS PARA LOS CUALES SE ADQUIERE.
¿TIENE PREGUNTAS O COMENTARIOS? País LLAME AL O VISÍTENOS EN LÍNEA EN U.S.A 1-800-SAMSUNG(726-7864) www.samsung.com/us MEXICO 01-800-SAMSUNG(726-7864) www.samsung.com/mx N.º de código: DC68-02562A-06_MES WF338AA-02562A-06_MES.