WW10H9***** WW90H9***** Washing Machine User manual Imagine the possibilities Thank you for purchasing this Samsung product.
Content 3 Safety information What you need to know about the safety instructions. . . . . . . . . . . . . . . . . . . . . . . . . . . . . . . . 3 Important safety symbols. . . . . . . . . . . . . . . . . . . . . . . . . . . . . . . . . . . . . . . . . . . . . . . . . . . . . 3 Important safety precautions . . . . . . . . . . . . . . . . . . . . . . . . . . . . . . . . . . . . . . . . . . . . . . . . . . 4 11 Installation What’s included. . . . . . . . . . . . . . . . . . . . . . . . . . . . . . . .
Safety information SAFETY INFORMATION Congratulations on your new Samsung washing machine. This manual contains important information on the installation, use and care of your appliance. Please take some time to read this manual to take full advantage of your washing machine’s many benefits and features.
Important safety precautions WARNING: To reduce the risk of fire, electric shock, or injury to persons when using your appliance, follow basic precautions, including the following: Do not let children (or pets) play in or on your washing machine. The washing machine door does not open easily from the inside and children may be seriously injured if trapped inside.
SAFETY INFORMATION CAUTION: In order to avoid a hazard due to inadvertent resetting of the thermal cut-out, this appliance must not be supplied through an external switching device, such as a timer, or connected to a circuit that is regularly switched on and off by the utility. WARNING: Critical installation WARNINGS The installation of this appliance must be performed by a qualified technician or service company.
Do not use an electric transformer. • This may result in electric shock or fire. Do not use a damaged power plug, damaged power cord, or loose wall socket. • This may result in electric shock or fire. Do not pull or excessively bend the power cord. Do not twist or tie the power cord. Do not hook the power cord over a metal object, place a heavy object on the power cord, insert the power cord between objects, or push the power cord into the space behind the appliance.
SAFETY INFORMATION Do not open the washing machine door by force while it is operating (high-temperature washing/ drying/spinning). • Water flowing out of the washing machine may result in burns or cause the floor to be slippery. This may result in injury. • Opening the door by force may result in damage to the product or injury. Do not insert your hand under the washing machine while an operation is in progress. • This may result in injury. Do not touch the power plug with wet hands.
CAUTION: Usage CAUTIONS When the washing machine is contaminated by a foreign substance such as detergent, dirt, food waste, etc., unplug the power plug and clean the washing machine using a damp, soft cloth. • Failure to do so may result in discolouration, deformation, damage, or rust. The front glass may be broken by a strong impact. Take care when using the washing machine. • If the glass is broken, it may result in injury.
Water drained during a high-temperature wash or drying cycle is hot. Do not touch the water. • This may result in burns or injury. SAFETY INFORMATION Do not wash, spin, or dry water-proof seats, mats, or clothing (*) unless your appliance has a special cycle for washing these items. (*): Woollen bedding, rain covers, fishing vests, ski pants, sleeping bags, diaper covers, sweat suits, and bicycle, motor cycle and car covers, etc.
• Failure to do so may result in injury due to abnormal vibrations. Do not use hardened detergent. • If it accumulates inside the washing machine, it may result in a water leak. Make sure that the pockets of all the clothing items to be washed are empty. • Hard, sharp objects such as coins, safety pins, nails, screws, or stones can cause extensive damage to the appliance. Do not wash clothing with large buckles, buttons or other heavy metal objects.
Installation INSTALLATION Follow these instructions carefully to ensure proper installation of the washing machine and to prevent accidents when doing laundry. What’s included Make sure all the parts are included in the product package. If you have a problem with the washing machine or the parts, contact a local Samsung customer centre or the retailer.
Installation requirements Electrical supply and grounding • • AC 220-240 V / 50 Hz fuse or circuit breaker is required Use an individual branch circuit specific to the washing machine To ensure proper grounding, the washing machine comes with a power cord featuring a threeprong grounding plug for use in a properly installed and grounded outlet. Check with a qualified electrician or serviceperson if you are not sure about the grounding. Do not modify the provided plug.
Drain INSTALLATION Samsung recommends a standpipe in height of 65 cm. The drain hose must be connected through the hose clip to the standpipe, and the standpipe must fully cover the drain hose. Flooring For best performance, the washing machine must be installed on a solid floor. Wood floors may need to be reinforced to minimize vibration and/or unbalanced loads.
Step-by-step installation STEP 1 - Select a location Location requirements: • Solid, level surface without carpeting or flooring that may obstruct ventilation • Away from direct sunlight • Adequate room for ventilation and wiring • The ambient temperature is always higher than the freezing point (0 ˚C) • Away from a heat source STEP 2 – Remove the shipping bolts Unpack the product package and remove all shipping bolts. 1. Loosen all shipping bolts on the rear of the machine using the supplied spanner. 2.
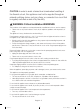
STEP 4 - Connect the water hose Connect the water supply hose to the water tap. INSTALLATION 1. Remove the adaptor (A) from the water supply hose (B). A B 2. Use a Philips screwdriver to loosen four screws on the adaptor. 3. Hold the adaptor and turn part (C) in the arrow direction to loosen it by 5 mm (*). C 4. Insert the adaptor into the water tap, and tighten the screws while lifting up the adaptor. 5. Turn part (C) in the arrow direction to tighten it. C 6.
7. Connect the other end of the water supply hose to the inlet valve on the back of the washing machine. Turn the hose clockwise to tighten. 8. Open the water tap and check if there are any leaks around the connection areas. If there are water leaks, repeat the steps above. • If using a screw type of water tap, connect the water hose to the water tap as shown. WARNING Stop using the washing machine if there is a water leak, and contact a local Samsung service centre.
Aqua hose (applicable models only) INSTALLATION The aqua hose alerts users of a risk of water leaks. It senses the water flow and turns red on the centre indicator (A) in case of a leak. A STEP 5 - Position the drain hose The drain hose can be positioned in three ways: Over the edge of a wash basin The drain hose must be placed at a height of between 60 cm and 90 cm (*) from the floor. To keep the spout of the drain hose bent, use the supplied plastic hose guide (A).
Before you start Initial settings When the washing machine turns on for the first time, the welcome screen appears with the Samsung logo. Follow the onscreen instructions to complete the initial settings. You can change the initial settings later by accessing the Settings screen. STEP 1 - Set Language Set a preferred menu language. 1. Select a language. 2. Tap Next. Step 1 of 4. Set Language English Deutsch Français Next STEP 2 - Set Date & Time Set the current date and time. 1.
STEP 3 - Set Auto Dispense 1. Both Auto Detergent and Auto Softener are set to On by default. To change the setting, slide the corresponding bar to Off. 2. Set the Amount and the Water Hardness. 3. Set the Amount and the Concentration. 4. Tap Next. BEFORE YOU START The Auto Dispense unit dispenses an appropriate amount of detergent and fabric softener into the drum according to the course and cycle. Step 3 of 4. Set Auto Dispense Auto Detergent On Amount Less Std.
Laundry guidelines STEP 1 - Sort Sort the laundry according to these criteria: • • • • Care Label: Sort the laundry into cottons, mixed fibres, synthetics, silks, wools, and rayon. Colour: Separate whites from colours. Size: Mixing different-sized items together in the drum improves the washing performance. Sensitivity: Wash delicate items separately using an Easy Iron option for pure, new woollen items, curtains, and silk items. Check the labels on the items.
STEP 5- Determine the load capacity BEFORE YOU START Do not overload the washing machine. Overloading may cause the washing machine to not wash properly. For the load capacity for the type of clothing, see page 29. When washing bedding or bedding covers, the wash time may be lengthened or the spin efficiency may be reduced. For bedding or bedding covers, the recommended maximum spin cycle speed is 800 rpm, and the load capacity is 2.0 kg or less.
Detergent Guidelines Auto Dispense The washing machine provides a two-compartment dispenser: the left compartment for detergent, and the right compartment for fabric softener. The Auto Dispense unit dispenses an appropriate amount of detergent and fabric softener into the drum according to the course and cycle. CAUTION • Use only a liquid detergent and fabric softener with the Auto Dispense unit. • Make sure the Auto Dispense unit is inserted completely.
1. Open the door, and pull out the Auto Dispense unit from the washing machine. BEFORE YOU START 2. Turn the left knob anticlockwise to open, and apply detergent to the left compartment to the max line. 3. Turn the right knob anticlockwise to open, and apply fabric softener to the right compartment to the max line. 4. Lock the knobs by turning them clockwise. 5. Reinsert the Auto Dispense unit in the original position.
Manual Dispense In case you don’t want to use the dispenser (Auto Dispense unit), you can either dose the detergent directly into the drum or use the provided aqua pebble when applying detergent manually. The Aqua Pebbles comes in two sizes and are provided as accessories with your appliance. Choose an Aqua Pebble that is appropriate for the detergent amount. 1. Turn off Auto Detergent. See “Auto Dispense” on page 33. 2. Apply a powder, gel, or liquid detergent to a proper Aqua pebble (A).
Operations OPERATIONS Screen The actual screen may differ from the image below depending on the model. Main screen Most Used Cotton Temp. 40 1 A 3 °C B D C 4 Rinse 3 12:00AM 2 Spin 8 1hr 21min Start 5 1200 7 6 Options Buttons 1 Course Tap to enter the course tile. 2 Settings Tap to enter the settings screen. 3 Temp. Tap to change the temperature for the current course. 4 Rinse Tap to change the rinse times for the current course.
Status bar 12:00AM Auto Detergent If this indicator turns on, Auto Detergent is enabled. Auto Softener If this indicator turns on, Auto Softener is enabled. Door Lock If this indicator turns on, the door is locked to prevent a door opening during operation. Child Lock ], the Child Lock is set If this icon turns to a closed lock [ to prevent accidents by children or infants. Network It displays the Wi-Fi network connection state.
Options screen OPERATIONS 12:00AM Cotton Temp. 40 Rinse 1hr 21min Start 6 Spin 3 1200 1 2 3 Quick Wash Pre Wash Intensive 4 Soaking+ 5 7 Easy Iron 1 Quick Wash Specific for less soiled clothing for a load less than 2 kg. 2 Pre Wash A preliminary washing cycle is added before the main wash. 3 Intensive The operation time for each cycle is longer than normal. 4 Soaking+ This is useful to remove stubborn stains on laundry. 5 Easy Iron This is useful to reduce wrinkles.
Simple steps to start 12:00AM Most Used Cotton 1 1hr 21min Start 4 Temp. Rinse 40 3 °C Spin 1200 2 Options 3 Press the Power button to display the main screen. On the main screen, tap the Course icon on the top centre to display the course tile. Select a course. The washing machine supports 22 courses. Change the course settings (Temp., Rinse, and Spin) if necessary. Tap the Options icon at the bottom right corner. Then, select options and change the option settings. 6. Tap Start. 1. 2. 3. 4.
Course overview Course Description & Max load (kg) • Add the current course configuration to the Favourite list, and quickly access the course configuration later. You can add up to 4 custom courses, which appear at the first of the course tile. - • The most frequently used course is displayed on the upper left corner of the main screen by default. - • Auto Optimal Wash adjusts the detergent amount and the course cycles according to the laundry weight and contamination level.
Course Description & Max load (kg) • For sheer fabrics, bras, lingerie (silk), and other handwashonly fabrics. For best performance, use liquid detergent. Delicates • 2 Bedding • • For bed spreads, bed sheets, bedding covers, etc. For best results, wash only 1 type of bedding and make sure the load weighs less than 2.5 kg. 2.5 Spin • Featuring an additional spin cycle to remove water thoroughly. - • Featuring an additional rinse after applying fabric softener to the laundry.
Options Options Description • • Quick Wash • • Specific for less soiled garments for loads less than 2 kg. It takes a minimum of about 15 minutes, depending on the conditions such as the water pressure, water hardness, and/or extra options selected. The Quick Wash time increases in this sequence: Off > 15 min > 20 min > 30 min > 40 min > 50 min > 60 min. A recommended amount of detergent is less than 20 g (for a 2 kg load). • This will add a preliminary washing cycle before the main wash cycle.
Delay End You can set the washing machine to finish the current course at a specific hours later. This is useful if you want to finish the wash by the time you come home from business. 1. Select a course. Then change the course settings if necessary. 2. Tap the Options icon at the bottom right corner. Then, select options and change the option settings. 3. Tap Delay End. 4. Use the arrows to set the end time of the current course, and tap Start.
Settings OPERATIONS Child Lock To prevent accidents by children or infants, Child Lock locks all buttons except for the Settings button. You can access the Child Lock menu from the Settings screen or the Quick panel bar. • To set the Child Lock, tap Settings, and tap the Child Lock button. • To activate Child Lock, press and hold the Activate button for 3 seconds. • To deactivate Child Lock temporarily, press and hold the Temporarily Deactivate button for 3 seconds.
Date & Time The default time is set to the 12-hour format. 1. Tap Settings > Date & Time. 2. Tap the arrows to change the time for each time element. For example, to change the date, use the arrows above and below the date element. 3. To switch between the AM and PM elements, simply tap the corresponding element. 4. Tap Save. Language Select a preferred menu language. • Tap Settings > Language, and select a preferred menu language.
Smart control • • • • OPERATIONS With Smart Control, you can control the washing machine on your mobile device. Tap this icon to turn the Smart control function on or off. 1. Tap Settings > Slide the Smart Control bar to On. 2. Back on the main screen, Smart Control activated. 3. Tap Deactivate to disable the function, Smart Control deactivated. The icon is greyed out if Smart Control is not activated.
Update When updates are available, the update notification appears on the screen. To check the current firmware version 1. Tap Settings > Update to display the current firmware version. 2. To update the firmware manually, tap Update. To update the firmware automatically 1. Tap Auto Update on the Settings screen. 2. Slide the Auto Update bar to On. The update proceeds without notification when updates are available.
Samsung Mobile Smart Control OPERATIONS This washer provides two different mobile control apps that you can use for controlling your washer via a network connection. Mobile apps that apply to the Smart Control feature of Samsung smart washers Samsung Smart Home With the newly designed Samsung Smart Home app, you can access your washer on the move, and control or check the operation status of your washer.
• • • By default, this product uses the newly designed Samsung Smart Home app as a connection method, which is recommended. For iPhone models, the Samsung Smart Home app is scheduled to be available at the Apple Store from the second half of 2014. In some countries, the Samsung Smart Home app may not be available. If this is the case, use the Samsung Smart Washer app instead.
Samsung Smart Home app OPERATIONS When using the Samsung Smart Home app, make sure “Samsung Smart Home” under the Setup menu is selected. The Samsung Smart Home app enables you to access and control the washing machine on the move. Installation 1. Visit Google Play Store for Android devices, or Apple App Store for iOS devices, and search for Samsung Smart Home to select. 2. Download and install the Samsung Smart Home app on your mobile device. • • • • The Samsung Smart Home app supports Android OS 4.
Using the Samsung Smart Home app Key features • • • • • Integrated control of Samsung smart appliances Register your Samsung smart devices to the Samsung Smart Home service that you can leverage for easy access. Select the washing machine icon on the app to access the core features of the washing machine on the move. Master key The master key consists of 4 modes: Going out, Coming home, Good night, and Good morning. Chat controls Chat between smart devices and get the information to control the device.
Samsung Smart Washer app OPERATIONS When using the Samsung Smart Washer app, make sure “Samsung Smart Washer” under the Setup menu is selected. The Samsung Smart Washer app allows you to control some functions of the washing machine on your mobile device. Download 1. Search for Samsung Smart Washer at the Play Store or the Apple Store. 2. Download and install the app on the mobile device. 3. Run the Samsung Smart Washer app on your mobile device.
Registration Register your washing machine to the Samsung Smart Appliance site (www. samsungsmartappliance.com), and get remote access to the washing machine. The washing machine must be connected to a Wi-Fi network. 1. Go to the Samsung Smart Appliance website (www.samsungsmartappliance.com). 2. Provide your Samsung account credentials to log in. If not a registered user, click Create a Samsung account and follow the onscreen instructions. 3.
Maintenance MAINTENANCE Keep the washing machine clean to prevent deteriorated performance and to preserve its life cycle. Eco Drum Clean Perform this course regularly to clean the drum and to remove bacteria from it. 1. Tap Course > Eco Drum Clean. 2. Move to the main screen, and tap Start. The water temperature for Eco Drum Clean is set to 70 °C, which cannot be changed. CAUTION Do not use any cleaning agents for cleaning the drum. Chemical residue in the drum deteriorates the washing performance.
Emergency drain In case of a power failure, drain the water inside the drum before taking out the laundry. 1. Unplug the power cord of the washing machine from the main socket. 2. Gently press the top area of the filter cover to open. 3. Gently pull out the emergency drain tube. 4. While holding the end of the drain tube, open the tube cap. 5. Let the water run into a container. 6. Close the tube cap, and reinsert the drain tube. 7. Close the filter cover.
Cleaning MAINTENANCE Surface of the washing machine Use a soft cloth with a nonabrasive household detergent. Do not spray water onto the washing machine. Mesh filter Clean the mesh filter of the water supply hose once or twice a year. 1. Turn off the washing machine, and unplug the power cord. 2. Close the water tap. 3. Loosen and disconnect the water supply hose from the back of the washing machine. Cover the hose with a cloth to prevent water from gushing out. 4.
Debris filter It is advisable to clean the debris filter 5 or 6 times a year to prevent its clogging. A clogged debris filter may reduce the bubble effect. 1. Turn off the washing machine, and unplug the power cord. 2. Drain the remaining water inside the drum by referring to “Emergency drain” on page 44. 3. Open the filter cover using a coin or key. 4. Turn the debris filter cap to the left, and drain off the remaining water. 5. Remove the debris filter. 6. Clean the debris filter using soft brushes.
Auto Dispense unit The Auto Dispense unit must be cleaned regularly to ensure proper operation at all times. MAINTENANCE 1. Remove the Auto Dispense unit from the washing machine. 2. Wipe out the recess of the Auto Dispense unit using a dry cloth. 3. Remove two knobs of the Auto Dispense unit as well as the two caps at the bottom, and run water through the Auto Dispense unit to clean the inner area.
Recovery from freezing The washing machine may freeze when it drops below 0 °C. 1. Turn off the washing machine, and unplug the power cord. 2. Pour warm water over the water tap to loosen the water supply hose. 3. Disconnect the water supply hose, and soak it in warm water. 4. Pour warm water into the drum and leave it for about 10 minutes. 5. Reconnect the water supply hose to the water tap. If the washing machine still doesn’t operate normally, repeat the above steps until it operates normally.
Troubleshooting TROUBLESHOOTING Checkpoints If you encounter a problem with the washing machine, first check the table below and try the suggestions. Problem Action The washing machine won’t start. • • • • Make sure the washing machine is plugged in. Make sure the door is properly closed. Make sure the water tap is open. Tap Start again on the main screen. Water supply is insufficient, or no water is supplied. • • • • Open the water tap fully. Make sure the water supply hose is not frozen.
Information codes If the washing machine fails to operate, you may see an information code on the screen. Check the table below and try the suggestions. Problem Action DE • • Make sure the door is properly closed. Make sure laundry is not caught in the door. 4E • • • Make sure the water tap is open. Make sure the washing machine is operating with sufficient water pressure, Clean the mesh filter as it may be clogged. 5E • • • Clean the debris filter as it may be clogged.
Specifications SPECIFICATIONS Protecting the environment • • • • This appliance is manufactured from recyclable materials. If you decide to dispose of this appliance, please observe local waste disposal regulations. Cut off the power cord so that the appliance cannot be connected to a power source. Remove the door so that animals and small children cannot get trapped inside the appliance. Do not exceed the detergent quantities recommended in the detergent manufacturer's instructions.
Fabric care chart The following symbols provide garment care directions. The care labels include four symbols in this order: washing, bleaching, drying and ironing (and dry cleaning when necessary). The use of symbols ensures consistency among garment manufacturers of domestic and imported items. Follow the care label directions to maximize garment life and reduce laundry problems.
Specification sheet FRONT LOADING WASHING MACHINE MODEL NAME WW10H9***** DIMENSIONS W600xD600xH850(mm) WATER PRESSURE 50 kPa ~ 800 kPa WATER VOLUME 68 ℓ NET WEIGHT 87 kg WASH AND SPIN CAPACITY WASHING POWER CONSUMPTION SPECIFICATIONS TYPE 10.
Memo Untitled-46 54 2015-01-26 3:25:44
Memo Untitled-46 55 2015-01-26 3:25:44
QUESTIONS OR COMMENTS? COUNTRY CALL OR VISIT US ONLINE AT THAILAND 0-2689-3232 1800-29-3232 www.samsung.
WW10H9***** WW90H9***** เครือ่ งซักผ้า คู่มือผูใ้ ช้ Imagine the possibilities ขอขอบคุณทีเ่ ลือกซือ้ ผลิตภัณฑ์ Samsung Untitled-47 1 2015-01-26 3:28:45
สารบัญ 3 ข้อมูลเกี่ยวกับความปลอดภัย สิง่ ทีค่ ณ ุ ต้องทราบเกีย่ วกับค�ำแนะน�ำเพือ่ ความปลอดภัย .. . . . . . . . . . . . . . . . . . . . . . . . . . . . . . . . . . . . . . . . . . . . . . . . . . . . 3 สัญลักษณ์สำ� คัญเพือ่ ความปลอดภัย . . . . . . . . . . . . . . . . . . . . . . . . . . . . . . . . . . . . . . . . . . . . . . . . . . . . . . . . . . . . . . . . . . 3 ข้อควรระวังเพือ่ ความปลอดภัยทีส่ ำ� คัญ . . . . . . . . . . . . . . . . . . . . . . . . . . . . . . . . . . . . . . . . . . . . . . . . . .
ข้อมูลเกี่ยวกับความปลอดภัย ข้อมูลเกี่ยวกับความปลอดภัย ขอแสดงความยินดีกบั เครือ่ งซักผ้า Samsung เครือ่ งใหม่ของคุณ คูม่ อื นี้มขี อ้ มูลทีส่ ำ� คัญเกีย่ วกับการติดตัง้ การใช้งานและการบ�ำรุงรักษา เครือ่ งซักผ้า Samsung เครือ่ งใหม่ของคุณ โปรดสละเวลาเพือ่ อ่านคูม่ อื นี้ เพือ่ ใช้ประโยชน์สงู สุดจากคุณสมบัตแิ ละคุณประโยชน์มากมาย ของเครือ่ งซักผ้า สิ่ งที่คณ ุ ต้องทราบเกี่ยวกับค�ำแนะน�ำเพื่อความปลอดภัย โปรดอ่านคูม่ อื ให้ละเอียดเพือ่ ให้ทราบถึงวิธใี ช้อุปกรณ์อย่างปลอดภัยและสามารถใช้คณ ุ ลักษณะและการท�ำงานขัน
ข้อควรระวังเพื่อความปลอดภัยที่สำ� คัญ ค�ำเตือน: ในการลดความเสี่ยงจากไฟ การระเบิด ไฟฟ้ าช็อต หรือการบาดเจ็บขณะใช้อปุ กรณ์ โปรดปฏิ บตั ิ ตามข้อควร ระวังเพื่อ ความปลอดภัยต่อไปนี้ : อย่าให้เด็ก (หรือสัตว์เลีย้ ง) เล่นบนเครือ่ งซักผ้าหรือในเครือ่ งซักผ้า ประตูเครือ่ งซักผ้านัน้ ไม่สามารถ เปิดได้โดยง่ายจากภายใน และเด็กอาจได้รบั บาดเจ็บร้ายแรงถ้าติดอยูภ่ ายใน อุปกรณ์น้ีไม่เหมาะส�ำหรับบุคคลทีม่ สี ภาพร่างกาย ประสาทสัมผัสหรือจิตทีไ่ ม่ปกติ รวมถึงเด็กหรือ บุคคลทีข่ าดประสบการณ์ ความรู้ ยกเว้นจะได้รบั การดูแลหรือได้
• ตรวจสอบว่าแรงดันไฟฟ้า ความถี่ และกระแสไฟฟ้าตรงกับในข้อมูลจ�ำเพาะของผลิตภัณฑ์ มิฉะนัน้ อาจท�ำให้เกิดไฟฟ้า ช็อตหรือเพลิงไหม้ ต่อสายไฟเข้ากับเต้ารับไฟฟ้าทีผ่ นังอย่างแน่นหนา ข้อมูลเกี่ยวกับความปลอดภัย น�ำสิง่ แปลกปลอมทัง้ หมด เช่น ฝุน่ ละอองหรือน�้ำออกจากขัว้ ของปลักไฟและหน้ ๊ าสัมผัสเป็ นประจ�ำ โดยใช้ผา้ แห้ง • ถอดปลักไฟและท� ๊ ำความสะอาดด้วยผ้าแห้ง • มิฉะนัน้ อาจท�ำให้เกิดไฟฟ้าช็อตหรือเพลิงไหม้ ต่อปลักไฟเข้ ๊ ากับเต้ารับทีผ่ นังเพือ่ ให้สายไฟพาดไปตามพืน้ • ถ้าคุณต่อปลักไฟกั ๊ บเต้ารับในทางตรงกันข้าม ลวดน
ข้อควรระวัง: ข้อควรระวังเกี่ยวกับการติ ดตัง้ อุปกรณ์น้ีควรอยูใ่ นต�ำแหน่งทีส่ ามารถเอือ้ มถึงปลักไฟได้ ๊ งา่ ย • มิฉะนัน้ อาจท�ำให้เกิดไฟฟ้าช็อต หรือเพลิงไหม้เนื่องจากไฟฟ้ารัว่ ติดตัง้ เครือ่ งบนพืน้ แข็งและเรียบทีส่ ามารถรับน�้ำหนักได้ • มิฉะนัน้ อาจท�ำให้มกี ารสันสะเทื ่ อนผิดปกติ มีการเคลือ่ นที่ เสียงรบกวน หรือมีปญั หากับผลิตภัณฑ์ ค�ำเตือน: ค�ำเตือนส�ำคัญเกี่ยวกับการใช้งาน ถ้าอุปกรณ์มนี ้�ำท่วม ให้ตดั ไฟฟ้าและการจ่ายน�้ำทันที และติดต่อศูนย์บริการใกล้บา้ น • ห้ามสัมผัสปลักไฟด้ ๊ วยมือทีเ่ ปียก • มิฉะนัน
• มิฉะนัน้ อาจท�ำให้เกิดไฟฟ้าช็อต เพลิงไหม้ เกิดปญั หากับผลิตภัณฑ์ หรือการบาดเจ็บ ข้อมูลเกี่ยวกับความปลอดภัย เมือ่ ท่อจ่ายน�้ำหลวมหลุดออกจากก๊อกและท�ำให้น้�ำท่วมอุปกรณ์ ให้ถอดปลักไฟ ๊ • มิฉะนัน้ อาจท�ำให้เกิดไฟฟ้าช็อตหรือเพลิงไหม้ ถอดปลักไฟเมื ๊ อ่ ไม่ได้ใช้อุปกรณ์เป็ นเวลานาน หรือระหว่างพายุฝนฟ้าคะนอง • มิฉะนัน้ อาจท�ำให้เกิดไฟฟ้าช็อตหรือเพลิงไหม้ ถ้ามีสงิ่ แปลกปลอมเข้าเครือ่ ง ให้ถอดปลักไฟและติ ๊ ดต่อศูนย์บริการลูกค้าของ Samsung ทีอ่ ยูใ่ กล้ทส่ี ดุ • อาจท�ำให้เกิดไฟฟ้าช็อตหรือเพลิงไหม้ ข้อควรระวัง: ข
น�้ำทีร่ ะบายระหว่างการซักผ้าอุณหภูมสิ งู หรือรอบการอบแห้งนัน้ จะร้อนจัด โปรดอย่าสัมผัสน�้ำ • อาจท�ำให้เกิดการลวกหรือบาดเจ็บได้ ห้ามซัก ปนั ่ หรืออบแห้งเบาะรองนัง่ เบาะ หรือเสือ้ ผ้า (*) ทีก่ นั น�้ำ ยกเว้นอุปกรณ์ของคุณมีโปรแกรมพิเศษส�ำหรับซักสิง่ ของเหล่านี้ (*): เครือ่ งนอนขนสัตว์ เสือ้ กันฝน เสือ้ ชูชพี กางเกงเล่นสกี ถุงนอน ผ้าปิดผ้าอ้อม ชุดกันลม ตลอดจนผ้าคลุมจักรยาน จักรยานยนต์ และ รถยนต์ ฯลฯ • อย่าซักเบาะทีห่ นาหรือแข็ง แม้วา่ จะมีสญ ั ลักษณ์เครือ่ งซักผ้าบนป้ายดูแลผ้าก็ตาม อาจท�ำให้เกิดการบาดเจ็บหรือท
ห้ามซักผ้าทีม่ หี วั เข็มขัด กระดุม หรือโลหะหนักติดอยู่ ข้อมูลเกี่ยวกับความปลอดภัย แยกผ้าตามสี โดยแยกผ้าสีตกไว้ต่างหาก และเลือกโปรแกรม อุณหภูมขิ องน�้ำ และฟงั ก์ชนเพิ ั ่ ม่ เติมทีแ่ นะน�ำ • เนื่องจากอาจท�ำให้สตี กหรือผ้าเสียหาย โปรดระวังอย่าให้ประตูหนีบนิ้วของเด็กเมือ่ คุณปิดประตู • มิฉะนัน้ อาจท�ำให้เกิดการบาดเจ็บ ค�ำเตือน: ค�ำเตือนส�ำคัญเกี่ยวกับการท�ำความสะอาด ห้ามท�ำความสะอาดอุปกรณ์ โดยฉีดน�้ำใส่ตวั เครือ่ งโดยตรง ห้ามใช้สารท�ำความสะอาดทีเ่ ป็ นกรดรุนแรง ห้ามใช้น้�ำมันเบนซิน, ทินเนอร์ หรือแอลกอฮอล์
การติดตัง้ โปรดด�ำเนินการตามค�ำแนะน�ำเหล่านี้ดว้ ยความรอบคอบเพือ่ ให้แน่ใจว่าสามารถติดตัง้ เครือ่ งซักผ้าได้อย่างถูกต้องและเพือ่ ป้องกันอุบตั เิ หตุเมือ่ เริม่ ซักผ้า มีชิ้นส่วนใดบ้าง โปรดตรวจสอบว่าชิน้ ส่วนทัง้ หมดนี้อยูใ่ นบรรจุภณ ั ฑ์ของผลิตภัณฑ์ ถ้าคุณพบปญั หากับเครือ่ งซักผ้าหรือชิน้ ส่วน โปรดติดต่อศูนย์บริการลูกค้า ของ Samsung ในพืน้ ทีห่ รือผูข้ ายปลีก 3 1 1 ปุม่ เริม่ 2 2 ปุม่ เปิด/ปิด 3 หน้าจอควบคุม 4 ประตู 5 ถังซัก 6 อุปกรณ์ระบบจ่ายอัตโนมัติ 7 ขาตัง้ ปรับระดับ 8 ตัวกรอง 9 ท
ข้อก�ำหนดในการติ ดตัง้ • • การติ ดตัง้ ค�ำเตือนเกี่ยวกับไฟฟ้ าและการลงกราวด์ ต้องใช้ฟิวส์หรือเบรกเกอร์วงจร AC 220-240 V / 50 Hz โปรดใช้วงจรสาขาแยกส�ำหรับเครือ่ งซักผ้าโดยเฉพาะ เพือ่ ให้แน่ใจว่าลงกราวด์ได้อย่างถูกต้อง เครือ่ งซักผ้าจึงมาพร้อมกับสายไฟทีม่ ปี ลักลงกราวด์ ๊ สามขาส�ำหรับใช้กบั เต้ารับไฟฟ้าทีต่ ดิ ตัง้ และลง กราวด์อย่างเหมาะสม โปรดติดต่อช่างไฟฟ้าหรือช่างซ่อมบ�ำรุงทีม่ คี วามช�ำนาญ ถ้าคุณไม่แน่ใจเกีย่ วกับการลงกราวด์ ห้ามดัดแปลงปลักที ๊ ม่ ใี ห้ ถ้าไม่สามารถใช้รว่ มกับเต้ารับได้ โปรดให้ชา่ งทีม
การระบายน�้ำ Samsung ขอแนะน�ำให้ใช้ทอ่ ตัง้ ทีม่ คี วามสูง 65 ซม.
การติ ดตัง้ แบบทีละขัน้ ตอน การติ ดตัง้ ขัน้ ตอนที่ 1 - เลือกต�ำแหน่ ง ข้อก�ำหนดของต�ำแหน่ง: • มีพน้ื ผิวแข็ง ราบเรียบเสมอกัน โดยไม่มพี รมหรือวัสดุปพู น้ื ทีอ่ าจปิดกัน้ การระบายอากาศ • พ้นจากแสงแดดโดยตรง • มีพน้ื ทีว่ า่ งส�ำหรับการระบายอากาศและการเดินสายอย่างเพียงพอ • อุณหภูมแิ วดล้อมต้องสูงกว่าจุดเยือกแข็ง (0 ˚C) อยูเ่ สมอ • อยูห่ า่ งจากแหล่งก�ำเนิดความร้อนเสมอ ขัน้ ตอนที่ 2 – น�ำหมุดส�ำหรับการขนส่งออก แกะบรรจุภณ ั ฑ์ของผลิตภัณฑ์ออกและน�ำหมุดส�ำหรับการขนส่งทัง้ หมดออก 1.
ขัน้ ตอนที่ 4 - เชื่อมต่อท่อน�้ำ ต่อท่อจ่ายน�้ำเข้ากับก๊อกน�้ำ 1. ถอด ข้อต่อ (A) ออกจาก ท่อจ่ายน�้ำ (B) A B 2. ใช้ไขควงฟิลลิปส์เพือ่ คลายสกรูสต่ี วั บนข้อต่อ 3. จับข้อต่อไว้และหมุน ชิ้ นส่วน (C) ไปตามทิศทางของลูกศรเพือ่ คลายออก 5 มม. (*) C 4. 5. ต่อข้อต่อเข้ากับก๊อกน�้ำ และขันสกรูให้แน่นพร้อมทัง้ ยกข้อต่อขึน้ หมุน ชิ้ นส่วน (C) ไปตามทิศทางของลูกศรเพือ่ ขันให้แน่น C 6.
ต่อปลายอีกด้านของท่อจ่ายน�้ำเข้ากับวาล์วน�้ำเข้าทีด่ า้ นหลังของเครือ่ งซักผ้า หมุนท่อ ตามเข็มนาฬิกาเพือ่ ขันให้แน่น 8. เปิดก๊อกน�้ำและตรวจสอบว่ามีรอยรัวรอบบริ ่ เวณเชือ่ มต่อหรือไม่ ถ้ามีน้�ำรัว่ ให้ทำ� ตาม ขัน้ ตอนข้างต้นนี้ซ้ำ� • หากก๊อกน�้ำประเภทเกลียว ให้ต่อท่อน�้ำเข้ากับก๊อกน�้ำตามภาพ การติ ดตัง้ 7.
ท่อเตือนน�้ำรัว่ (เฉพาะรุ่นที่ใช้ได้เท่านัน้ ) ท่อเตือนน�้ำรัวจะเตื ่ อนให้ผใู้ ช้ทราบถึงความเสีย่ งในการเกิดน�้ำรัว่ อุปกรณ์จะรับรูก้ ารไหลของ น�้ำและเปลีย่ นเป็ นสีแดงที่ สัญลักษณ์ (A) บริเวณกึง่ กลางในกรณีทเ่ี กิดการรัว่ A ขัน้ ตอนที่ 5 - วางท่อทิ้ งน�้ำ สามารถติดตัง้ ท่อทิง้ น�้ำได้สามวิธ:ี พาดขอบอ่างซักล้าง ท่อทิง้ น�้ำต้องวางในความสูงระหว่าง 60 ซม. ถึง 90 ซม.
ก่อนการเริ่มต้น ก่อนการเริ่ มต้น การตัง้ ค่าเริ่ มต้น เมือ่ เครือ่ งซักผ้าเปิดใช้งานเป็ นครัง้ แรก หน้าจอยินดีตอ้ นรับจะปรากฏพร้อมกับโลโก้ Samsung โปรดปฏิบตั ติ ามค�ำแนะน�ำบนหน้าจอเพือ่ ด�ำเนินการตัง้ ค่าเริม่ ต้นให้เสร็จสมบูรณ์ คุณสามารถเปลีย่ นการตัง้ ค่าเริม่ ต้นในภายหลังด้วยการเข้าถึงหน้าจอ การตัง้ ค่า ขัน้ ตอนที่ 1 - ตัง้ ค่าภาษา ตัง้ ค่าภาษาของเมนูตามต้องการ 1. เลือกภาษา 2. แตะ ถัดไป ขัน้ ตอนที่ 2 - ตัง้ วันที่ & เวลา ตัง้ ค่าวันทีแ่ ละเวลาปจั จุบนั 1.
ขัน้ ตอนที่ 3 - ตัง้ ค่าการจ่ายอัตโนมัติ อุปกรณ์ระบบจ่ายอัตโนมัตจิ ะจ่ายผงซักฟอกและน�้ำยาปรับผ้านุ่มลงถังซักในปริมาณทีเ่ หมาะสมตามโปรแกรมและรอบการท�ำงาน 1. มีการตัง้ ค่าเริม่ ต้นให้กบั ทัง้ เติ มผงซักฟอกอัตโนมัติ และ เติ มน�้ำยาปรับ ผ้านุ่มอัตโนมัติ เป็ น เปิ ด หากต้องการเปลีย่ นการตัง้ ค่า ให้เลือ่ นแถบที่ เกีย่ วข้องเป็ น ปิ ด 2. ตัง้ ค่า ปริ มาณ และ ความกระด้างของน�้ำ 3. ตัง้ ค่า ปริ มาณ และ ความเข้มข้น 4.
ค�ำแนะน�ำของผ้า ก่อนการเริ่ มต้น ขัน้ ตอนที่ 1 - คัดแยก แยกผ้าตามเกณฑ์ดงั นี้ : • • • • ฉลากดูแลผ้า: แยกผ้าเป็ น ผ้าฝ้าย ผ้าเนื้อผสม ผ้าใยสังเคราะห์ ผ้าไหม ผ้าขนสัตว์ และเรยอน สี: แยกผ้าขาวออกจากผ้าสี ขนาด: การน�ำผ้าทีม่ ขี นาดแตกต่างมารวมเข้าไว้ดว้ ยกันในถังซักจะช่วยเพิม่ ประสิทธิภาพในการซัก ความบอบบาง: ซักผ้าบางแยกต่างหาก โดยใช้ตวั เลือกโปรแกรมรีดง่ายส�ำหรับส�ำหรับผ้าขนสัตว์ใหม่ ผ้าม่าน และผ้าไหม โปรดดูฉลากบนผ้า โปรดดูฉลากดูแลผ้าบนเสือ้ ผ้า และแยกเสือ้ ผ้าตามนัน้ ก่อนเริม่ ต้นซัก ขัน้ ตอนที่ 2 - น�ำสิ่
ขัน้ ตอนที่ 5 - พิ จารณาปริ มาณผ้าที่จะซัก ห้ามใส่ผา้ เกินปริมาณทีก่ ำ� หนด การใส่ผา้ มากเกินไปอาจท�ำให้เครือ่ งซักผ้าไม่สามารถซักได้อย่างเหมาะสม โปรดดูหน้า 28 ส�ำหรับข้อมูล เกีย่ วกับปริมาณผ้าแต่ละชนิดทีจ่ ะซัก ั่ เมือ่ ซักชุดเครือ่ งนอนหรือผ้านวม เวลาในการซักอาจนานขึน้ และประสิทธิภาพในการปนหมาดจะลดลง ส�ำหรับชุดเครือ่ งนอนหรือ ั ่ ผ้านวม ความเร็วของรอบปนหมาดสูงสุดทีแ่ นะน�ำคือ 800 รอบต่อนาที และน�้ำหนักคือ 2.
ค�ำแนะน�ำส�ำหรับผงซักฟอก ก่อนการเริ่ มต้น ระบบจ่ายอัตโนมัติ เครือ่ งซักผ้ามีชอ่ งจ่ายสองช่อง: ช่องด้านซ้ายส�ำหรัน้�ำยาซักผ้า และช่องด้านขวาส�ำหรับน�้ำยาปรับผ้านุ่ม อุปกรณ์ระบบจ่ายอัตโนมัตจิ ะจ่าน�้ำยา ซักผ้าละน�้ำยาปรับผ้านุ่มลงถังซักในปริมาณทีเ่ หมาะสมตามโปรแกรมและรอบการท�ำงาน ข้อควรระวัง • ใช้น้�ำยาซักผ้าและน�้ำยาปรับผ้านุ่มกับอุปกรณ์ระบบจ่ายอัตโนมัตเิ ท่านัน้ • โปรดตรวจสอบว่าได้ใส่อุปกรณ์ระบบจ่ายอัตโนมัตไิ ว้เรียบร้อยแล้ว เครือ่ งซักผ้าจะไม่เริม่ ท�ำงานจนกว่าจะใส่อุปกรณ์ระบบจ่าย อัตโนมัตไิ ว้อย่างถูกต้อ
1. เปิดประตู และดึงอุปกรณ์ระบบจ่ายอัตโนมัตอิ อกมาจากเครือ่ งซักผ้า 2. หมุนปุม่ บิดด้านซ้ายทวนเข็มนาฬิกาเพือ่ เปิด และเทน�้ำยาซักผ้าไปทีช่ อ่ งด้านซ้ายจนถึง เส้นบอกปริมาณสูงสุด หมุนปุม่ บิดด้านขวาทวนเข็มนาฬิกาเพือ่ เปิด และเทน�้ำยาปรับผ้านุ่มไปทีช่ อ่ งด้านขวา จนถึงเส้นบอกปริมาณสูงสุด ล็อคปุม่ บิดด้วยการหมุนตามเข็มนาฬิกา 3. 4. 5. 6.
การจ่ายด้วยตนเอง ก่อนการเริ่ มต้น ในกรณีทค่ี ณ ุ ไม่ตอ้ งการใช้เครือ่ งจ่ายอัตโนมัติ (อุปกรณ์ระบบจ่ายอัตโนมัต)ิ คุณสามารถตวงสารซักฟอกลงในถังซักโดยตรง หรือใช้อะควา เพบเบิล้ ทีม่ ใี ห้เมือ่ ใส่สารซักฟอกด้วยตนเอง อะควาเพบเบิล้ มีสองขนาดและมีให้เป็ นอุปกรณ์เสริมกับเครือ่ ง โปรดเลือกอะควาเพบเบิล้ ทีเ่ หมาะ ส�ำหรับปริมาณผงซักฟอก 1. ปิด เติ มผงซักฟอกอัตโนมัติ โปรดดู “ระบบจ่ายอัตโนมัติ” ทีห่ น้า 32 2.
การท�ำงาน หน้ าจอ หน้าจอจริงอาจต่างไปจากภาพด้านล่าง ทัง้ นี้ขน้ึ อยูก่ บั แต่ละรุน่ หน้ าจอหลัก 1 A 12:00AM 2 B 8 D C 7 3 4 5 6 เลือกการทำงาน ปุ่ ม 1 โปรแกรม แตะเพือ่ เข้าสูช่ อ่ งของโปรแกรม 2 การตัง้ ค่า แตะเพือ่ เข้าสูห่ น้าจอการตัง้ ค่า 3 อุณหภูมิ แตะเพือ่ เปลีย่ นอุณหภูมสิ ำ� หรับโปรแกรมปจั จุบนั 4 ล้างน�้ำ แตะเพือ่ เปลีย่ นจ�ำนวนครัง้ ในการล้างน�้ำส�ำหรับโปรแกรมปจั จุบนั 5 รอบปัน่ ั ่ ำหรับโปรแกรมปจั จุบนั แตะเพือ่ เปลีย่ นความเร็วในการปนส� 6 เลือกการท�ำงาน แตะเพือ่ เข้าส
แถบสถานะ �������� 12:00AM เติ มน�้ำยาซักผ้าอัตโนมัติ ถ้าสัญลักษณ์น้ีสอ่ งสว่าง แสดงว่ามีการเปิดใช้งาน เติมน�้ำยาซักผ้าอัตโนมัติ เติ มน�้ำยาปรับผ้านุ่ม อัตโนมัติ ถ้าสัญลักษณ์น้ีสอ่ งสว่าง แสดงว่ามีการเปิดใช้งาน เติมน�้ำยาปรับผ้านุ่มอัตโนมัติ Door Lock ถ้าสัญลักษณ์น้ีสอ่ งสว่าง แสดงว่ามีการล็อคประตูเพือ่ ป้องกันประตูเปิดในระหว่างการ ท�ำงาน ล็อคป้ องกันเด็ก ถ้าไอคอนนี้เปลีย่ นเป็ นลงล็อค [ ป้องกันการเกิดอุบตั เิ หตุกบั เด็ก เครือข่าย แสดงสถานะการเชือ่ มต่อเครือข่าย Wi-Fi ระบบควบคุมอัจฉริ ยะ ถ้าสัญลั
หน้ าจอตัวเลือก 1 ซักเร็ว ส�ำหรับเสือ้ ผ้าทีเ่ ปื้อนน้อย มีน้�ำหนักผ้าน้อยกว่า 2 กก.
ขัน้ ตอนง่ายๆ ในการเริ่ มต้น �������� เลือกการทำงาน 1. 2. 3. 4. 5. 6.
ภาพรวมของโปรแกรม โปรแกรมมาตรฐาน โปรแกรม ค�ำอธิ บาย & น�้ำหนักสูงสุด (กก.
โปรแกรม ผ้าฝ้ าย ท�ำความสะอาดถังซักด้วยการขจัดคราบสกปรกและแบคทีเรียออกจากถังซัก ด�ำเนินการหนึ่งครัง้ เมือ่ ซักครบ 40 ครัง้ โดยไม่ตอ้ งใส่ผงซักฟอกหรือสารฟอกขาว ตรวจสอบว่าถังซักว่างเปล่า โปรดอย่าใช้สารท�ำความสะอาดเพือ่ ท�ำความสะอาดถังซัก • ประสิทธิภาพทีด่ ที ส่ี ดุ พร้อมกับใช้พลังงานน้อยลงส�ำหรับผ้าฝ้าย ผ้าปูทน่ี อน ผ้าปูโต๊ะ ชุด ชัน้ ใน ผ้าขนหนู หรือเสือ้ เชิต้ �������� ล้างถังซัก ค�ำอธิ บาย & น�้ำหนักสูงสุด (กก.
เลือกการท�ำงาน ตัวเลือกทีใ่ ช้ได้จะแตกต่างกันไปตามแต่ละโปรแกรม ตัวเลือกทีไ่ ม่ใช้งานส�ำหรับโปรแกรมบางอย่างจะเป็ นสีเทา เลือกการท�ำงาน ค�ำอธิ บาย • • • ส�ำหรับเสือ้ ผ้าทีเ่ ปื้อนน้อย มีน้�ำหนักผ้าน้อยกว่า 2 กก.
ตัง้ เวลาสิ้ นสุด • �������� คุณสามารถตัง้ ค่าให้เครือ่ งซักผ้าท�ำงานด้วยโปรแกรมปจั จุบนั ให้เสร็จสิน้ ในภายหลังตามเวลาทีก่ ำ� หนด ตัวเลือกนี้มปี ระโยชน์ถา้ คุณต้องการให้ซกั เสร็จภายในเวลาทีค่ ณ ุ กลับมาจากการท�ำธุระนอกบ้าน 1. เลือกโปรแกรม จากนัน้ เปลีย่ นการตัง้ ค่าโปรแกรมตามความจ�ำเป็ น 2. แตะไอคอน เลือกการท�ำงาน ทีม่ มุ ขวาล่าง จากนัน้ เลือกตัวเลือกและเปลีย่ นการตัง้ ค่าตัวเลือก 3. แตะ ตัง้ เวลาสิ้ นสุด 4.
การตัง้ ค่า ล็อคป้ องกันเด็ก เพือ่ เป็ นการป้องกันการเกิดอุบตั เิ หตุกบั เด็ก ล็อคป้องกันเด็ก จะล็อคทุกปุม่ ยกเว้นปุม่ การตัง้ ค่า คุณสามารถเข้าถึงเมนู ล็อคป้องกันเด็ก จากหน้าจอ การตัง้ ค่า หรือแถบแผงควบคุมด่วน • หากต้องการตัง้ ค่า ล็อคป้องกันเด็ก ให้แตะ การตัง้ ค่า แล้วแตะปุม่ ล็อคป้ องกันเด็ก • ในการใช้ ล็อคป้องกันเด็ก ให้กดปุม่ เปิ ดใช้งาน ค้างไว้ 3 วินาที • ในการปิดการ ล็อคป้องกันเด็ก ชัวคราว ่ ให้กดปุม่ ปิ ดใช้งานชัวคราว ่ ค้างไว้ 3 วินาที • ในการปิดการ ล็อคป้องกันเด็ก อย่างถาวร ให้กดปุม่ ปิ ดใช้งาน ค
วันที่ & เวลา �������� เวลาเริม่ ต้นจะตัง้ ไว้ในรูปแบบ 12 ชัวโมง ่ 1. แตะ การตัง้ ค่า > วันที่ & เวลา 2. แตะลูกศรเพือ่ เปลีย่ นเวลาส�ำหรับส่วนของเวลาแต่ละส่วน ตัวอย่างเช่น หากต้องการเปลีย่ นวันที่ ให้ใช้ลกู ศรข้างบนและข้างล่างส่วนของ วันที่ 3. หากต้องการสลับระหว่างส่วน AM และ PM ให้แตะส่วนทีเ่ กีย่ วข้อง 4.
ระบบควบคุมอัจฉริ ยะ คุณสามารถใช้ ระบบควบคุมอัจฉริยะ เพือ่ ควบคุมเครือ่ งซักผ้าจากอุปกรณ์เคลือ่ นทีข่ องคุณ แตะไอคอนนี้เพือ่ เปิดหรือปิดฟงั ก์ชนั ่ ระบบ ควบคุมอัจฉริยะ 1. แตะ การตัง้ ค่า > เลือ่ นแถบ ระบบควบคุมอัจฉริ ยะ ไปที่ เปิ ด 2. กลับไปทีห่ น้าจอหลัก ระบบควบคุมอัจฉริยะเปิดใช้งานอยู่ 3.
อัพเดท เมือ่ มีการอัพเดท การแจ้งเตือนการอัพเดทจะปรากฏบนหน้าจอ 1. 2. �������� หากต้องการตรวจสอบเวอร์ชนปั ั ่ จจุบนั ของเฟิ ร์มแวร์ แตะ การตัง้ ค่า > อัพเดท เพือ่ แสดงเวอร์ชนป ั ่ จั จุบนั ของเฟิรม์ แวร์ หากต้องการอัพเดทเฟิรม์ แวร์ดว้ ยตนเอง ให้แตะ อัพเดท หากต้องการอัพเดทเฟิ ร์มแวร์โดยอัตโนมัติ 1. 2.
Samsung Mobile Smart Control เครือ่ งซักผ้านี้มแี อปควบคุมผ่านอุปกรณ์เคลือ่ นทีส่ องชนิดด้วยกันทีค่ ณ ุ สามารถใช้ควบคุมเครือ่ งผ่านการเชือ่ มต่อเครือข่าย แอปอุปกรณ์เคลื่อนที่ที่ใช้กบั คุณสมบัติ Smart Control ของเครื่องซักผ้า Samsung Smart Washer Samsung Smart Home ด้วย แอป Samsung Smart Home ทีอ่ อกแบบใหม่ คุณสามารถเข้าถึงเครือ่ งซักผ้าขณะทีค่ ณ ุ เดินทาง และควบคุมหรือตรวจสอบสถานะ การท�ำงานของเครือ่ งได้ ดาวน์โหลดแอป “Samsung Smart Home” จาก Play Store หรือ Apple Store และติดตัง้ ในโทรศัพท์เคลือ่ นทีข่ อง
แอปพลิ เคชัน Samsung Smart Home �������� เมือ่ ใช้แอป Samsung Smart Home โปรดตรวจสอบว่าได้เลือก “Samsung Smart Home” ไว้ในเมนู Setup แอปพลิเคชัน Samsung Smart Home จะช่วยให้คณ ุ สามารถเข้าถึงและควบคุมเครือ่ งซักผ้าได้ในขณะทีไ่ ม่อยูบ่ า้ น การติ ดตัง้ 1. 2.
การใช้แอปพลิ เคชัน Samsung Smart Home คุณสมบัติหลัก • • • • • การควบคุมอุปกรณ์ Samsung Smart Appliances อย่างครบวงจร ลงทะเบียนอุปกรณ์สมาร์ท Samsung ของคุณกับบริการ Samsung Smart Home เพือ่ ให้สามารถใช้งานได้อย่างสะดวก เลือกไอคอน เครือ่ งซักผ้าในแอปพลิเคชันเพือ่ เข้าถึงคุณสมบัตหิ ลักของเครือ่ งซักผ้าได้แม้ขณะเดินทาง Master key (มาสเตอร์คีย)์ มาสเตอร์คยี ป์ ระกอบด้วย 4 โหมด: Going out (ออกนอกบ้าน), Coming home (กลับบ้าน), Good night (ราตรีสวัสดิ)์ และ Good morning (อรุณสวัสดิ ์) Chat controls (ควบคุมการแชท
แอปพลิ เคชัน่ Samsung Smart Washer �������� เมือ่ ใช้แอป Samsung Smart Washer โปรดตรวจสอบว่าได้เลือก “Samsung Smart Washer” ไว้ในเมนู Setup แอปพลิเคชัน่ Samsung Smart Washer จะช่วยให้คณ ุ สามารถควบคุมฟงั ก์ชนบางอย่ ั่ างของเครือ่ งซักผ้าจากอุปกรณ์เคลือ่ นทีข่ องคุณ ดาวน์ โหลด 1. 2. 3.
การลงทะเบียน ลงทะเบียนเครือ่ งซักผ้าในเว็บไซต์ Samsung Smart Appliance (www.samsungsmartappliance.com) และรับการเข้าถึงเครือ่ งซักผ้าจาก ระยะไกล ต้องเชือ่ มต่อเครือ่ งซักผ้ากับเครือข่าย Wi-Fi 1. ไปทีเ่ ว็บไซต์ Samsung Smart Appliance (www.samsungsmartappliance.com) 2. ระบุขอ้ มูลประจ�ำตัวส�ำหรับบัญชี Samsung เพือ่ เข้าสูร่ ะบบ ถ้าเป็ นผูใ้ ช้ทไ่ี ม่เคยลงทะเบียนไว้ ให้คลิก สร้างบัญชี Samsung และด�ำเนิน การตามค�ำแนะน�ำบนหน้าจอ 3.
การบ�ำรุงรักษา ������������� โปรดรักษาให้เครือ่ งซักผ้าสะอาดอยูเ่ สมอเพือ่ ป้องกันประสิทธิภาพลดลงและเพือ่ ให้มอี ายุการใช้งานทีย่ าวนาน ล้างถังซัก โปรดใช้โปรแกรมนี้เป็ นประจ�ำเพือ่ ล้างถังซักและก�ำจัดแบคทีเรียออก 1. แตะ โปรแกรม > ล้างถังซัก 2.
ท่อทิ้ งน�้ำฉุกเฉิ น ในกรณีทเ่ี กิดไฟฟ้าดับ ให้ระบายน�้ำภายในถังซักก่อนน�ำผ้าออก 1. ถอดปลักสายไฟของเครื ๊ อ่ งซักผ้าออกจากเต้ารับหลัก 2. ค่อยๆ กดบริเวณด้านบนของทีป่ ิดตัวกรองเพือ่ เปิด 3. ค่อยๆ ดึงท่อทิง้ น�้ำฉุกเฉินออกมา 4. ในขณะทีถ่ อื ส่วนปลายของท่อทิง้ น�้ำ ให้เปิดฝาปิดท่อ 5. 6. 7.
การท�ำความสะอาด ������������� พืน้ ผิวของเครื่องซักผ้า ใช้ผา้ นุ่มเช็ดทีม่ นี ้�ำยาท�ำความสะอาดทีไ่ ม่มสี ารขัดถู ห้ามฉีดน�้ำลงบนเครือ่ งซักผ้า ตะแกรงตัวกรอง ท�ำความสะอาดตะแกรงตัวกรองของท่อจ่ายน�้ำหนึ่งหรือสองครัง้ ต่อปี 1. ปิดเครือ่ งซักผ้า และถอดปลักสายไฟ ๊ 2. ปิดก๊อกน�้ำ 3. คลายและปลดท่อจ่ายน�้ำจากด้านหลังของเครือ่ งซักผ้า หุม้ ท่อด้วยผ้า เพือ่ ป้องกันน�้ำไหลออก 4. 5. 6. 7. 8.
ตัวกรอง ขอแนะน�ำให้ทำ� ความสะอาดตัวกรอง 5 หรือ 6 ครัง้ ต่อปีเพือ่ ป้องกันการอุดตัน ตัวกรองทีอ่ ุดตันอาจลดประสิทธิภาพของการซักฟอก 1. ปิดเครือ่ งซักผ้า และถอดปลักสายไฟ ๊ 2. ระบายน�้ำทีเ่ หลืออยูภ่ ายในถังซักออก โดยดูท่ี “ท่อทิ้ งน�้ำฉุกเฉิ น” ในหน้า 42 3. เปิดทีป่ ิดตัวกรองโดยใช้เหรียญหรือกุญแจ 4. หมุนฝาปิดตัวกรองไปทางซ้าย และระบายน�้ำทีเ่ หลืออยูอ่ อกให้หมด 5. ถอดตัวกรองออก 6. 7.
อุปกรณ์ระบบจ่ายอัตโนมัติ 2. เช็ดช่องของอุปกรณ์ระบบจ่ายอัตโนมัตโิ ดยใช้ผา้ แห้ง 3. ถอดปุม่ บิดสองปุม่ ของอุปกรณ์ระบบจ่ายอัตโนมัตอิ อก และถอดฝาปิดสองฝาทีด่ า้ นล่าง ด้วย แล้วปล่อยน�้ำไหลผ่านอุปกรณ์ระบบจ่ายอัตโนมัตเิ พือ่ ท�ำความสะอาดบริเวณด้านใน ห้ามเขย่าอุปกรณ์ระบบจ่ายอัตโนมัตเิ นื่องจากน�้ำอาจกระเซ็นจากช่องของอุปกรณ์ระบบ จ่ายอัตโนมัติ ใส่ปมุ่ บิดและฝาปิดกลับเข้าทีเ่ ดิม ใส่อุปกรณ์ระบบจ่ายอัตโนมัตกิ ลับเข้าทีเ่ ดิม 4. 5.
การคืนสภาพจากการเป็ นน�้ำแข็ง เครือ่ งซักผ้าอาจกลายเป็ นน�้ำแข็งเมือ่ อุณหภูมติ ่ำ� กว่า 0 °C 1. ปิดเครือ่ งซักผ้า และถอดปลักสายไฟ ๊ 2. เทน�้ำอุน่ บนก๊อกน�้ำเพือ่ คลายท่อจ่ายน�้ำให้หลวม 3. ถอดท่อจ่ายน�้ำ และแช่ในน�้ำอุน่ 4. เทน�้ำอุน่ ลงในถังซักและปล่อยทิง้ ไว้เป็ นเวลาประมาณ 10 นาที 5.
การแก้ไขปัญหา การแก้ไขปัญหา จุดตรวจสอบ ถ้าคุณพบว่าเกิดปญั หากับเครือ่ งซักผ้า โปรดตรวจสอบทีต่ ารางด้านล่างนี้ก่อนและลองด�ำเนินการตามค�ำแนะน�ำ ปัญหา การด�ำเนิ นการ เครือ่ งซักผ้าไม่เริม่ ท�ำงาน • • • • ตรวจสอบว่าเสียบปลักเรี ๊ ยบร้อย ตรวจสอบว่าประตูปิดเหมาะสมแล้ว ตรวจสอบว่าก๊อกน�้ำเปิดอยู่ แตะ เริ่ ม อีกครัง้ บนหน้าจอหลัก การจ่ายน�้ำไม่เพียงพอ หรือไม่ม ี การจ่ายน�้ำ • • • • เปิดก๊อกน�้ำเต็มที่ ตรวจสอบว่าท่อจ่ายน�้ำไม่จบั ตัวเป็ นน�้ำแข็ง ตรวจสอบว่าท่อจ่ายน�้ำไม่บดิ งอหรืออุดตัน ท�ำความสะอาดตัวกรองที
รหัสข้อมูล ถ้าเครือ่ งซักผ้าไม่ทำ� งาน คุณสามารถดูรหัสข้อมูลบนหน้าจอได้ โปรดตรวจสอบตารางด้านล่างและลองด�ำเนินการตามค�ำแนะน�ำ ปัญหา การด�ำเนิ นการ DE • • ตรวจสอบว่าประตูปิดเหมาะสมแล้ว ตรวจสอบว่าผ้าไม่ได้ตดิ อยูท่ ป่ี ระตู 4E • • • ตรวจสอบว่าก๊อกน�้ำเปิดอยู่ ตรวจสอบว่าเครือ่ งซักผ้าต่อกับแหล่งจ่ายน�้ำทีม่ แี รงดันเพียงพอ ท�ำความสะอาดตะแกรงตัวกรองเมือ่ มีการอุดตัน 5E • • • ท�ำความสะอาดตัวกรองเมือ่ มีการอุดตัน ตรวจสอบว่าท่อทิง้ น�้ำไม่บดิ งอตลอดเส้นทางไปยังระบบระบายน�้ำ ท�ำความสะอาดตะแกรงตัวกรองเมือ่
ข้อมูลจ�ำเพาะ ������������ การปกป้ องสิ่ งแวดล้อม • • • • อุปกรณ์น้ีได้รบั การผลิตจากวัสดุรไี ซเคิล หากคุณต้องการทิง้ อุปกรณ์น้ี โปรดปฏิบตั ติ ามระเบียบการทิง้ ขยะของพืน้ ที่ ตัดสายไฟ เพือ่ ป้องกันไม่ให้มกี ารต่อสายไฟกับเครือ่ งใช้ไฟฟ้านี้อกี ถอดประตูออก เพือ่ ป้องกันไม่ให้สตั ว์หรือเด็กติดอยูภ่ ายใน อย่าใช้ผงซักฟอกเกินปริมาณทีแ่ นะน�ำโดยผูผ้ ลิตผงซักฟอก ใช้สารขจัดคราบและสารฟอกขาวก่อนการซักเฉพาะเมือ่ จ�ำเป็ นเท่านัน้ ประหยัดน�้ำและไฟฟ้าโดยซักเต็มถัง (ปริมาณผ้าขึน้ อยูก่ บั โปรแกรมทีใ่ ช้) ไทย - 49 Unti
ผังการดูแลผ้า สัญลักษณ์ต่อไปนี้เป็ นค�ำแนะน�ำในการดูแลผ้า ฉลากการดูแลผ้าประกอบด้วยสัญลักษณ์สอ่ี ย่างตามล�ำดับ: การซัก การฟอกขาว การอบแห้ง และการรีด (ตลอดจนการซักแห้ง ถ้าจ�ำเป็ น) การใช้สญ ั ลักษณ์ชว่ ยให้มคี วามสม�่ำเสมอระหว่างผูผ้ ลิตเสือ้ ผ้าแต่ละรายทัง้ ส�ำหรับผ้าในประเทศ และผ้าทีน่ �ำเข้า โปรดปฏิบตั ติ ามฉลากการดูแลเพือ่ ยืดอายุการใช้งานของผ้าและลดปญั หาในการซัก ผ้าหนา ห้ามรีด ผ้าบาง ซักแห้งด้วยสารท�ำละลายใดก็ได้ ซักผ้าได้ทค่ี วามร้อน 95 ˚C ซักแห้ง ซักผ้าได้ทค่ี วามร้อน 60 ˚C ซักแห้งด้วยเปอร์คลอไ
ข้อมูลจ�ำเพาะ เครือ่ งซักผ้าฝาหน้า ชือ่ รุน่ WW10H9***** ขนาด ก 600 x ล 600 x ส 850 (มม.) แรงดันน�้ำ 50 kPa ~ 800 kPa ปริมาณนํ้า 68 ล. นํ้าหนักสุทธิ 87 กก. ั่ ความจุในการซักและการปนหมาด 10.0 กก.
ถ้าคุณมีคำ� ถามหรือข้อคิ ดเห็น ประเทศ โทรศัพท์ หรือเยี่ยมชมเว็บไซต์ของเราที่ THAILAND 0-2689-3232 1800-29-3232 www.samsung.