cover-Rio 7/28/03 11:09 AM Page 2 Digital Audio Player http://www.samsungyepp.com MP3, WMA file playback 64MB/128MB internal memory FM Radio Voice Recording D. I. Y. Support Fashion Backlight Long time playback (15 hours) High-Speed USB AH68-01036A (Rev 2.
90-eng-Rio 7/28/03 10:36 AM Page 2 Contents Preparations Explorer Usage Features ............................................................................................................4 Components ....................................................................................................5 Location of Controls ..........................................................................................6 Inserting Batteries .....................................................................
90-eng-Rio 7/28/03 10:36 AM Page 4 Features Components CD quality sound. Carrying case Miniature Design Fashion Backlight Earphones Software Installation CD Small and light. Pull the packing foam on the bottom in the direction of the arrow to remove the installation CD. Player D.I.Y. Support Logo Embellishment Adjustable Scroll Speed Adjustable Contrast MP3, WMA file Playback 4 Voice Recording Max.
90-eng-Rio 7/28/03 10:36 AM Page 6 Location of Controls Rear Front Earphones Jack Inserting batteries Microphone Play/Stop/ Forward/Backward Button Display Window MENU/Mode/Loop Repeating Button Volume Voice Recording Button Press and pull the cover in the direction of the arrow to open it. Note : LCD panel seems to be misty. Please peel off the tape from the LCD panel.
90-eng-Rio 7/28/03 10:37 AM Page 8 Listening to Music with yepp Setting up Volume / Hold Functions First, insert batteries and connect the earphones to the player. Playing Music Stopping Music (Power On) (Power Off/Sleep) When you press the button, the yepp logo appears and a music/voice file/FM is played. When you press the button while playing, the music stops. If any key is not entered, it automatically turns into Power Off or Sleep mode in 5 seconds.
90-eng-Rio 7/28/03 10:37 AM Page 10 Changing Modes Recording Voice Changing to Voice Mode Stop playing music and press the button short to change to voice mode. Press the button to play. Changing to Music Mode Stop playing voice and press the button short twice to change to music mode. Press the button to play. To Record Voice 1 2 Press the REC button longer (more than 1 second) to start a voice recording. 3 Press the REC button to stop recording. A new voice file is created.
90-eng-Rio 7/28/03 10:37 AM Page 12 Searching for Music/Voice Files Searching for Specific Parts in a Track (Music/Voice file) Searching for Music/Voice Files in Play Searching for Music/Voice Files in Stop ● Press the button for longer while playing to find and listen to the part you choose. Release the button to resume playing. ● Press the button short while playing to play the next track. ● Press the button short within 5 seconds from the start to play the previous track.
90-eng-Rio 7/28/03 10:37 AM Page 14 Listening to FM FM On / Off Press the button during FM reception to turn the radio Off, and repress it to turn On. Changing channel frequency Press the button longer from the channel desired to change frequency for Auto Search. Press the short during flickering ‘Ch’ to select a desired frequency and then press the button longer to store the appropriate frequency. FM FM 88.80MHz 88.80MHz Ch02 FM FM 103.50MHz Ch01 STOP 103.
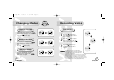
0-eng-Rio 7/28/03 10:37 AM Page 16 Loop Repeating Setting up MENU ● Press the ● Use the ● Press the Loop Function Starting Point Ending Point While playing music/voice files, press the button short at the first part that you want to set up the loop. Press the button short at the last point of the loop. flickers in the display. button longer than 1 seconds to switch to MENU mode. button to select and the button to move. button one more time to cancel the MENU mode.
90-eng-Rio 7/28/03 10:37 AM Page 18 Repeating Tracks Setting up EQ Track Repeating Function 1 2 EQ Function In MENU, select 1.Play mode. In PLAY MODE, use the button to move to the mode you want and press the button to select. 1 2 In MENU, select 2. Equalizer. In EQ, use the / button to move to the tone you want (out of the 5 tones) and press the button to select. Normal ● Normal: To play all the tracks in order one time. ● Repeat one: To repeat one track.
90-eng-Rio 7/28/03 10:37 AM Page 20 Managing Files Deleting 1 2 In MENU, select 5. File In File, select Delete and the mode the target file is in. 3 Move to the file to delete and press the button to select. The file is deleted. 4 Select Cancel to exit the mode. 20 Formatting 1 2 In MENU, select 5. File In File, select Format ➞ Confirm. Select Cancel to exit the mode. Note : ● You can format also in yepp Audio Manager. ● All files will be deleted when formatting the built-in memory.
90-eng-Rio 7/28/03 10:37 AM Page 22 Customizing Options Contrast Setting Up Function 1 2 Press the up the contrast. button to set In MENU, select 4. Setting Backlight Use the button to move to the function you want to change and select the function by using the button. ● Never: No Backlight ● 1 sec. ON ● 3 sec. ON ● 5 sec. ON ❈ Select Never to save electrical power of batteries.
90-eng-Rio 7/28/03 10:37 AM Page 24 Display ➞ 1. Information ● Play time: displaying current play time ● Remain time: displaying remained play time ● Total time: displaying total play time Display ➞ 2. Logo ● Compression: displaying compression rate 128 Kbps ● Free memory: displaying remained memory 32 MB FREE Default Setting ex) User define setting ● Default: "yepp" logo ● User define: displaying user-defined logo ● None: displaying no logo. Note : 24 ● yepp homepage (http://www.samsungyepp.
90-eng-Rio 7/28/03 10:37 AM Page 26 Installing Software (PC) Insert the installation CD into CD-ROM drive. Then the picture appears as shown below. 1 2 Click [Next] for a series of windows that appear. Select [yepp Audio Manager] ➝ [yepp Audio Manager Install]. 3 Note : 26 Before using yepp Audio Manager, make sure to set up options (refer to p.
90-eng-Rio 7/28/03 10:37 AM Page 28 Installing Software (Mac) To install the Mac iTunes Plug-in, iTunes 1.1 version or more should be installed in your system. If you have installed by using the Mac OS 9 installation CD or Mac OS X installation CD, the system is basically installed. If not, download it from iTunes homepage of Apple Computer (http://www.apple.com/itunes) to install. 1 Double-Click the YP-90 iTunes Plug-in Installer in the installation CD supplied.
90-eng-Rio 2 7/28/03 10:37 AM Page 30 Double-Click the installation program, then the following screen appears. Press the [Continue] button here. 3 In case of OS 9 The following figure is the main screen of the installation program. To continue installation, press the [Install] button at the right bottom, then installation starts. In case of OS 9 In case of OS X In case of OS X 4 30 When the installation is completed, you must reboot the system in case of Mac OS 9.
90-eng-Rio 7/28/03 10:37 AM Page 32 Connecting to Computer System Requirements. ● Pentium 133MHz or over ● Windows 98/ME/2000/XP ● Mac (9 ~ X) ● 20MB of available hard disk space ● CD-ROM drive 1 Plug one end of the USB cable into the USB port at the back of a computer. 2 Open the USB cover on the right side of yepp and connect the other end of the USB cable to the USB port of yepp.
90-eng-Rio 7/28/03 10:37 AM Page 34 Manual Installation of USB Driver In case of being not installed USB driver automatically, connect yepp to PC and install USB driver manually (How to check USB driver: refer to 39 page) 1 In Windows 98/ME 2 In Windows 2000 Click [Next] button for a series of windows that appear. Click [Next] button for a series of windows that appear. Insert installation CD and select drive. Insert installation CD and select drive.
90-eng-Rio 7/28/03 10:37 AM Page 36 3 In Windows XP 1 Connect yepp to PC. The screen below will appear. Select [Install from a list or specific location (Advanced)] and click [Next]. 2 Insert Installation CD into CD-ROM drive. Select [Search removable media (floppy, CD-ROM...)] and click [Next] 3 Sometimes the message below will appear. This software will not impair or destabilize the correct operation of your system. Click [Continue Anyway] 4 When Installation is completed, click [Finish].
90-eng-Rio 7/28/03 10:37 AM Page 38 Setting up Option Function (PC) Note : How to check USB driver "Turning on the power of yepp"➝ "Connecting yepp to PC" - USB driver is installed with the message saying that it is searching for a new device. If USB driver is not installed, try one more time after rebooting the PC. (If USB driver is not installed at the second attempt, contact your PC manufacturer.
90-eng-Rio 7/28/03 10:37 AM Page 40 Copying Files to yepp (PC) Before copying files, turn on the power of yepp and connect yepp to PC. (To use yepp Audio Manager in the FM mode, change the mode to Music or Voice first.) 1 Run yepp Audio Manager. ● Double-click yepp Audio Manager icon on your desktop. 2 Click on the [File] ➝ [Search Hard Disks for Tracks] / [Add Tracks...] and save the music files that you want on the database.
90-eng-Rio 7/28/03 10:37 AM Page 42 Copying Files to yepp (Mac) Before copying files to yepp, execute iTunes. Connect yepp to Mac, turn on the power of yepp and then proceed. (To use yepp Audio Manager in the FM mode, change the mode to Music or Voice first.) 1 To copy files to yepp, Drag & drop files to iTunes. In case of OS 9 2 Files are saved. Now you can listen to music with yepp after removing the USB cable.
90-eng-Rio 7/28/03 10:37 AM Page 44 Deleting Files (PC) Deleting Files (Mac) Before deleting files, turn on the power of yepp and connect yepp to PC. Before deleting files, execute iTunes. Connect yepp to Mac, turn on the power of yepp and then proceed. 1 2 44 Run yepp Audio Manager. ● Double-click yepp Audio Manager icon on your desktop. Select [copy to devices]. 3 4 Select the file to delete. Press the ( ) icon.
90-eng-Rio 7/28/03 10:37 AM Page 46 Formatting (PC) Formatting (Mac) Before formatting, turn on the power of yepp and connect yepp to PC. 1 2 Run yepp Audio Manager. For formatting, click the shaped icon at the bottom on the right of iTunes. ● Double-click yepp Audio Manager icon. Select [copy to devices]. Note : 46 Before formatting files, execute iTunes. Connect yepp to Mac, turn on the power of yepp and then proceed. 3 Click on the [Format Media].
90-eng-Rio 7/28/03 10:37 AM Page 48 Uploading Files (PC) Uploading Files (Mac) Before uploading files, turn on the yepp and connect yepp to PC. Before Uploading files, execute iTunes. Connect yepp to Mac, turn on the power of yepp and then proceed. 1 2 Run yepp Audio Manager. To load a file to Macintosh, select a file in the list of iTunes as shown in the figure below and drag it to the location to stored. ● Double-click yepp Audio Manager icon on your desktop.
90-eng-Rio 7/28/03 10:37 AM Page 50 Make MP3 files from an Audio CD (PC) Make sure to install yepp Audio Manager on PC before making an MP3 file. You can make MP3 files though yepp Audio Manager. 1 Run yepp Audio Manager. ● Double-click yepp Audio Manager icon on your desktop. 2 Insert the audio CD into the CD-ROM drive. ● Press the [read a CD] button to see CD information. 3 Check songs to convert into an MP3 file. 4 Note : 50 Press the [Start Reading] button.
90-eng-Rio 7/28/03 10:37 AM Page 52 Rearranging Files (PC) Changing a File Name (Mac) You can change the order that the files are played. Before changing a file name, execute iTunes. Connect yepp to Mac, turn on the power of yepp and then proceed. 1 2 52 Run yepp Audio Manager. Select the file desired to change the name and enter the desired file name when the file name is inversed, and then press Return to change the file name. ● Double-click yepp Audio Manager icon on your desktop.
90-eng-Rio 7/28/03 10:37 AM Page 54 BUTTON STATUS PRESSING LENGTH RESPONSE Playback Short Within 5 seconds from the start: Play the previous track After 5 seconds from the start: Play the beginning of the current track. Playback Longer than 1 Second Fast rewind in the current track.
90-eng-Rio 7/28/03 10:37 AM Page 56 MENU Table MENU Play mode EQ Select with the button and move with the Setting Hold button. File Delete Normal Normal Confirm Contrast Repeat one Classic Cancel Backlight Never Voice Repeat all Jazz Scroll speed 1 sec. ON Cancel Shuffle Rock Intro User mode Go up 3 sec. ON Format 5 sec.
90-eng-Rio 7/28/03 10:37 AM Page 58 Precautions 1. Do not drop or press on it. 2. Make sure not to let water in it ● If it got wet, remove batteries, dry it with towel and contact the service center. 3. Keep out of humid, hot or magnetic places. 4. Do not clean it with thinner, alcohol or benzene. It can be damaged. Troubleshooting Software does not work. ● Refer to 33page.(computer environment) yepp does not work and the LCD displays nothing.
90-eng-Rio 7/28/03 10:37 AM Page 60 Security Specifications You can get legal MP3 files from a growing number of internet sites. Model Internet Site What is SecuMax? Processor Memory capacity With the increasing amount of digital multimedia content, the content providers became concerned with the ease in which the content could be copied and distributed in violation of their copyrights.
90-eng-Rio 7/28/03 10:37 AM Page 62 Safety Information FCC Part 15: This equipment has been tested and found to comply with the limits for a Class B digital device, pursuant to Part 15 of the FCC Rules. These limits are designed to provide reasonable protection against harmful interference in a residential installation.
90-eng-Rio 7/28/03 10:37 AM Page 64 Warranty Samsung warrants this product as free of defects in material, design and workmanship for the period of twelve(12) months from the original date of purchase. If during the period of warranty this product proves defective under normal use and service, you should return the product to the retailer from whom it was originally purchased.
90-eng-Rio 7/28/03 10:37 AM THERE ARE NO EXPRESS WARRANTIES OTHER THAN THOSE LISTED AND DESCRIBED ABOVE, AND NO WARRANTIES WHETHER EXPRESS OR IMPLIED,INCLUDING, BUT NOT LIMITED TO, ANY IMPLIED WARRANTIES OF MERCHANTABILITY OR FITNESS FOR A PARTICULAR PURPOSE, SHALL APPLY AFTER THE EXPRESS WARRANTY PERIODS STATED ABOVE, AND NO OTHER EXPRESS WARRANTY OR GUARANTY GIVEN BY ANY PERSON, FIRM OR CORPORATION WITH RESPECT TO THIS PRODUCT SHALL BE BINDING ON SAMSUNG, SAMSUNG SHALL NOT BE LIABLE FOR LOSS OF REVENUE