SECURITY SAFE INSTRUCTION MANUAL FOR SA-PLAT1-BIO, SA-PLAT2-BIO, SA-PLAT3-BIO, SA-PLAT4-BIO, SA-PLAT1-BIO-DP, SA-PLAT2-BIO-DP, SA-PLAT3-BIO-DP AND SA-PLAT4-BIO-DP IMPORTANT: Please read this information and follow all safety rules carefully before operating your security safe. Failure to do so will void your warranty.
TABLE OF CONTENTS IMPORTANT INFORMATION ............................................................................................... 2 1. REGISTRATION ................................................................................................................ 3 2. UNDERSTANDING YOUR SAFE ...................................................................................... 4 3. INITIAL ENTRY ..............................................................................................................
DISCLAIMER - READ BEFORE SAFE SETUP PLEASE READ THIS INFORMATION CAREFULLY BEFORE OPERATING YOUR SANCTUARY SAFE. DO NOT LOCK THIS MANUAL OR THE BACKUP KEYS IN YOUR SAFE. Thank you for choosing a Sanctuary safe to protect your valuables. We are committed to securing, organizing and protecting your most important documents, valuables and keepsakes. If you experience problems or challenges with your safe, please contact us. Many issues can be quickly resolved without the product being returned.
1. REGISTRATION Please ensure you register your safe by visiting our website. Locate the “contact” button on the top header on the home page. Select registration from the drop down menu. www.saproducts.com By registering your Sanctuary safe we will be able to expedite and address any problems or challenges you may have which would otherwise require a notary letter and proof of payment.
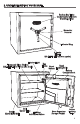
2.
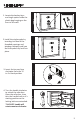
3. INITIAL ENTRY 3. Insert the key and turn clockwise from the 12 to 3 o'clock position. Step 3 4. Turn the handle clockwise to unlock the safe door. Open the safe door, then turn the handle back to it's starting position so the locking bolts are extended. Step 4 2. Install the single spoke by inserting into one of the threaded openings and twisting clockwise until you feel the spoke fully lock into place. Step 2 1.
3. INITIAL ENTRY (Continued) 5. Locate the magnetic key cover inside of your safe. On the front of the safe, remove the backup key and install the magnetic key cover in this same location as shown. 6. Locate the 4xAA batteries. Install them into the battery compartment on top of the door panel in the proper orientation. The unit will beep when batteries are successfully installed. Replace battery cover.
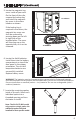
2. Press the reset button. You will hear 1 beep and the indicator ring will illuminate white on the front of the door indicating that you are now in programming mode. Reset button located under brass cap Step 2 1. On the inside of the safe door, locate the brass cap. Unscrew and remove the cap, giving you access to the reset button. Step 1 4. PROGRAMMING YOUR FINGERPRINT BEEP WHITE LED HOLD FOR BEEP 4. REPEAT at least 3 more times until there are 2 consecutive beeps and 2 green flashes.
5. OPENING SAFE WITH PROGRAMMED FINGERPRINT With keys in hand, close and lock the door. PLACE AND HOLD the PROGRAMMED finger pad on scanner, indcator ring will flash white 1 time and beep 1 time to alert scanner is activated. If fingerprint is accepted, indicator ring will illuminate green. You now have access to your safe. GREEN LED = SUCCESS! If fingerpring is rejected, the indicator ring will flash red 5 times and beep 5 times.
6. PROGRAMMING ADDITIONAL FINGERPRINTS (Continued) Complete section 4 again for each fingerprint zone you would like to program. NOTE: If you experience any problems reading your print, including inconsistent readings, note the area of your print that doesn’t work properly, and specifically reprogram that area. This scanner will hold up to 100 different fingerprints. HOLD FOR BEEP BEEP GREEN LED LIFT FINGER BEEP P BEE GREEN LED 2 BEEPS + 2 GREEN FLASHES = SUCCESS! 7.
8. CLEARING ALL PROGRAMMED FINGERPRINTS Hold the reset button for 5 seconds. After 5 seconds, the indicator ring will flash green two times and beep two times to signal that all fingerprints have now been cleared. The safe will not open to any fingerprints until a new fingerprint has been programmed. HOLD DOWN THE RESET BUTTON GREEN LIGHT x2 x2 NOTE: If 100 max fingerprints have already been programmed the indicator ring will flash 5 times and beep 5 times.
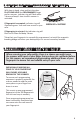
1. First, remove the protective film from the acrylic mirror back wall. Then, remove the tempered glass shelving from the protective packaging located at the bottom of the safe and gather all provided hardware. Step 1 9. GLASS SHELF INSTALLATION brackets into place on both the left and the right walls of the safe using a Phillips head screwdriver. Step 2 2. Screw all provided shelving 3. Rotate the front shelving brackets 45 degrees on both sides of the safe. Step 3 Note: Do not over tighten.
9. GLASS SHELF INSTALLATION (Continued) safe, positioned just below the top brackets. Step 4 4. Maneuver the top shelf into the 5. Pull the shelf towards you, passing 6. Once the top shelf has passed through the front bracket, rotate the shelf down to a horizontal position. Step 6 7. Push the top shelf away from you, passing the back end of the shelf through the back shelving brackets.
9. GLASS SHELF INSTALLATION (Continued) Move this shelf towards the top of your safe, then slide the shelf down into the front brackets. Step 8 8. Insert the bottom shelf into your safe, in between the top and bottom brackets Note: The PLAT4-BIO model will contain a third shelf. Repeat steps 8-10 for installation instruction of this final shelf. 11. Secure shelves by tightening the set screw under each shelf bracket. Step 10 10.
10. INTERNAL LIGHTING When the safe door is opened, internal lighting activates for 30 seconds. Internal Light If you need to activate your light longer, you can press the green light activation button on the inner door panel. This will activate the internal lighting for an additional 30 seconds each time it is pressed. Light Activation Button 11. LOW BATTERY WARNING BATTERIES ARE LOW IF THE INDICATOR RING FLASHES PURPLE This safe is equipped to alert you of Low Battery Mode.
13. SILENT ENTRY MODE By activating the silent entry mode, the safe will no longer make audible sounds. To turn on silent entry mode, hold a programmed finger on the scanner for 5 seconds beyond your fingerprint being accepted. The green indicator ring will turn off and back on, but will not beep, indicating you are now in silent entry mode. You will not hear any sounds for any functions while the safe is in silent entry mode.
16. SECURING YOUR SAFE WARNING: YOUR SAFE IS DESIGNED TO SUPPORT ITSELF WHEN THE DOOR IS OPENED. HOWEVER, CAUTION SHOULD BE USED TO AVOID TIPPING. WHILE SECURING YOUR SAFE BE SURE TO HAVE A SECOND PERSON HOLD AND STABILIZE THE SAFE TO KEEP IT FROM TIPPING, CAUSING INJURY, AND/OR DAMAGE TO THE SAFE AND SURROUNDING STRUCTURES. FAILURE TO DO SO WILL COMPROMISE THE SAFETY, SECURITY, AND WARRANTY OF THE SAFE.
17. LOADING YOUR SAFE 1. Store documents or heat sensitive items in the bottom of the safe for greatest protection against fire damage. 2. Store ammunition separately from valuables. 3. Do not put anything in your safe that will put pressure against the door when it is closed. 4. As a good safety precaution store heavier items either on the floor of the safe, or away from the middle of the shelves. 18.
LIFETIME WARRANTY SA Consumer Products, Inc. will repair or replace, at their sole discretion, any Sanctuary Safe damaged by fire, forced entry, forced attack or natural flood for the lifetime of the original owner. SA Consumer Products, Inc. will repair or replace, at their sole discretion, any Sanctuary Safe with defective parts, paint or lock for the lifetime or the original owner. If SA Consumer Products, Inc.