
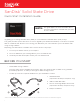
Installation Manual


5
We’realmostdone!Inthisnalstep,youwillswapyourcurrentHDDwithyournewSanDiskSSD.
Before you begin, be sure to shut your computer down and disconnect the power cable.
Removethebatteryifit’sanotebookcomputer.
This process will dier depending on whether you are installing your new SanDisk SSD in a desktop or
notebookcomputer.We’llcovertheseintwoseparatesections.Ifyou’reinstallingyourSSDinadesktop
computer,pleaseskiptothe“DesktopComputerSSDInstallation”sectionbelow.
Replacing your HDD
STEP3
Notebook Computer SSD Installation
1. Makesureyourcomputerispoweredo,thepowercableisdisconnectedandthebatteryisremoved.
Youmaywanttokeepyouroldharddiskdriveasabackupdrive.
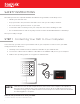
NOTE:
2. Openyournotebookcomputer’sdrive
bay(refertoyourcomputer’smanual
for instructions).
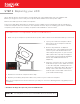
3. Remove any brackets or adapters
attached to the current HDD and install
them on your new SanDisk SSD in the
same way as they were on your current
HDD. (Note: This step may not apply to
every install, not all notebook hard disk
drives have additional brackets or
adapters.)
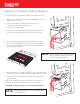
4. Align the connector pins on your SanDisk
SSD with the pins on the SATA connector
in the drive bay and carefully place the
SSD into the drive bay. (Note: Be sure to
firmly connect the SSD connector pins
with the pins on the SATA connector in
your notebook drive bay.)
5. Replacethenotebookcomputer’sdrivebay.
6. Replace your battery and power cable, then power on your notebook computer.
Whenyourcomputerbootsforthersttime,youmayseeascreenindicatingthattheupgradeprocess
is complete.
…And that’s it! Enjoy the speed of your new SanDisk SSD!