
Assembly Instructions
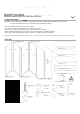

General Instructions
TIPS FOR EASIER ASSEMBLY:
Page 2
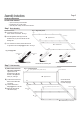
Step 1
-
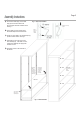
Back Assembly
A)
Lay the two back panels on a flat
surface. Position as illustrated. See Fig. 1.
B) Place the Right Back Panel (A2) next to the
Left Back Panel (A1) and insert the tabs into the
matching slots.
C) Once all the tabs are started, slide the Back Panels
in opposite directions to fully engage the tabs. See Fig. 2.
A1 - Left Back Panel
A2 - Right Back Panel
Slots
Tabs
Bend is up
Bend is up
Right Back Panel
A2
Left Back Panel
A1
Insert the tabs into the matching slots
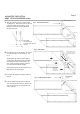
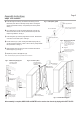
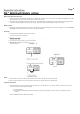
Step 2 - Side Assembly
• 2-person assembly is recommended.
• Assemble the unit on a flat surface.
• Check the parts carefully and follow the instructions.
A) While the Back Panels are
still lying on a flat surface,
align the slots on the
Right Side Panel (B2) with
the tabs on the Right Back
Panel (A2). See Fig 3.
B) Insert the tabs into the slots.
Make sure that all the tabs
are inserted.
C) Slide the Side Panel to
fully engage them in the slots
D) Repeat the steps with the
Left Side Panel (B1).
Slide the panels to fully engage the tabs
Tabs
Tabs
Align the tabs with the matching slots
A2
- Right Back
Panel
B2 - Right Side Panel
B1 - Left Side Panel
(shown transparent)
A1 - Left Back
Panel
Tabs
Slots
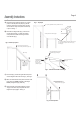
J - Top Stop (installed at factory DO NOT remove)
Holes for Face Plate
Insert the tabs into the
matching slots and slide
the panel to fully engage
Holes for Face Plate
Snap-It Storage Cabinets
Assembly Instructions
J - Top Stop (installed at factory DO NOT remove)
Fig. 1 - Align back panels
Fig. 2 - Engage tabs
Fig. 3 - Install side panels