
Assembly Instructions

Page 3
Step 3
-
Face Plate and Bottom Assembly
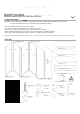
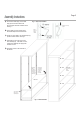
A) Attach the Inside Face Plate (C) using the Screws
and Wing Nuts (I). Make sure the door rod and hinge
holes are facing the top of the cabinet. Use the
inside pair of holes and do not fully tighten the
Wing Nuts at this time.
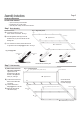
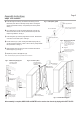
B) Insert the Bottom (D) into the assembly. The notch in
its center should be in rear, facing the back. See
Fig. 2.
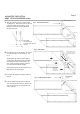
Slide the Bottom (D) down and angle it slighty to
partially engage all 3 of the supports on the Inside
Face Plate (C). Push the rear of the Bottom (D)
down, making sure that the supports on the back
and side panels are all partially engaged.
Tap the Bottom (D) down around the edges until it is
fully seated on each of the supports.
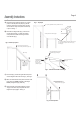
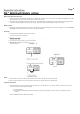
C) Fully tighten the Wing Nuts holding the Inside Face
Plate (C).
D) Install the Outside Face Plate (E) by snapping it in
place over the Inside Face Plate (C). Make sure the
door rod and hinge holes are facing the top of the
cabinet. See Fig. 3.
Snap-It Storage Cabinets
Assembly Instructions
C - Inside Face Plate
I - Screws / Wing Nuts
Insert into the
inside pair of
holes
Screws
Wing nuts
Use the inside
pair of holes, closest
to the center of the cabinet, on
each side.
D
- Bottom
The notch
in the center
of the Bottom is
toward the back.
Supports
Angle the Bottom slightly
to engage the 3 supports
on the Inside Face Plate
first.
Door hinge hole
Door rod
hole
Door hinge hole
Door rod
hole
Door hinge hole
Snap the Outside
Face Plate over the
Inside plate.
E - Outside Face Plate
Fig. 1 - Install inside face plate
Fig. 2 - Install bottom
Fig. 3 - Install outside face plate