
Assembly Instructions

Page 4
Step 4
-
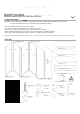
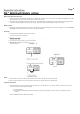
Top Installation
A) Carefully stand the cabinet assembly to an upright
position. Note the plastic Top Stops (J) that are
located on the front of each side panel. Do NOT
remove these as they are required to hold the top
in place. See Fig. 1.
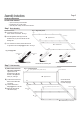
B) Insert the front edge of the Top (F) over the side
panels and Top Stops (J). Make sure that the
side panels are inserted in the flanges located
under the the Top (F).
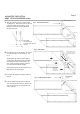
C) Press the Top (F) forward and guide the back panels
into the flanges located under the Top (F). See Fig. 3.
D) Make sure the both of the side panels and each of the
back panels are partially engaged in the flanges
before pushing the Top (F) down fully.
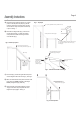
E) Once the flanges are partially engaged, push the
Top (F) down until it snaps into place and all the
flanges are fully engaged. See Fig. 4.
Snap-It Storage Cabinets
Assembly Instructions
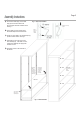
J - Top Stop (installed at factory DO NOT remove)
J - Top Stop (installed at factory DO NOT remove)
Carefully stand the cabinet upright
The Top Stop (J) keeps the front of the Top (F)
from lifting up.
F - Top
Place the front edge of the Top
over the side panels and Top Stops (F).
Make sure the
side panels are
inserted in the
flange on the
Top (F).
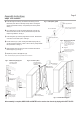
Apply forward pressure
to Top (F).
Guide the back
panels into the
flanges - make
sure both are
partially engaged.
Apply slight downward pressure
to partially engage all flanges.
Press Top (F) down until
it snaps into place and all of
the flanges are fully engaged.
Press
down
until tabs
lock into
place.
Fig. 1 - Top stops
Fig. 2 - Place top in place
Fig. 3 - Insert back and sides into flanges
Fig. 4 - Push top down