
Assembly Instructions

Page 6
Step 6
-
Door Installation
Snap-It Storage Cabinets
Assembly Instructions
A)
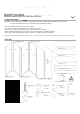
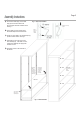
Install the Hinge Pin Guides (K) and the Door Rod Guide (L) into the
bottom face plate. Make sure that they are fully seated. The Hinge Pin
Guides are preinstalled in the top. Verify that they are also fully seated.
See Fig. 1.
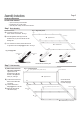
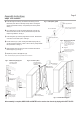
B) Use a Hinge Pin (O) to make sure that the hinge holes on the top and
bottom of each door are clear of excess paint and that the pin will slide
freely during installation. See Fig. 2.
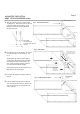
C) Install a Hinge Pin (O) into the top hinge hole of each door. Bend the tabs
on the door to secure them in place. See Fig. 3.
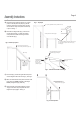
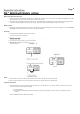
D) Put the Left Door (H1) in place, inserting the installed top Hinge Pin (O)
into the top Hinge Pin Guide (K). NOTE: The door fits very closely between
the top and bottom. See Fig. 4.
E) Align the bottom hinge pin holes in the door and cabinet and install the
bottom Hinge Pin (O). See Fig. 5.
F) Repeat this process for the Right Door (H2).
NOTE: The Door Bumpers (Q) are factory installed on each of the doors.
K - Hinge Pin Guide
K - Hinge Pin Guide
L - Door Rod Guide
Q - Door Bumper
(factory installed)
Q - Door Bumper
(factory installed)
The Hinge Pin and Rod Guides
are factory installed on the top
H2 - Right Door
with electronic lock
H1 - Left Door
with no lock (installed)
Align the bottom
holes, insert the
pin and bend the
tab to secure it in
place
Use a Hinge Pin to
clear any excess paint from
ALL the holes in the doors so
that they slide freely before
installing
O - Hinge Pin
Insert the Hinge Pin
until it is past the
locking tab
Turn the Hinge Pin
Locking Tab
Bend the locking tab
over the Hinge Pin,
securing it in place.
Hinge pin holes in the doors
sometimes have excess paint,
making the pin fit tight.
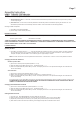
After assembly is complete, MILD SOAP and WATER can be used to clean the unit by wiping with a SOFT CLOTH.
Install the top Hinge
Pins in both doors.
Insert the installed
top Hinge Pin into the
cabinet top.
Fig. 2 - Remove excess paint
Fig. 3 - Install the top hinge pins
Fig. 1 - Install plastic guides
Fig. 4 - Put door in place
Slide the door
into place
Fig. 5 - Insert bottom hinge pin