User Manual RCR-8
Contents Important safety instructions ........................................... 2-4 Controls .......................................................................... 5-8 Troubleshooting ............................................................... 36 Before you can use this product ........................................ 9 Factory reset .................................................................... 37 Upgrade firmware .............................................................
Important safety instructions 1. Read and understand all safety and operating instructions before the radio is operated. 2. Retain instruction: The safety and operating instructions should be retained for future reference. 3. Heed warnings. All warnings on the appliance and operating instructions should be followed. 4. Follow all operations and use instructions. 9. Do not expose this product to splashing or dripping.
16. Power cords: The power cord should be positioned so it is not walked on, pinched, or items placed on top of it. Pay particular attention to cords at plugs, convenience receptacles, and the point where they exit from the unit. Unplug the power cord by gripping the power plug, not the cord. Operate the radio using only the current type of power source indicated. If you are not sure of the type of power supply to your home, consult your dealer or local power company. 17.
25. FCC INFORMATION The Federal Communication Commission Radio Frequency Interference Statement includes the following paragraph: The equipment has been tested and found to comply with the limits for a Class B Digital Device, pursuant to part 15 of the FCC Rules. These limits are designed to provide reasonable protection against harmful interference in a residential installation.
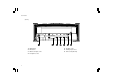
Controls (Front) 1. 2. 3. 4. 5. 5 Alarm 1 button Alarm 2 button Nap button Time Set/Sleep button Power button 6. 7. 8. 9.
Controls (TOP) 10. 11. 12. 13. 14. Tuning +/- and Snooze button Back button Preset 1 / Shuffle/Repeat button Preset 2 / Queue button Preset 3 / Backward button 15. 16. 17. 18.
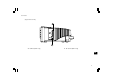
Controls (Rear) 19. 20. 21. 22. 7 WiFi antenna FM antenna Main Power input socket Headphone socket 23. Line Out socket 24. Auxiliary Input socket 25.
Controls (Right hand side) 26. USB slot (RCR-7 only) 27.
Before you can use this product Before you can use your Internet radio, you must have the following: A broadband Internet connection. A wireless access point (Wi-Fi) or a wired Ethernet connection (10 or 100 Mbits/sec with RJ45 connection; For RCR-7 only) connected to your broadband Internet, preferably via a router. In many cases the broadband modem, router and wireless access point will be a single combined unit supplied by your Internet Service Provider or bought from a computer store.
Connecting your radio to your network 1. Place your radio on a surface and plug the mains lead into the Mains input socket located on the rear of your radio (marked ) ensuring that the plug is pushed fully into the socket. 2. Plug the other end of the mains lead into a wall socket and switch on the wall socket. There are 2 days of connecting your radio to the network, wired and wireless: When using a wired (LAN) network (For RCR-7WF only) 1.
When using a wireless network (Ignore this section if wired LAN Internet connection is used with RCR-7WF) 1. Turn on the radio by pressing the Power button. 2. The display will show “Starting” and then “Initializing Network”, followed by showing “Scanning” * If the radio cannot find a network then the display will say ‘No Wireless Networks Found’. If this happens then you will have to get your wireless access point working - please see the instructions supplied with it.
3. There may be more than 1 wireless networks that your radio finds. The display now shows “Select networks”. Press the Tuning+/buttons to search your wireless network. This is a name that is allocated to the access point by the person who set up the network -for example: ‘My Home Network’. When you find your wireless network, press the Select button.
Operating controls 6. If you make an error, press the Back button to delete the character entered. Use the left and right arrows to move the block cursor to access incorrectly entered characters. 7. After the final character of the WEP or WPA key has been entered, locate the ‘END’ symbol and press the Select button. The radio should now be able to connect to the network. And the display will show . 13 1.
Selecting an Internet radio station There are several thousand Internet radio stations to select, and there are 3 ways of selecting ways which are by Location, Genre and Search. Location: enables you to choose a radio station from the list first by geographic region and then by country. Genre: enables you to choose radio stations according to their content, for example Classic, Rock, Sport, News, etc.
Selecting an Internet radio station by location 1. Press the Tuning+/- buttons until the display shows , and then press the Select button to enter the Location search. 2. Press the Tuning+/- buttons until the country is shown on the display. Press the Select button to confirm your choice. The station list for that country will appear on display. 3. Press the Tuning+/- buttons. It will show all the Internet radio stations from the country you select. 4.
Selecting an Internet radio station by genre 1. Press the Tuning+/- buttons until the display shows , and then press the Select button to enter the Genre search. 2. Press the Tuning+/- buttons until the genre you would like to choose is shown on the display. Press the Select button to confirm your choice. 3. Press the Tuning+/- buttons. It will show all the Internet radio stations from the genre you select. 4. When you find the radio station you would like to listen to, press the Select button.
Selecting an Internet radio station by Search 1. Press the Tuning+/- buttons until the display shows , and then press the Select button to enter the Search. 2. Use the Tuning+/- button and the Select button to enter the key word of the radio station name you would like to search. If there is an error, press the Back button to backspace your input. 3. When you finish the key word, press the Tuning+/- button to find the word “END”. And then press the Select button. 4.
Volume control Internet radio station preset While the radio station is playing, you can change the volume by pressing Volume+/- buttons on the top panel. Storing an Internet radio station in a preset There are 5 memory presets available. Audio setting (tone control) 1. Select the required station as previously described. Your radio has bass and treble characteristics of the sound can be adjusted to your personal taste. 1.
Listening to previously broadcast material Some radio stations allow you listen to programs that have already been broadcast. When you select a radio station that has this facility, the station does not start playing immediately, but instead the display shows the options ‘Live’ and ‘On demand’. 1. Press the Tuning+/- buttons and it will show ‘Live’ or ‘On Demand’. 7. To listen from the beginning of the program, press the Select button again.
Customizing your radio on website In addition to storing your favorite radio stations in the radio presets, your radio allows you to create a customized list of stations which can appear in a special menu on the radio called ‘My Stuff’. Your radio uses Internet Radio has been programmed by a British company, Reciva Limited. Reciva allow you to register your radio on their web site, and then to associate a choice of radio stations with your radio.
Media Player Configure My Streams 1. Once logged into your Reciva website account, you can add your own Internet radio streams to the My Streams section, which is listed under the My Account section. Typically, these will be Internet radio stations that you will have found using your computer. 2. Clicking on My Streams will prompt you to enter the station’s name and its media stream URL. The media stream URL should be a link to a website’s actual audio stream.
Window Shares Set up the PC to allow your radio to access your audio files via Window Shares (make the music file shared) 1. Please ensure that your PC is available on the same network as your Internet radio. Using Windows Explorer, locate the folder where your audio files are stored. 2. Right click on the folder. 3. Select ‘Properties’. 4. Click on ‘Sharing’. 5. Select ‘Share this folder on the network’ and ‘Allow network users to change my files’.
UPnP server Set up a Windows PC to allow the radio to access your audio files via a UPnP server 1. If your PC is running Microsoft Windows XP or Windows Vista then you can use Microsoft’s Windows Media Player 11 (WMP 11) to act as your UPnP (Universal Plug and Play) media server.
5. Select the named server again using the Tuning+/- and the Select buttons. If WMP 11 is now able to communicate with your radio you will be presented with some media selection options by the server software. Note: In UPnP mode the search criteria offered and the file types made available to the radio are a function of the UPnP server software installed on your PC.
USB and SD — Local Media operation (For RCR-7 only) 1. Turn on the radio by pressing the Power button. 2. Slot in an audio USB or SD card on the side of the radio. And refer to “Operation after you set up for Window Shares, UPnP or USB/SD card” below for the operation. Note: 1. When USB and SD card are slotted into the radio together, Local Media will combine all the music as one. 2. When Slot in or un-slot either USB or SD card while the music is playing, the radio will stop playing. 3.
Operation after you set up for Window Shares, UPnP or USB/SD card Whether you access your files using Windows Shares, UPnP or USB and SD card, the file selection mechanisms are the same. The only difference is that when using UPnP you will generally have a wider choice of search criteria, as determined by the UPnP server software on your computer.
Queuing up tracks for playback later 1. If you wish to add only particular tracks from an album to the queue, first choose the album as described. Browsing the list of tracks currently queued up for playback 1. Press the Queue button, the currently playing track name will be displayed. 2. Press the Tuning+/- button to search for the required track, and then press the Select button. 2. Press the Tuning+/- buttons to see which tracks are queued up for playback.
Playing tracks in the queue repeatedly 1. When the radio is playing, press the Back button to go back to the main Mode menu. Playing tracks in random (Shuffle) order 1. When the radio is playing, press the Back button to go back to the main Mode menu. 2. Press the Tuning+/- buttons until “Media Player” is shown on the display then press the Select button to enter the Media Player menu. 2.
FM Radio To listen to the FM radio 1. Turn on the radio by press the Power button. 2. Press the Band button until the display shows . Storing a FM radio station in a preset There are 5 memory presets available. 1. Select the required station as previously described. To change FM stations 1. Press the Tuning+/- buttons to change the frequency. 2. Long press the Tuning+/- buttons to search for the next available radio station.
Auxiliary input socket Clock Setting Your radio has a 3.5mm stereo jack socket for connection to external audio sources. This can be configured to two sensitivity levels to suit the output level of the connected device. Setting the clock time 1. Long press Tine Set button until “Set Time/Date” is shown on the display. (If it is not on the display, press Tuning+/- buttons until “Set Time/Date ” is shown). 1.
DST(Auto time set by Internet) This is the function that real time set by Internet These are options available: Auto(US) – Sets your radio to the US time Auto(EU) – Sets your radio to the EU time None – Disable the auto time set Manual – manually set up 1. Press the Power button to switch on your radio. Setting the alarm clock Your radio has 2 separate alarms which can be set to wake you to either FM radio, buzzer, Aux In, or Internet Radio.
5. Press the Tuning+/- buttons to set whether the alarm is for once, everyday, weekly, weekdays or at weekends. Then press the Set button. Once - will sound at one time only Everyday - will sound everyday. Weekly - will sound once every week. Weekdays - will sound on weekdays only. Weekends - will sound on weekends only. 6. Press the Tuning+/- buttons to set whether the Alarm will sound with FM radio, buzzer, Aux In, or Internet Radio.
Sleep timer Your radio can be set to turn off after a preset time has elapsed. The sleep setting can be adjusted between 15 and 3 hours 15 minutes in 15-minute increments. 1. Make sure the radio is on and playing. Nap timer It is a countdown alarm which will sound after the time period that you set. And the time period can be set from 10 to 1 hour 30 minutes in 10 minutes steps. 1. Touch the NAP key button the required time period is shown on the display. 2.
Backlight Network configuration (For RCR-7 only) Press the Dimmer button to adjust the display backlight settings to suit your needs. Separate settings are available for Active mode (while operating the radio), Inactive mode (when listening), and Standby mode (when the radio is off with just the clock display showing). This menu enables you to configure your radio’s network settings, scan for a connection to an alternative wireless network, or to manually configure the network parameters.
Configuring the radio to use either an Ethernet or a Wi-Fi connection 1. Turn on the radio, and press the Tuning+/- button until the display shows . (If necessary, press the Back button). Then press the Select button. 2. Press the Tuning+/- buttons until it shows . Then press the Select button. 3. Press the Tuning+/- buttons until it shows . Then press the Select button. It will then attempt to establish an Ethernet connection to the network.
Troubleshooting If you have difficulty connecting the radio to your wireless network, some of these steps may help to resolve the problem: 1. Confirm that a Wi-Fi connected PC can access the Internet (i.e. can browse the web) using the same network. 2. Check that a DHCP server is available, or that you have configured a static IP address on the radio. You can configure a static IP address on the radio using the menu item “ Setting -> Network Config -> Edit Config” , and then select ‘No’ for ‘Auto (DHCP)’.
Factory reset Upgrade firmware If you wish to completely reset your radio to its initial state this may be performed by following this procedure. 1. Press the Tuning+/- buttons on the main menu (Press the Back button if necessary), until it shows . From time to time, new software features for your radio may be developed. For example, a new audio decoder may be added to allow an alternative audio format to be supported.
Headphone socket Specifications 1. A 3.5mm Headphone Socket located on the rear of your radio is provided for use with headphones. Inserting a plug automatically mutes the internal loudspeaker. IMPORTANT: Excessive sound pressure from earphones and headphones can cause hearing loss. Power AC 100 ~ 240 volts, 50 ~ 60 Hz. Connectivity Wired Ethernet Wi-Fi 10/100M bits/sec via RJ-45 802.11b and 802.11g supported WEP and WPA encryption supported Line out socket (3.
If at any time in the future you should need to dispose of this product please note that: Waste electrical products should not be disposed of with household waste. Please recycle where facilities exist. Check with your Local Authority or retailer for recycling advice.
40