
User's Manual


8
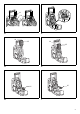
Installing or removing Cluster battery
cartridge (Fig. 6 & 7)
• To insert the battery cartridge, align the tongue on the
battery cartridge with the grove in the housing and slip
it into place.
• To remove the battery cartridge, take the battery out of
the terminal while pressing the buttons on the side of
cartridge.
Return the battery compartment locker to the original
position.
Reduced power, distortion, “stuttering sound” or when
both low battery sign and “POWERFAIL” appear on
the display are all the signs that the main battery pack
needs to replace.
Note:
The battery pack can’t be charged via the supplied AC
power adaptor.
When low battery sign appears and an “EMPTY”
keeps on flashing is the time to replace the back up
batteries.
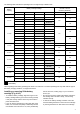
Indicating the remaining battery capacity
(Only for battery cartridges with “B” at the end of the
model number.) (Fig. 8)
Press the check button on the battery cartridge to indicate
the remaining battery capacity. The indicator lamps light
up for few seconds.
015658
NOTE:
• Depending on the conditions of use and the ambient
temperature, the indication may differ slightly from the
actual capacity.
Using the soft bended rod antenna
(Fig. 9)
Straight up the soft bended rod antenna as shown in the
figure.
Using Supplied AC power adaptor
(Fig. 10)
Remove the rubber protector and insert the adaptor plug
into the DC socket on the left side of the radio. Plug the
adaptor into a standard mains socket outlet. Whenever
the adaptor is used, the battery pack is automatically
disconnected. The AC adaptor should be disconnected
from the main supply when not in use.
Note:
When your radio has any interference in AM band by its
adaptor, please move your radio away from its AC adaptor
over 30 cm.
Operating your radio – Scan tuning AM/
FM
1. Press the Power button to switch on your radio.
2. Press the Source button to select AM or FM radio
mode.
3. Press and hold the Tuning control knob to carry out
an auto-tune. Your radio will scan up the AM/FM band
from the currently displayed frequency and will stop
scanning automatically when it finds a station of
sufficient strength.
4. After a few seconds the display will update. The
display will show the frequency of the signal found.
5. To find other station, press and hold the Tuning
control knob as before.
6. When the end of the waveband is reached your radio
will recommence tuning from the opposite end of the
waveband.
7. Rotate the Tuning control knob to adjust the sound
level as required.
Note:
• While adjusting the volume, make sure the FM/AM is
NOT flashing on the screen.
• If AM/FM is flashing on the screen, it allows you to
tune the stations manually (see the section of
“Manual tuning
– AM/ FM” for more detail).
8. To switch off your radio press the Power button .
Manual tuning – AM/FM
1. Press the Power button to switch on your radio.
2. Press the Source button to select AM or FM radio
mode.
3. Press the Tuning control knob and you will see the
FM or AM is flashing on the display.
Note:
Indicator lamps
Remaining
capacity
Lighted Off Blinking
75% to 100%
50% to 75%
25% to 50%
0% to 25%
Charge the
battery.
The battery may
have
malfunctioned.