PR-D5 GB Version 1
Important safety instructions 1. Read and understand all safety and operating instructions before the radio is operated. 2. Retain instruction: The safety and operating instructions should be retained for future reference. 3. Heed warnings. All warnings on the appliance and operating instructions should be followed. 4. Follow all operations and use instructions. 5. Water and moisture: The appliance should not be used near water.
10. Power cords: The power cord should be positioned so it is not walked on, pinched, or items placed on top of it. Pay particular attention to cords at plugs, convenience receptacles, and the point where they exit from the unit. Unplug the power cord by gripping the power plug, not the cord. Operate the radio using only the current type of power source indicated. If you are not sure of the type of power supply to your home, consult your dealer or local power company. 11.
3
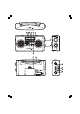
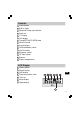
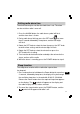
Controls 1 2 3 4 5 6 7 8 9 10 11 12 13 14 15 Power button AUX In signal Band and Tuning step selection Alarm set CT Display LCD display Tuning/SET/AUTO SEEK knob Volume Control Preset buttons FM Stereo/Mono switch AUX IN socket Earphone socket DC input socket Antenna Battery compartment LCD Display A B C D E F G Battery power Stereo display RDS display Sleep and snooze status Time set Alarm display Digital display GB 4
Setting the clock 1. Clock can be set either the radio is power on or off. 2. Press the SET knob (on the side of the radio) for more than 2 seconds, display will flash time set symbol and also the hour digits, followed by a beep. 3. Rotate the SET knob to set the required hours. 4. Press the SET knob, the minute digits will flash. 5. Rotate the SET knob to set the required minute. 6. Press the SET knob to complete time setting. Or press POWER. Operating the radio Tuning the radio 1.
Storing station presets There are 5 memory presets for each waveband – STATION PRESETS 1 to 5. 1. Press the Power button to turn on the radio. 2. Tune to required station using one of the methods previously described. 3. Press and hold the required preset until the radio beeps. The preset number will appear in the display (such as: ) and the station will be stored under chosen preset button. 4. Repeat this procedure for the remaining presets. 5.
AUX IN 1. Turn on the radio, and press the STEP/BAND button until “AUX” is displayed. 2. Connect a stereo or mono audio source (ie iPod, MP3 or CD player) to the Aux in socket on the side of the radio. And the AUX-IN light will be on. 3. Adjust the Volume control on your iPod, MP3 or CD player. Setting the radio alarm 1. To activate the alarm, press and hold the ALARM button for more than 2 seconds and it will beep and the display will show “ALARM”. 2.
Setting radio alarm time The alarm time may be set after the clock time is set. The alarm can be set either radio is on or off. 1. Press the ALARM button, the radio alarm symbol will flash, and the alarm time is shown. 2. During radio alarm flashing, press the SET knob for more than 2 seconds followed by a beep tone, and the hour digits will flash. 3. Rotate the SET knob to select the hour then press the SET knob to confirm hour setting, and the minute digits will flash. 4.
Setting tuning step Why setting tuning step? There are different tuning steps for different countries. If you buy the radio in Europe and intend to use it in America, includes Latin America, the tuning step should be switched. 1. When radio is off, long press the STEP/BAND button until it beeps and “24 HOUR” flashes. Then rotate the TUNING knob to switch 24/12 hour system. 2. Press the STEP/BAND button and then rotate the TUNING knob to switch MW (AM) step which is MW 9KHz or MW 10 KHz.
Specifications Power Requirements AC Power adaptor DC 9V 700mA center pin positive Batteries 6 X UM-2 ( C size ) Battery Life Approx . 70 hours of listening for 4 hours A day at normal volume using alkaline cells Frequency Coverage FM 87.50 – 108 MHz AM 522 – 1629 kHz ( 9 kHz /step) or AM 520 – 1710 kHz ( 10 kHz/step ) Circuit Feature Loudspeaker 2.5 inches 8 ohm Output Power 800 + 800 mW Headphone socket 3.5 m dia.