RCR-22 GB Version 1
Important safety instructions 1. Read these instructions. GB 2. Keep these instructions. 3. Heed all warnings. 4. Follow all instructions. 5. Do not use this apparatus near water. 6. Clean only with dry cloth. 7. Do not block any ventilation openings. Install in accordance with the manufacturer’s instructions. 8. Do not install near any heat sources such as radiators, heat registers, stoves, or other apparatus (including amplifiers) that produce heat. 9.
11. O n l y u s e a t t a c h m e n t s / a c c e s s o r i e s s p e c i f i e d b y t h e manufacturer. 12. Use only with the cart, stand, tripod, bracket, or table specified by the manufacturer, or sold with the apparatus. When a cart is used, use caution when moving the cart/apparatus combination to avoid injury from tip-over. 13. Unplug this apparatus during lightning storms or when unused for long periods of time. 14. Refer all servicing to qualified service personnel.
17. Apparatus shall not be exposed to dripping or splashing and no objects filled with liquids, shall be placed on the apparatus. GB 18. Excessive sound pressure on ear- and headphones could impair the hearing ability. Higher setting that idle on the equalizer leads to higher signal voltages on the output for ear and headphones. 19.
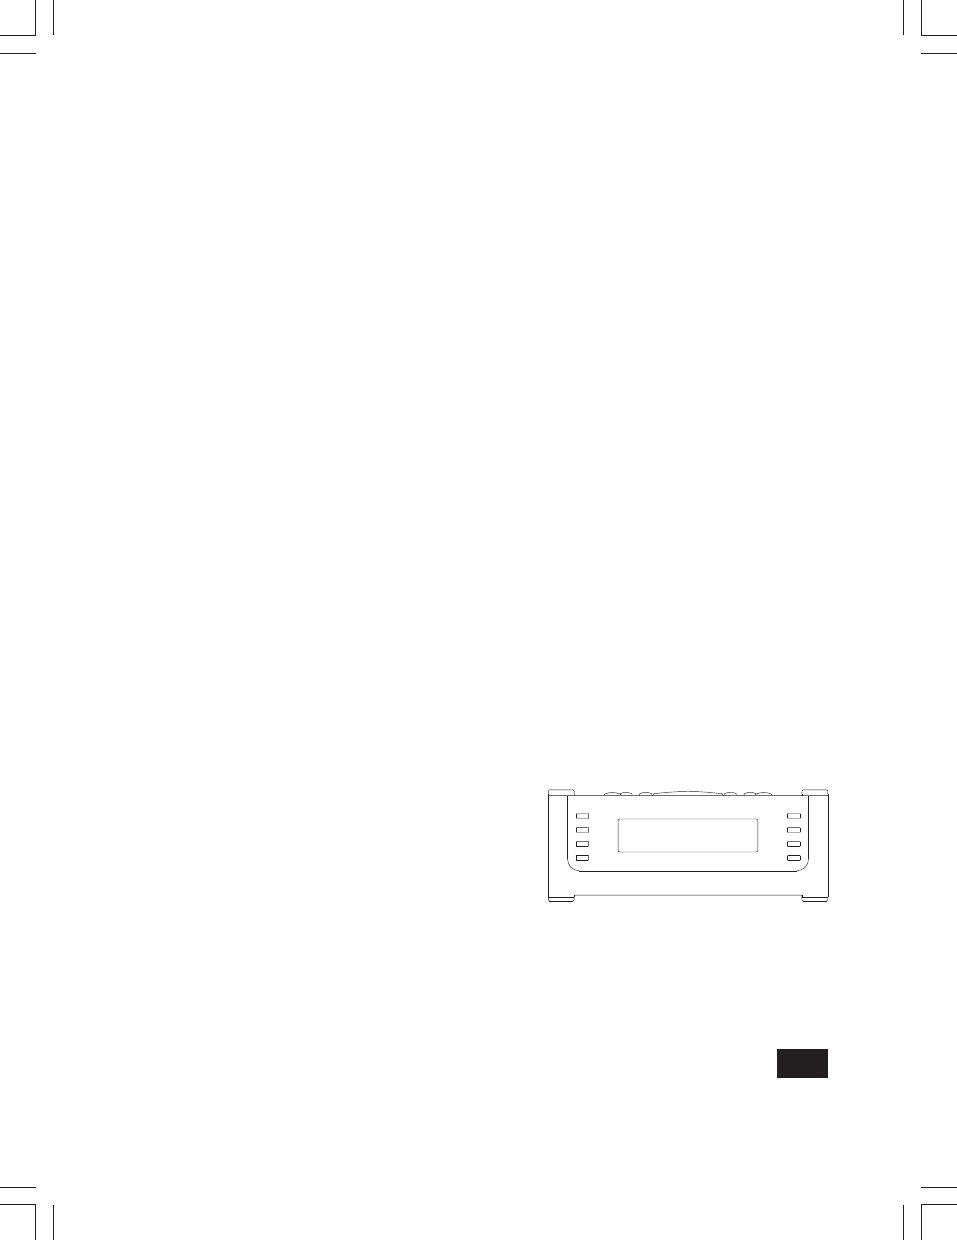
Controls Menu button 2 Preset button 3 Tuning up / down button / Snooze button 4 Band / Select button 5 Time capsule 6 Date button 7 Time button 8 Alarm 2 button 9 Alarm 1 button 10 Display 11 Power button / Sleep button 12 Nap button 13 Info button 14 Light button 15 Reset button 16 Light level control 17 Aux in socket 18 Headphone socket 1 GB
LCD display A B C D E F G H I J K Time and frequency indicator Radio-controlled time signal RDS indicator Sleep / Snooze indicator Nap indicator Alarm 1 with buzzer alarm indicator Alarm 1 with radio alarm indicator Alarm 2 with buzzer alarm indicator Alarm 2 with radio alarm indicator FM stereo indicator Signal level indicator
Using the clock radio for the first time 1. Place your clock radio on a flat surface. GB 2. Fully extend the wire aerial located on the rear of your clock radio. Place the wire antenna so that it is straight as possible extending either above or below the radio. 3. Insert the adaptor plug into the AC socket located on the rear of your clock radio. The display will show "time zone" for a few seconds and then the display will ask you to set your time zone.
Clock Manual clock setting (only if automatic setting fails) 1. Press and hold the Time button to enter the clock setting, and the hour digits will flash on the display. 2. Press the Tuning up or down button to adjust the hours. Then press the Band/Select button to confirm the setting. The minute digits will flash on the display. 3. Press the Tuning up or down button to adjust the minutes. Then press the Band/Select button to confirm the setting. Now the clock setting is completed.
Change 12/24 hour clock format 1. Press the Menu button to enter the setting. GB 2. Press the Tuning up or down button until ‘CLOCK 24H’ is highlighted on the display. Press the Band/Select button to enter the setting. 3. Press the Tuning up or down button to choose 12/24 hour clock format. Press Band/Select button to confirm the setting. Change date format 1. Press the Menu button to enter the setting. 2. Press the Tuning up or down until date format is highlighted on the display.
Radio operation Tuning into radio stations There are 3 ways of tuning your radio: A. Manual tuning 1. Press the Power button to turn on your radio. 2. Press the Band button repeatedly to select AM (MW) or FM waveband. 3. Press the Tuning up or down button to change the frequency. B. Scan tuning 1. Press the Power button to turn on your radio. 2. Press the Band button repeatedly to select AM (MW) or FM waveband. 3. Press and hold the Tuning up or down button.
C. Presetting and recalling stations Presetting stations: 1. Press the Power button to turn on your radio. GB 2. Press the Band button repeatedly to select AM (MW) or FM waveband. 3. Tune into the station that you would like to preset following the steps above. 4. There are 7 preset buttons from 1 to 7. Press and hold one of preset buttons until the radio beeps, and the station frequency will be saved into the chosen preset. 5. Repeat the procedure for the remaining presets.
Setting up the tuning step increment 1. Press the Menu button to enter the menu setting when the radio source is in AM/FM mode. 2. Press the Tuning up or down button until FM xxkHz or AM xxkHz appears on the display, and press the Band/Select button to enter the step increment setting. 3. Press the Tuning up/down button to select 50kHz/100kHz for FM radio, and 9kHz/10kHz for AM radio. Then press the Band/ Select button to confirm the setting.
1. Press the Info button to cycle through the various modes. a. Station name Displays the name of the station being listened to. b. Programme Type Displays the type of station being listened to e.g. Pop, Classic, News, etc. c. Radio text Displays radio text message such as, new item etc. GB If there is no RDS data available (or if the signal is too weak) then the radio will display only the FM frequency.
3. Press the TUNING up/down button until DCF77 (European version), WWVB (US version) or JJY40/60 (Japan version) appeared on the display. Press the Band/Select button to confirm the setting. And the clock time of the radio will set up automatically to the Radio-controlled clock time. 4. If the radio-controlled clock signal is being received by the radio, the radio-controlled time icon will flash on the display at an internal of 1 second.
2. Press the Tuning up/down button until a clock symbol appears on the display. Press the Band/Select button to enter the setting. GB 3. Press the Tuning up/down button until RDS CT (or ‘RBDS CT’ in the US ) appears on the display. Press the Band/Select button to confirm the setting. The clock time of the radio will set up automatically according to the RDS data received. 4. When the action is completed, the RDS icon will appear on the LCD display indicating the radio time is RDS clock time.
Alarm operation There are two alarms which can each be set to wake you to AM/ FM radio or buzzer alarm. The alarms may be set while the unit is in standby mode or while playing. When the alarm light is on, it means the indicated alarm will active in 24 hours. Ensure that the time is set correctly before setting the alarms. 1. Before setting an alarm ensure the clock time is set. Press and hold any of the Alarm button to enter the alarm setting (e.g. Alarm 1 button to enter the alarm 1 setting). 2.
4. Press the Tuning up/down to choose the required alarm type, and then press the Band/Select button to confirm the setting. The alarm can be set to buzzer, FM or AM. When radio mode is selected, the radio frequency and the preset number on the display will begin to flash. Press the Tuning up/down to adjust the required radio frequency or the required preset number for the radio alarm, then press the Band/ Select button to confirm the setting. 5.
Snooze 1. When the alarm sounds, press any button other than the Standby button will silence the alarm for 5 minutes. “ ’ will appear on the display. 2. To adjust the silence time for the snooze timer, press the Menu button to enter the menu setting. 3. Press the Tuning up/down until “SNOOZE X” shown on the display, then press the Band/Select button to enter the setting. Press the Tuning up/down button to adjust the silence time. There are 5, 10, 15 and 20 minutes for the snooze timer.
3. Your radio will switch off automatically after the preset Sleep Timer has elapsed. The Sleep Timer icon will show on the display indicating an active Sleep Timer. 4. To cancel the Sleep Timer function before the preset time has elapsed, simply press and release the Standby button to turn the unit off manually. Nap timer 1. Press the Nap timer button to enter the menu setting. Keep holding the Nap timer button and the options will start switching on the display from 5 to 120 minutes.
Time zone setting Your radio can set up the time zone for its radio clock time. 1. Press the Menu button to enter the menu setting. 2. Press the TUNING up/down button until ‘TIME ZONE’ appears on the display. Press the SELECT button to enter the setting. 3. Press the TUNING up/down button to choose the Time zone setting for your area, then press the SELECT button to confirm the setting.
Loudness You can get compensation on lower and higher frequency for your radio by adjusting the Loudness function. GB 1. Press the Menu button to enter the menu setting. 2. Press the Tuning control until ‘LOUD ON or OFF’ appears on the display. Press the Select button to enter the setting. 3. Press the Tuning up/down button to choose ON to turn on the loudness function, then press the Select button to confirm the setting. 4.
Factory reset If your radio fails to operate correctly, or some digits on the display are missing/incomplete or you simply just want to restore to original factory setting, carry out the following procedure. 1. Press the Menu button to enter the menu setting. 2. Press the Tuning up/down button until “FACTORY” shown on the display. Press the Select button to enter the setting. 3. Press the Tuning up/down button to select ‘YES’, and press the Select button to confirm the setting .
Auxiliary input socket A 3.5mm stereo Auxiliary Input socket is provided on the left hand side of your radio to permit an audio signal to be fed into the unit from an external audio device such as iPod, MP3 or CD player. 1. Repeatedly press and release the Band button until AUX IN is shown. 2. Connect an external audio source (for example, iPod, MP3 or CD player) to the Auxiliary Input socket. 3.
Specifications Power supply: 120 Volt/60 Hz (USA version); 230 Volt/50Hz (Europe version) Output power: 800 mW (max) Power consumption: 7W (max) Frequency coverage: FM 87.5 – 108.0 MHz AM 520 – 1710 kHz (USA version); AM 522 – 1710 kHz (Europe version) The company reserves the right to amend the specification without notice. If at any time in the future you should need to dispose of this product please note that: Waste electrical products should not be disposed of with household waste.