
Use and Care Manual


6
GENERAL
SANIMARIN
®
is a WC equipped with a pump/macerator
which installed and used correctly will give reliable and
consistent service for many years. SANIMARIN
®
is for
marine or mobil unit use. Please follow these installation
instructions, paying attention to the following warnings;
« » Possible danger to personnel,
«
» Warning of possible electrical hazard,
«WARNING» Possible danger of damage to the macerator.
THIS DEVICE MAY BE USED BY CHILDREN WHO ARE
AT LEAST 8 YEARS OLD, BY PEOPLE WITH REDUCED
PHYSICAL, SENSORY OR MENTAL CAPACITIES OR THOSE
WITHOUT KNOWLEDGE OR EXPERIENCE, IF THEY ARE
PROPERLY SUPERVISED AND IF THE INSTRUCTIONS
RELATING TO USING THE DEVICE COMPLETELY SAFELY
HAVE BEEN GIVEN TO THEM AND THE ASSOCIATED
RISKS HAVE BEEN UNDERSTOOD. CHILDREN MUST NOT
PLAY WITH THE DEVICE. CLEANING AND MAINTENANCE
UNDERTAKEN BY THE USER MUST NOT BE CARRIED OUT
BY UNSUPERVISED CHILDREN.
The electricity supply to the SANIMARIN
®
must be
connected directly to the boat’s electrical switchboard,
and it must be used solely for that equipment. It is advisable
to add a 25 A fuse in a 12 Volt system, and a 15 A fuse in a
24 Volt system.
APPLICATION
SANIMARIN
®
LUXE uses an electronic keyboard
L
which
operates as follows;
• STANDARD Operation: press the NORMAL pad on the
control console. Cycle time 19 secs.
Water consumption: 2.2 lit.
• ECO Cycle: press the ECO pad on the control console.
Cycle time 10 secs.
Water consumption: 1.2 lit.
• DRAINING Cycle: press continuously the EMPTY pad on
the control console.
• Adjustment of the cycle of rinsing
The rinsing time during the “Normal” cycle can be
programmed, to add up to a further 5 seconds. The cycle
time thus varies between 19 seconds and 24 seconds, and
water consumption varies between 2.2 l and 3 l.
To enter the programming mode: press the “Normal” and
“Eco” keys at the same time for at least 5 seconds.
The red LED flashes for 5 seconds and then goes out.
To increase rinsing time by 1 second: press the “Normal”
key = 1 beep (press 5 times at most).
To reduce rinsing time by 1 second: press the “Eco”
key = 1 beep.
To exit the programming mode automatically: no keys
pressed for 5 seconds = the green LED comes on.
The water consumption programmed remains in the
memory even after the unit has been disconnected from
the power supply.
• Management of the black water holding tank
LEDs and Buzzer: Depend on the status of the “Holding
Tank” high level switch (optional connection to the electro-
nic box
6b
).
Normal level: Green LED on, red LED off. Buzzer silent and
all cycles authorized.
High level reached: Green LED off, red LED flashing =
“Full” message visible, + Beeps when a key is pressed.
3 further cycles allowed. Pressing “Normal” for 5 seconds
will return cycles to normal operation.
SANIMARIN
®
COMFORT PLUS is commanded by a
pneumatic pushbutton that triggers an automatic flushing/
maceration-discharge/flushing cycle. The cycle
is controlled by an electronic box; it lasts 19 sec and
consumes 2.2 litres of water.
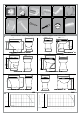
3
DIMENSIONS
(see drawing n° 3 page 2)
4
TECHNICAL DATA
Applications discharge of a WC
Max. vertical evacuation 3 m
Max. horizontal evacuation 30 m
Nominal power 300 W in 12 V version
360 W in 24 V version
Electrical class III
Isolation level IPX4
Net weight
SANIMARIN
®
31 17 Kg
SANIMARIN
®
35 21 Kg
SANIMARIN
®
35 ST 21 Kg
SANIMARIN
®
Bidet 35 23 Kg
SANIMARIN
®
Exclusive Medium 26 Kg
SANIMARIN
®
Exclusive Short 21 Kg
CAUTION : This product should not be used for any other
purpose other than that described here. The minimum
discharge pipe inner diameter should be 19mm.
5
PERFORMANCE CURVE
(see drawing n° 5 page 2)
UK
2
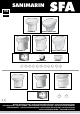
LIST OF ACCESSORIES INCLUDED
(see drawing n° 2)
Tools required to fit a SANIMARIN
®
• A drill
• A jigsaw
• An electric screwdriver
SANIMARIN
®
COMFORT is commanded by a two-posi-
tion switch:
• Add water: bowl flushing command
• Pump out: maceration and discharge command
Use:
1/ FLUSH: (Add Water) recommended water level: halfway
up the bowl
2/ DISCHARGE: (Pump out)
3/ FLUSH: (Add Water) to fill the bottom of the bowl with
water
Note 1: In rough seas, empty the bowl (using the pump out
position) to avoid spillage
Note 2: No automatic cycle
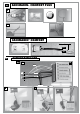
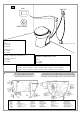
6
INSTALLATION GUIDE
6a
FIXING BOWL TO THE FLOOR
a – Draw the outline of the base on the floor, in the area
around the fixing holes in the ceramic bowl.
b – Measure 15 mm from the outline drawn, position the
brackets
A
and drill through the middle of the holes.
c – Screw the brackets in place, leaving them loose, they
will be tightened once the bowl has been fitted.
d – Fit the bowl.
Note: wait until all the connections have been made
before fixing the bowl definitively in place.
Note: on the SANIMARIN
®
35, there is only one bracket,
in the front. The two screws at the back are placed verti-
cally.