
Use and Care Manual


7
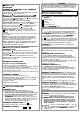
DISCHARGE PIPE
Caution: Please check local legislation regarding dis-
charge from on board toilets- i.e. holding tanks etc.
SANIMARIN
®
macerates and pumps at the same time.
A seacock 3 should be fitted where the SANIMARIN
®
discharges through a skin fitting. (see drawing
7
)
2
Caution: For units installed below the water line, the
discharge pipe should rise at least 50 cm above water
level and be fitted with an anti-syphon valve 4 prior to
falling and discharging through the skin fitting.
SANIMARIN
®
does not require the use of chemicals in
order to operate.
8
COMMISSIONING
Open the water admission valve fully to ensure a good
bowl rinse.
SANIMARIN
®
LUXE STANDARD Cycle
Press pushbutton NORMAL and after approximately
9 seconds of flush cycle, the pump will start and run for
approximately 6 seconds to clear the bowl and then it takes
4 seconds to reprime the bowl.
Throw several sheets of toilet tissue into the bowl and repeat
the cycle. The bowl should completely clear.
Repeat the cycle again.
SANIMARIN
®
LUXE ECO Cycle
Press pushbutton ECO and after approximately
3 seconds of flush cycle the pump will start and complete
the discharge within a further 3 seconds and then it takes 4
seconds to reprime the bowl.
SANIMARIN
®
COMFORT PLUS: press pushbutton and
after approximately 9 seconds of flush cycle, the pump will
start and run for approximately 6 seconds to clear the bowl
and then it takes 4 seconds to reprime the bowl. Throw
several sheets of toilet tissue into the bowl and repeat the
cycle.
The bowl should completely clear. Repeat the cycle again.
SANIMARIN
®
COMFORT: press Add water until the
water level is about halfway up the bowl (about 9 sec), put
some pieces of toilet paper in the bowl, Pump out (about 6
sec) and then Add water (about 4 sec)
Note: We recommend compliance with the time lapses
shown above.
9
USAGE
SANIMARIN
®
can be used like any normal toilet and does
not require any particular maintenance.
Caution 1
Only the disposal of toilet papers, fecal
matter, and waste water will be under guarantee.
Any damage due to foreign bodies such as cotton,
condoms, sanitary towels, wet wipes food, hair, or
liquids such as oils, solvent products,… will not be
under guarantee.
Caution 2
If away for a long period (holiday,…) or in the
event of a long interruption of electricity, the water and
electricity supplies to the SANIMARIN
®
should be
switched off.
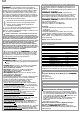
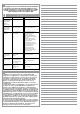
6b
CONNECTING THE WASTE PIPE AND THE WATER
SUPPLY PIPE
EVACUATION
SANIMARIN
®
35, SANIMARIN
®
35 ST, SANIMARIN
EXCLUSIVE MEDIUM,
connect the 38/38 mm diameter bend
Q
or the 38/25 mm
diameter bend
Q’
to the check valve
U
and the waste pipe, and then fix in place with clip
D
.
SANIMARIN 31, SANIMARIN EXCLUSIVE SHORT:
Connect the elbow diameter 38/38 mm
Q
or the elbow dia-
meter 38/25 mm
Q’
to the rubber
drainpipe (adjustable height: see diagram 6b).
Horizontal Outlet option: remove the rubber pipe from its
fitting, install the check valve
U
(accessory supplied),
making sure that the arrow is placed uppermost, and then
fix it in place using two collars
D
, see diagram 6b.
Note: Connect the pump to the electronic box
R
.
1
Water supply pipe. To be connected to a seawa-
ter pump (supplied as an option), or to the pressurized
onboard
freshwater system. The pressure in the system must be at
least 1.7 bar.
Safety: To ensure that your installation is safe under all
heeling conditions, put a loop in the feeder and waste
pipes, with a high point 50 cm above the waterline. Fit a
ventilation valve at the high point of each loop.
Note: it is possible to fit a seawater pump other than the
pump supplied as an option, provided that the current
requirement is not more than 16 A.
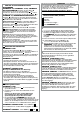
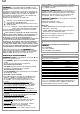
6c
FITTING THE CONTROL TOUCHPAD
SANIMARIN
®
LUXE
The touchpad
L
must be fitted in a position where
it does not interfere with use of the seat and cover, and it
must not be placed more than 1.50 m from the electrical
control box
R
.
Cut out a rectangle measuring 80x50 mm from the
bulkhead. Fix the keyboard in a horizontal position and
clip the frame into place.
SANIMARIN
®
COMFORT PLUS
Fitting the one-piece PUSHBUTTON:
• Drill out a 33 mm hole in the bulkhead.
• Insert the pushbutton and screw on the locknut supplied.
• Connect the plastic tube to the pushbutton.
• Connect the other end of the tube to the electronic box,
after fixing it nearby (see d’).
• Wire up the electronic box as shown on the label (see d).
SANIMARIN
®
COMFORT
• Panel cut-out: rectangle 40 mm x 25 mm.
• Fitting the switch: Cut out a rectangle in the bulkhead, to
the measurements shown above.
• Fix the holder supplied in place with screws, and then
insert the switch.
• Wire up the switch (6d).
6d
ELECTRICAL CONNECTIONS
SANIMARIN
®
LUXE
a - Fix the box
R
in a dry, protected location.
b - Connect the cable from the touchpad to the box
Caution: do not connect battery, power source in to
the control panel connection on the electronic box.
c - Insert and connect the electrical wiring from the
SANIMARIN
®
to the electrical box. Lastly, connect the
electrical box to the battery, making sure that the cross-
section of the wires is sufficient (2.5 sq. mm up to 3 m
and larger if a greater length is required).
SANIMARIN
®
COMFORT PLUS - see
d
.
Wire up the electronic box as shown on the label.
SANIMARIN
®
COMFORT - see
a
b
and
c
.
The electricity supply to the SANIMARIN
®
must be connec-
ted directly to the boat’s electrical switchboard, and it must
be used solely for that equipment. It is advisable to add a 25
A fuse in a 12 Volt system, and a 15 A fuse in a 24 Volt sys-
tem.
Make sure the wires are connected correctly:
Red wire = positive (+) terminal,
black wire = negative (-) terminal
6e
FITTING AND CONNECTING THE SEAWATER PUMP
(OPTION
1
Seawater filter
2
Suction
3
Discharge
4
From the hull valve
…
5
…
to the SANIMARIN
®
toilet.