
System information


TowerSTOR TS4CT System Setup
Page 5
2 System Setup
2.1 Hard Drive Assembly
The drives can be installed at any position, there is no specific order required. Be careful not to
damage any components, and do not force the drives into place. If they don’t slide in properly,
make sure the drives have been installed correctly.
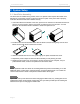
1. Unlock the switch at the bottom of the case, push the inner chassis from the back until the front
panel is out of the housing, pull the front panel out and then lift it up to remove it. Turn the
screws on the cassettes counter-clockwise to loosen and pull them out.
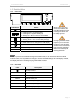
2. Install the hard drive as illustrated below with the SATA connector facing away from the front.
Mount the drive with the six screws from the side.
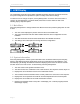
3. Slide the cassette back into the case, push it lightly into place and fasten the screw.
4. Repeat the previous steps for each hard drive cassette you are planning to install.
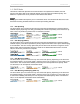
5. Replace the front panel, turn on the power, connect the drive to your computer, set your
preferred RAID mode, create a new partition and format the drives.
Note
It is not possible to add more drives to an existing RAID array without re-formatting it. To add
additional drives at a later point, install the drive(s), change the RAID mode or re-confirm the
current mode and then create a new partition and format the drives again.
Important
Upon initial start up of the device and when changing the RAID mode, any existing data on the
installed hard drives will be erased. Please make sure you backup all data prior to installing the
hard drives and prior to changing the RAID mode!