
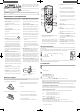
Operation Manual


1. To connect the TV to a VCR
2. To connect the TV to a TV Game
The TV can also be used as a display device for many video games. However, due to the wide variety of
different types of signal generated by these devices and subsequent hook-up variations required, they have
not all been included in the suggested connection diagrams. You’ll need to consult each component’s Owner’s
Manual for additional information.
3. To connect the TV to a camcorder
To playback from the camcorder, connect the camcorder to the TV as shown.
In case of “AUTO SHUT OFF” is “ON”, if a station being viewed stops broadcasting, the TV will automatically
shut itself off after 15 minutes.
Press MENU/ENTER.
Press
or
until the indicator next to “AUTO SHUT OFF” begins to fl ash, then press
or
to
select ON or OFF.
Press EXIT to return to the normal screen.
AUTO SHUT OFF
Press MENU/ENTER.
1
Press MENU/ENTER.
1
Press MENU/ENTER.
select ON or OFF.
2
Press EXIT to return to the normal screen.
3
Press EXIT to return to the normal screen.
3
Press EXIT to return to the normal screen.
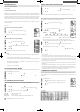
You can adjust the settings for color, sharpness, contrast, brightness and tint.
Press MENU/ENTER.
Press
or
until the indicator next to “PICTURE” begins to fl ash, t
hen press
.
Press
or
repeatedly to select the item you want to adjust.
Press
or
to adjust the setting.
Press EXIT to return to the normal screen.
ADJUSTING PICTURE
BRIGHTNESS
CONTRAST
COLOR
TINT
SHARPNESS
+
increase brightness
increase contrast
be brilliant color
be greenish color
decrease brightness
decrease contrast
be pale color
be reddish color
makes picture softer
makes picture
clearer
–
Press MENU/ENTER.
1
Press MENU/ENTER.
1
Press MENU/ENTER.
2
Press
3
Press
3
Press
Press
4
Press
4
Press
CONTRAST
COLOR
BRIGHTNESS
TINT
SHARPNESS
Press EXIT to return to the normal screen.
5
Press EXIT to return to the normal screen.
5
Press EXIT to return to the normal screen.
AUTOMATIC CHANNEL MEMORY
Press MENU/ENTER.
Press
or
until the indicator next to “CH SETUP” begins to fl ash,
then press
.
Press
or
until the indicator next to “AUTO CH MEMORY” begins
to fl ash, then press
. The TV will begin memorizing all the channels available
in your area.
After fi nishing Analog Tuning, Digital Tuning starts automatically.
NOTES:
• It may take from 15 minutes to 30 minutes to complete memorizing digital cable channels. Depending on the
reception condition, a BAR display may not advance for several minutes.
• Memorizing channels is best accomplished during evening “PRIMETIME” hours, as more stations are
broadcasting digital signals. Memorizing channels can only be accomplished while a station is broadcasting
a digital signal to set that channel into momory.
• If you are unsure of the digital channels available in your area you may visit
www.antennaweb.org
www.antennaweb.org
to receive
a list based on your address or zip code. Should you require further assistance you may call our toll-free
customer service line at 1-800-289-0980.
TO ADD/DELETE CHANNELS (ANALOG MODE)
Pr
ess MENU/ENTER in the analog mode.
Press
or
until the indicator next to “CH SETUP” begins to fl ash,
then press
.
Press
or
until the indicator next to “ADD/DELETE” begins to fl ash,
then press
.
Select the desired channel to be memorized or deleted using or .
Press or to select “ADD
” or
“DELETE”, whichever function you want to perform.
Repeat steps 4 for other channels you wish to add or delete, then press MENU/ENTER.
Press EXIT to return to the normal screen.
TO ADD/DELETE CHANNELS (DIGITAL MODE)
Press MENU/ENTER in the digital mode.
Press
o
r
to select DIGITAL SETUP, then press
.
When DIGITAL SETUP menu appears, press
o
r
to select
ADD/DELETE
and press
.
Press
o
r
to select ADD/DELETE, then press
.
Select the desired channel to be memorized or deleted using
or
.
Press
or
select “ADD” or “DELETE”, whichever function you want to perform.
Repeat step 4 for other channels you wish to add or delete,
then press MENU/ENTER.
Press MENU/ENTER until the menu screen is cleared.
TO ADD A DIGITAL CHANNEL
Select the channel you want to add. Press
o
r
to select “ADDING CHANNEL” as in step 4 above, then
press
.
Select the desired channel to be memorized or deleted using
4
Select the desired channel to be memorized or deleted using
4
Select the desired channel to be memorized or deleted using
Repeat steps 4 for other channels you wish to add or delete, then press MENU/ENTER.
5
Repeat steps 4 for other channels you wish to add or delete, then press MENU/ENTER.
5
Repeat steps 4 for other channels you wish to add or delete, then press MENU/ENTER.
1
Press
2
Press
2
Press
Press
3
Press
3
Press
Press MENU/ENTER in the digital mode.
1
Press MENU/ENTER in the digital mode.
1
Press MENU/ENTER in the digital mode.
Press
4
Press
4
Press
Select the desired channel to be memorized or deleted using
5
Select the desired channel to be memorized or deleted using
5
Select the desired channel to be memorized or deleted using
Press
2
Press
2
Press
When DIGITAL SETUP menu appears, press
3
When DIGITAL SETUP menu appears, press
3
When DIGITAL SETUP menu appears, press
Repeat step 4 for other channels you wish to add or delete,
6
Repeat step 4 for other channels you wish to add or delete,
6
Repeat step 4 for other channels you wish to add or delete,
Press EXIT to return to the normal screen.
6
Press EXIT to return to the normal screen.
6
Press EXIT to return to the normal screen.
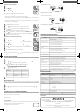
The exact arrangement you use to interconnect various video and audio components to the TV is dependent
on the model and features of each component. Check the Owner’s Manual provided with each component for
the location of video and audio inputs and outputs.
The connection diagrams below are offered as suggestions. You may need to modify them to accommodate
your particular assortment of components. The diagrams are intended to show component video and audio
interconnections only.
Press the TV/AV selector button to select the AV mode to use the TV as a monitor. Operate your VCR as usual.
TV/AV SELECTION
If you connect the TV to a VCR, camcorder or TV game, through the audio/video in jacks, use the TV/AV button
to make your selection.
Press the TV/AV button repeatedly to select the desired mode.
“AUX” will display on the screen for 4 seconds.
CONNECTION TO OTHER EQUIPMENT
Press
3
Press
3
Press
Press MENU/ENTER.
1
Press MENU/ENTER.
1
Press MENU/ENTER.
Press
2
Press
2
Press
7
AUDIO IN
VIDEO IN
Front of TV
To AV OUT
jack
(not supplied)
(not supplied)
(not supplied)
To AUDIO/VIDEO
OUT
Front of TV
Front of TV
VCR
VCR
AUDIO IN
AUDIO IN
VIDEO IN
To AUDIO/VIDEO OUT
To AUDIO/VIDEO OUT
(not supplied)
(not supplied)
AUDIO IN
AUDIO IN
VIDEO IN
Front of TV
Front of TV
ACCESSORY
Remote Control
SPECIFICATIONS
AC Power Input:g
AC Power Consumption:
Chassis Construction:
Picture Tube:
Horizontal resolution:
Audio Power Output Rating:
Speaker:
Tuner Type:
Remote Control:
Receiving Channels:
Antenna Input Impedance:
Input:
Dimensions:
Weight:
Weight:
120V, 60Hz
Operation: 60 Watts
Stand by: 3 Watts
IC Solid state
13" (measured diagonally)
260 lines
1.0 Watts
3" Full Range, 8 ohm
NTSC Standard
ATSC Standard (8VSB), QAM
Infrared, Direct Access, 2 × AAA batteries
VHF 2-13
UHF 14-69
CATV 01-97 (5A)-(A-3)
98-99 (A-2)-(A-1)
14-22 (A)-( I )
23-36 (J)-(W)
37-65 (AA)-(FFF)
66-125 (GGG)-(125)
75 Ohm (VHF/UHF/CATV) Coaxial Input
Video: 1.0 Vp-p 75 ohm
Audio: 300 mV, 47k ohm
362 mm (W) × 360 mm (D) × 320.5 mm (H)
(14-1/4" (W) × 14-3/16" (D) × 12-5/8" (H))
20.9 Ibs (9.5 kg)
Operation: 80 Watts
Stand by: 3 Watts
19" (measured diagonally)
488 mm (W) × 465 mm (D) × 416 mm (H)
(19-3/16" (W) × 18-5/16" (D) × 16-3/8" (H))
38.6 Ibs (17.5 kg)
DTV1300
Model
DTV1900
Before requesting service, please refer to the following chart for the symptom and possible solution.
TROUBLESHOOTING GUIDE
SYMPTOMS
TV does not operate.
Poor sound or no sound.
Poor picture or no picture.
Horizontal or diagonal bars
on screen.
• Select proper language in the menu options.
No CATV reception.
Picture wobbles or drifts.
Poor color or no color.
Poor reception on some
channels.
• Make sure the power cord is plugged in.
• Try another AC outlet.
• Make sure the power cord is plugged in.
• Try another AC outlet.
• Make sure the power cord is plugged in.
• Power is off, check fuse or circuit breaker.
• Unplug unit fo
r an hour, then plug it back in.
• Station or CATV experiencing problems, tune to another station.
• Check sound adjustments (Volume and Mute).
• Station or CATV experiencing problems, tune to another station.
• Check sound adjustments (Volume and Mute).
• Station or CATV experiencing problems, tune to another station.
• Check for sources of possible interference.
• Station or CATV experiencing problems, tune to another station.
• Make sure channels are set into memory.
• Check antenna or CATV connections, adjust antenna.
• Check for sources of possible interference.
• Check picture control adjustments.
• Check all CATV connections.
• Set TV/CATV menu option to the CATV mode.
• Station or CATV system problems, try another station.
• Check antenna connections, adjust or re-direct antenna.
• Check for sources of possible interference.
• Batteries are weak, dead or inserted incorrectly.
• Remote is out of range, move closer to TV (within 15 feet).
• Make sure Remote is aimed at sensor.
• Confi rm there are no obstructions between the Remote and the TV.
• Make sure the power cord is plugged in.
No Remote operation.
TV shuts off.
POSSIBLE SOLUTIONS
No reception above
channel 13.
Closed - Caption is not
activated.
Display is not shown in
your language.
Digital broadcasting screen
problem.
• Check antenna, adjust antenna.
• Station or CATV experiencing problems, tune to another station.
• Make sure channels are set into memory.
• Station is weak, adjust antenna to receive desired station.
• Check for sources of possible interference.
• Station or CATV experiencing problems, tune to another station.
• Make sure channels are set into memory.
• Check picture control adjustments.
• Check antenna or CATV connections, adjust antenna.
• Check for sources of possible interference.
• Station or CATV experiencing problems, tune to another station.
• Make sure channels are set into memory.
• CATV company is scrambling signal.
• Adjust antenna.
• Make sure TV/CATV menu option is in the appropriate mode.
• If using antenna, check UHF antenna connections.
• No broadcast on station tuned.
• Sleep Timer is set.
• Power interrupted.
•
TV station experiencing problems or program tuned is not closed captioned.
Try another channel.
•
Check CATV connection or VHF/UHF antenna, reposition or rotate antenna.
• Press CLOSED CAPTION button to turn on the closed caption decoder.
R
FOR CUSTOMER SERVICE,
ADDITIONAL SET-UP OR
OPERATING ASSISTANCE
PLEASE CALL:
1-800-289-0980
TO ORDER ACCESSORY PARTS
OR LITERATURE
PLEASE CALL:
1-888-369-0304
WHEN CALLING CUSTOMER SERVICE — PLEASE HAVE YOUR MODEL NUMBER READY
OR WRITE TO:
ORION SALES, INC.
3471 N. UNION DR.
OLNEY, ILLINOIS 62450
FOR INFORMATION ON OUR OTHER PRODUCTS, PLEASE VISIT OUR WEBSITE AT
www.orionsalesinc.com