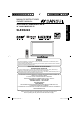
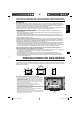
MANUAL DE INSTRUCCIONES OWNER’S MANUAL ESPAÑOL TELEVISOR DEL PANORÁMICO DE 32” 32” CLASS WIDE LED TV ENGLISH SLED3228 ATENCION ATTENTION Si usted ha comprado un control remoto universal, por favor comunicarse con el fabricante para el código de programación requerido. If you purchase a universal remote control from your local retailer, please contact the remote manufacturer for the required programming code.
ESPAÑOL PRECAUCIÓN NO ABRIR, PELIGRO DE DESCARGA ELÉCTRICA PRECAUCIÓN: PARA REDUCIR EL RIESGO DE DESCARGA ELECTRICA, NO RETIRE LA CUBIERTA (O LA PARTE TRASERA). EN EL INTERIOR DEL APARATO NO HAY COMPONENTE ALGUNO QUE PRECISE SERVICIO DE MANTENIMIENTO A CARGO DEL USUARIO. SOLICITE CUALQUIER OPERACION DE MANTENIMIENTO A PERSONAL DE SERVICIO CALIFICADO.
INSTRUCCIONES DE SEGURIDAD IMPORTANTES 1) Lea estas instrucciones. ESPAÑOL 2) Conserve las instrucciones. 3) Tenga en cuenta todos los avisos. 4) Siga todas las instrucciones. 5) No utilice este aparato cerca del agua. 6) Limpie el equipo con un paño seco. 7) No bloquee las rendijas de ventilación. Instale el equipo según las instrucciones del fabricante. 8) No lo instale cerca de fuentes de calor, como radiadores, registros de calor, hornos o demás aparatos (incluidos amplificadores) que produzcan calor.
INSTRUCCIONES DE SEGURIDAD IMPORTANTES 20) Cuando sea necesario reemplazar piezas, asegúrese de que el técnico de servicio emplee las piezas de repuesto especificadas por el fabricante, o piezas que tengan las mismas características que las piezas originales. Los cambios no autorizados podrán causar incendios, descargas eléctricas y otros problemas.
INSTRUCCIONES DE SEGURIDAD IMPORTANTES ESPAÑOL CONDENSACIÓN Se condensará humedad en el interior del aparato si se lo trae de un lugar fresco a una habitación caliente o si la temperatura en la habitación sube repentinamente. En este caso, se verán afectadas las prestaciones del aparato. Para evitarlo, deje el aparato a la nueva temperatura durante aproximadamente una hora antes de conectarlo, o haga que la temperatura en la habitación suba gradualmente.
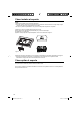
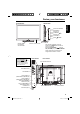
Cómo instalar el soporte NOTA: • Desenchufe el cable de CA del terminal AC INPUT. • Antes de comenzar este proceso, asegúrese de que la televisión este colocada en un lugar limpio, seguro y acolchonado para evitar cualquier daño a la unidad. • No toque o presione la pantalla de la TV, ya que el cristal podría romperse con la presión. Coloque la TV sobre su respaldo parte anterior de la mesa. Alinie la placa inferior del soporte (suministrada) tal y como se muestra aquí. Encajará solo en una dirección.
Características ESPAÑOL • Sintonizador digital integrado - Podrá disfrutar de transmisiones digitales sin necesidad de utilizar un decodificador de TV digital. • Descodificador de leyendas codificadas con modo de texto completo - Muestra las leyendas de los textos o el texto del programa en pantalla completa para las personas con problemas de audición.
Índice PREPARACIONES INSTRUCCIONES DE SEGURIDAD IMPORTANTES ............................................... 3 PRECAUCIONES DE SEGURIDAD................. 5 Cómo instalar el soporte .................................. 6 Cómo quitar el soporte .................................... 6 Características ................................................. 7 Fuente de alimentación.................................... 7 Índice ............................................................... 8 Partes y sus funciones ........
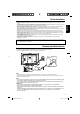
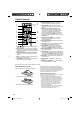
Partes y sus funciones Lado derecho ESPAÑOL Parte delantera Botón INPUT/ENTER Botón MENU Botones CH (CHANNEL) / Botones VOL (VOLUME) +/– Botón Indicador Power Rojo: Standby Azul: Encendido Sensor de control remoto SÓLO PARA USO DEL PERSONAL DE SERVICIO: NO introduzca NINGÚN dispositivo USB en este puerto. El uso de este puerto por parte de personas ajenas al personal de servicio puede invalidar la garantía del producto. Lado derecho POWER Para visualizar la pantalla de menús.
Control remoto 1 2 12 13 3 4 14 5 15 6 7 8 16 9 17 10 11 1.Botón (POWER) - Se utiliza para encender y apagar la unidad. 2.Botón DISPLAY - Cuando presiona este botón, la información actual se despliega en la pantalla. Para quitar esa imagen de la pantalla, presione el botón nuevamente. 3.Botones de selección directa de canal (0-9) - Permite acceso directo a cualquier canal del unidad. 4.Botón – - Este botón es que se utiliza cuando se seleccionan canales digitales. 5.
Si usted está utilizando una antena para interiores o exteriores, siga las instrucciones de abajo que correspondan a su sistema de antena. Si está utilizando el servicio de TV cable, vea “Conexiones de TV cable”. Antena combinada de VHF/UHF (Cable único de 75 ohmios) Toma de antena Conecte el cable de 75 ohmios de la antena combinada de VHF/UHF en el toma de la antena.
Conexiones a otros equipos La instalación exacta a utilizar para hacer las conexiones de los distintos componentes de vídeo y audio en la unidad depende del modelo y funciones de cada componente. Confirme en el manual de instrucciones de cada componente la posición de las entradas y salidas de vídeo y de audio.
Conexiones a otros equipos (continuación) Esta conexión le permite usar un amplificador de audio y altavoces externos, y ajustar el nivel de audio usando el mando a distancia del TV. Para controlar el audio, encienda el TV y el amplificador de estéreo, y desconecte los altavoces incorporados del TV (ver página 17). Derecho del unidad ESPAÑOL Para conectar la unidad a un sistema de audio Amplificador A salida de VAR.
Conexiones a otros equipos (continuación) Para conectar el unidad a un HDMI o a un dispositivo DVI La entrada HDMI1/DVI recibe audio digital y vídeo no comprimido desde un dispositivo HDMI o vídeo digital no comprimido desde un dispositivo DVI. Si se conecta un dispositivo DVI a un cable adaptador HDMI-a-DVI, sólo transfiere la señal de vídeo. Se requieren cables de audio separados.
3 El menú de Instalar Auto aparece la primera vez que enciende la TV, y le ayuda a seleccionar el especificar la opción Antena/Cable, y programar sus canales de forma automática. IMPORTANTE: ¡Cerciórese de que la antena o sistema de cable de TV este conectado! 4 1 Para encender el aparato, presione (POWER). (El indicador POWER en el frente de la unidad cambia a azul. Puede llevar aprox. 10 segundos para que aparezca una imagen en la pantalla.) La función de Instalar Auto comienza.
CH / Presione y libere CH / . La unidad se detendrá automáticamente en el siguiente canal almacenado en la memoria. Antes de seleccionar canales, éstos deberán ser almacenados en la memoria del televisor. Vea “Memorización de canales” en la página 18. DISPLAY Presione DISPLAY para ver en pantalla la información actual. Si el televisor recibe una señal digital, presione este botón para consultar la información digital. 62-1 HDTV_Moving_Picture...
Otras funciones prácticas Icono Elementos seleccionados Consejo de configuración Imagen Imagen Preferencia Imagen brillante y dinámica (ajuste de fábrica) Calidad de imagen normal (ajuste de fábrica) Ajuste de la imagen tipo película (ajuste de fábrica) Sus preferencias personales (configurado por usted; véase “Ajuste de Imagen”) Puede ajustar la calidad de imagen a su preferencia.
Memorización de canales 4 Este aparato está equipado con una función de memorización de canales que permite avanzar o retroceder al siguiente canal almacenado en la memoria, pasando por alto los canales no deseados. Antes de seleccionar canales, éstos deberán ser programados en la memoria del aparato. Para usar el aparato con una antena, ajuste la opción de aparato al modo Antena. Al salir la unidad de fábrica, la opción de Tipo de Señal se ajusta al modo de Cable.
6 Presione ◀ o ▶ para seleccionar “Agregar” o “Borrar”, dependiendo de la función que quiera ejecutar. Repita los pasos 4 - 5 para otros canales que desee agregar o borrar. 2 3 Eliminar Todo 3 Presione ◀ o ▶ para seleccionar un canal que quiera rotular, luego presione ▼. CH Titulo Canal Se eliminan todos los canales de la memoria de canales. Seleccionar “Canal”, luego presione ▶ o ENTER. 1 2 Presione ▲ o ▼ para seleccionar “Titulo Canal”, luego presione ▶ o ENTER.
Clasifique TV (Clasificación TV) Video de Menu Label Video Video1 - Video2 Component HDMI1 HDMI2 PC :Selección Clasifique TV TV-Y TV-Y7 TV-G TV-PG TV-14 TV-MA - :Ajustar – / VCR / DVD / STB / Cable / Satellite / Receiver / Game / Camcorder / PC / DVI PC / Blu-ray :Selección Ajuste del V-Chip Se puede establecer un límite de edad para evitar que los niños vean o escuchen escenas violentas o aquellas imágenes que decida excluir. La restricción se aplica “Clasifique TV” y “Clasif.
5 Ingrese la contraseña nueva con los Botones numéricos (0-9), luego presione ENTER. Ingrese nuevamente la misma contraseña para confirmar, luego presione ENTER. La contraseña queda registrada. Descargar el sistema de evaluación adicional V-Chip 3 4 Presione ▲ o ▼ para seleccionar “Borr conf chip antivio”, luego presione ▶ o ENTER. Aparecerá la pantalla Borr conf chip antivio. Entre la contraseña nueva con los Botones numéricos (0-9), luego presione ENTER.
• Si no se recibe la señal de emisión de texto, no aparecerán leyendas, pero el televisor permanecerá en el modo de recepción de texto. • Ocasionalmente podrán aparecer faltas de ortografía o caracteres extraños durante la recepción de texto. Esto es normal en este modo, especialmente con los programas en vivo. Esto se debe a que durante los programas en vivo, los textos son ingresados sin edición, ya que no hay tiempo para la misma. Estas transmisiones no dan tiempo para ediciones.
La imagen completa se amplía de forma uniforme: se estira tanto a lo largo como a la ancho (conserva su proporción original). ESPAÑOL Dimensión Cine2 (para programas letter box) Puede que desaparezca el borde superior e inferior de la imagen. Dimensión Cine3 (para programas letter box con subtítulos) Para llenar el ancho de la pantalla, ésta se extiende en horizontal. No obstante; sólo se estira ligeramente por la parte superior e inferior.
Disturbios de recepción La mayoría de los tipos de interferencia de televisión pueden ser solucionados ajustando la altura y la posición de la antena de VHF/UHF. Para obtener los mejores resultados se recomiendan las antenas exteriores. Los tipos más comunes de interferencia de televisión están mostrados abajo. Si aparece uno de estos síntomas cuando el TV está conectado a un sistema de TV cable, el disturbio puede ser causado por la compañía local emisora de TV cable.
Consulte la siguiente lista de localización de errores si experimenta problemas con su unidad. Consulte con su concesionario local o tienda de servicio si continúan los problemas. Compruebe que se han hecho correctamente todas las conexiones cuando utilice el equipo con otros aparatos. SÍNTOMA POSIBLE SOLUCIÓN • Verifique que el cable de alimentación esté conectado. • Pruebe con otro tomacorriente de CA. El TV no • La alimentación está desconectada; revise funciona. el fusible o el interruptor automático.
Especificaciones GENERALIDADES Alimentación de energía: Consumo de energía: 120V CA, 60Hz En operación: 59 Vatios Stand by: 0,3 Vatios Peso: 8,1 kg (17,9 lbs) Dimensiones: Ancho: 778 mm (30-5/8 pulgadas) Alto: 543,6 mm (21-3/8 pulgadas) Profundidad: 214 mm (8-7/16 pulgadas) Temperatura de operación: 5˚C - 40˚C Humedad de funcionamiento: Menos de 80% RH Tipo: 801,3mmV (32” clase/31,55” diagonal) Método de visualización: Pantalla de LCD en color TFT de transmisión Número de píxeles: 1366 (H) × 768 (V) Sistem
GARANTIA LIMITADA GARANTIA LIMITADA A UN AÑO SOBRE PARTES Y MANO DE OBRA ORION, por conducto de Integral Support S.A. de C.V., ofrece esta garantía al consumidor de productos marca SANSUI contra defectos de fabricación en materiales y mano de obra por un período de un año. Si el producto ORION presenta un defecto dentro del período de garantía, ORION deberá reparar o reemplazar la unidad.
ENGLISH The lightning flash with arrowhead symbol, within an equilateral triangle is intended to alert the user to the presence of uninsulated dangerous voltage within the product's enclosure that may be of sufficient magnitude to constitute a risk of electric shock.
ENGLISH 15) Apparatus should not be exposed to dripping or splashing, and objects filled with liquids, such as vases, should not be placed on the apparatus. 16) An outside antenna system should not be located in the vicinity of overhead power lines or other electric light or power circuits, or where it can fall into such power lines or circuits. When installing an outside antenna system, extreme care should be taken to keep from touching such power lines or circuits, as contact with them might be fatal.
IMPORTANT SAFETY INSTRUCTIONS 20) When replacement parts are required, be sure the service technician uses replacement parts specified by the manufacturer or those that have the same characteristics as the original part. Unauthorized substitutions may result in fire, electric shock or other hazards. 21) Upon completion of any service or repairs to this unit, ask the service technician to perform safety checks to determine that the unit is in proper operating condition.
IMPORTANT SAFETY INSTRUCTIONS CONDENSATION Moisture will form in the operating section of the unit if the unit is brought from cool surroundings into a warm room or if the temperature of the room rises suddenly. When this happens, unit's performance will be impaired. To prevent this, let the unit stand in its new surroundings for about an hour before switching it on, or make sure that the room temperature rises gradually.
How to attach the stand NOTE: • Unplug the AC cord from the AC INPUT terminal. • Before beginning this process, assure that the TV is laid on a clean, safe, and cushioned surface to avoid any damage to the unit. • Do not touch or press the TV-screen, glass might break under pressure. Place the TV on its front onto a table. Align the stand’s bottom-plate (supplied) as seen here. It will fit in only one direction. Hold the unit and attach the stand slowly, as shown in Figure 1.
Features ENGLISH • Integrated Digital Tuner - You can view digital broadcasts without using a Digital TV Set-Top Box. • Closed Caption Decoder With Full Text Mode - Displays text captions or full screen text on the screen for hearing impaired viewers. • Picture Adjustments Using The Remote Control - The On-Screen display allows precise remote control adjustment of BRIGHTNESS, CONTRAST, COLOR, TINT and SHARPNESS.
Contents Before using your unit IMPORTANT SAFETY INSTRUCTIONS ...........3 SAFETY PRECAUTIONS .................................5 How to attach the stand ....................................6 How to remove the stand ..................................6 Features............................................................7 Power source ....................................................7 Contents ...........................................................8 Parts and functions ..................................
Parts and functions Front Right side MENU button CH (CHANNEL) / buttons VOL (VOLUME) +/– buttons POWER button Power Indicator Red : Standby Blue : On Remote sensor To display the menu screen. Press MENU button to display the menu screen. CH (CHANNEL) / buttons, VOL (VOLUME) +/– buttons and INPUT/ENTER button can be used to select the desired setting during the menu screen operations. Right side FOR SERVICE PERSONNEL USE ONLY Do NOT insert ANY USB device into this port.
Remote control 1 2 12 13 3 4 14 5 15 6 7 8 16 9 17 10 11 1. (POWER) Button - Used to turn the power on/off to the unit. 2.DISPLAY Button - When you press this button, the current information will be displayed on a screen. To remove the display from the screen, press this button again. 3.Direct Channel Selection Buttons (0-9) - Allows direct access to any channel of the unit. 4.– Button -This button is used when selecting digital channels. 5.
Antenna connections If you are using an indoor or outdoor antenna, follow the instructions below that correspond to your antenna system. If you are using a Cable TV service, see “Cable TV connections”. Combination VHF/UHF Antenna (Single 75 ohm cable) 75 ohm Coaxial Cable Cable TV connections ENGLISH Connect the 75 ohm cable from the combination VHF/UHF antenna to the Antenna Jack.
Connections to other equipment The exact arrangement you use to interconnect various video and audio components to this unit is dependent on the model and features of each component. Check the Owner’s Manual provided with each component for the location of video and audio inputs and outputs.
Connections to other equipment (continued) To connect the unit to an audio system This connection allows you to use an audio amplifier and external speakers, and adjust the audio level using the TV’s remote control. To control the audio, turn on the TV and the stereo amplifier, and turn off the TV’s built-in speakers (see page 17). ENGLISH Right of the unit Amplifier To VAR.
Connections to other equipment (continued) To connect a HDMI or a DVI device to the unit The HDMI1/DVI input receives digital audio and uncompressed video from a HDMI device or uncompressed digital video from a DVI device. When you connect to a DVI device with a HDMI-to-DVI adapter cable, it transfers only video signal. Separate analog audio cords required.
4 The Auto Setup menu appears the first time you turn on the TV, and assists you to specify the Air/Cable setting, and program your channels automatically. IMPORTANT: Make sure that the antenna or cable TV system connection is made! 1 To turn on the TV, press (POWER) (POWER indicator on the front of the unit changes blue. It may take approx. 10 seconds for a picture to appear on screen.). The Auto Setup function begins.
DISPLAY Quick guide for menu operation When the TV receives a digital signal, the digital information will appear. Call menu and for example: Select Language. Press DISPLAY to display the current information on the screen. 62-1 HDTV Moving Picture1 CH-1 Digital TV-MA Air Sleep Timer Off English No Program Information is available 1 2 Press INPUT SELECT to select TV mode. Press MENU. The TV menu screen will appear.
Convenience functions You can change the default settings by pressing the MENU button on your remote, then select the one of the icons at the left of the menu - follow the On-Screen prompts to set your preferences.
Memorizing channels This TV is equipped with a channel memory feature which allows channels to skip up or down to the next channel set into memory, skipping over unwanted channels. Before selecting channels, they must be programmed into the TV’s memory. To use this TV with an antenna, set the Signal Type option to the Air mode. When shipped from the factory, this menu option is in the Cable mode. Air/Cable selection 1 2 3 4 Select “Channel”, then press ▶ or ENTER.
Clear All CH Ch Label All channels are deleted from the channel memory. 3 Press ▲ or ▼ to select “Add/Delete”, then press ▶ or ENTER. Press ▲ or ▼ to select “Clear All”, then press ▶ or ENTER. 4 Adding Channel Add/Delete Clear All >> >> >> CH DTV Signal 0 50 100 Signal Level NOTE: • Signal meter feature is not available for analog channels. • After 240 seconds, DTV Signal screen will return to normal TV operation automatically.
Setting the V-Chip Genre: D L S V FV An age limitation can be set to restrict children from viewing or hearing violent scenes or pictures that you may choose to exclude. The restriction applies to “TV Rating” and “Movie Rating” if this data is transmitted. You may set this restriction separately. To use the V-Chip function, you must register a password. Movie Rating Movie Rating G PG PG-13 R NC-17 X To register a password 1 2 Select “Lock”, then press ▶ or ENTER.
6 7 Press ◀ or ▶ to set “V-Chip” to “On”. Press ▲ or ▼ to select “V-Chip Set (DTV)”, then press ▶ or ENTER. If the TV is not storing the additional rating system, the TV will begin downloading it, which may take some time to be completed. Set your preferred content rating limits for the additional rating system. You also need “Update” procedure to update rating information. NOTE: • You can only download the additional V-Chip rating system when your TV is receiving a digital signal.
5 6 Press ▲ or ▼ to select “CC Advanced”, then press ▶ or ENTER. The CC Advanced menu will appear. Press ▲ or ▼ to select the desired item, then press ◀ or ▶ to change the setting. CC Advanced Text Size Auto Text Type Auto Text Edge Auto Text Color Auto Text Opacity Auto Background Color Auto Background Opacity Auto :Select Cinema Wide1 (for 4:3 format programs) To fill the screen, the right and left edges are extended, however; the center of the picture remains near its former ratio.
Reception disturbances Most types of television interference can be remedied by adjusting the height and position of the VHF/ UHF antenna. Outdoor antennas are recommended for best results. The most common types of television interference are shown below. If one of these symptoms appear when the TV is connected to a Cable TV system, the disturbance may be caused by the local Cable TV company broadcast. IGNITION ENGLISH Black spots or horizontal streaks may appear, the picture may flutter or drift.
Troubleshooting Use the following checklist for troubleshooting if you have problems with your unit. Consult your local dealer or service outlet if problems persist. Be sure all connections are properly made when using with other units. SYMPTOMS TV does not operate. • • • • • Poor sound or no sound. • • • • Poor picture • or no picture. • • • Poor reception on some channels. • • • • Poor color or no color. • • • • Picture wobbles or drifts.
GENERAL Power supply: Power consumption: Weight: Dimensions: Operating temperature: Operating humidity: Type: Display method: Number of Pixels: Broadcasting system: Receiving channels: Tuner type: Inputs: Outputs: Speakers: Audio output power: ACCESSORIES AC 120V, 60Hz Operation: 59W Stand by: 0.3W 8.1 kg (17.9 lbs) Width: 778 mm (30-5/8 inches) Height: 543.6 mm (21-3/8 inches) Depth: 214 mm (8-7/16 inches) 5˚C - 40˚C Less than 80% RH 801.3mmV (32” class/31.
limited WARRANTY 32” WIDE LED TELEVISION ORION warrants this product to be free from manufacturing defects in material and workmanship under normal use and conditions for a period of 1 year from date of original purchase in the United States.