
Use and Care Guide
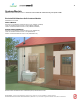
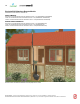
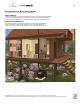
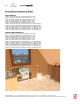

Table Of Contents
- TOC-Important-Installation-Guidelines
- TOC-Model-Differences
- TOC-Check-Contents-of-Box
- TOC-Do-Not-Remove-Paper-Mat
- TOC-Important-Notices
- TOC-Ready-to-Go-
- TOC-90-Bends-in-Vent
- TOC-1.-Position-Toilet
- TOC-1
- TOC-2.-Cut-Vent-Hole-in-Roof-Ceiling
- TOC-2
- TOC-3.-Vent-Roof-Stack-Installation
- TOC-3
- TOC-4.-Insert-Vent-Pipe-into-System
- TOC-4
- TOC-5.-Attach-Union-Coupling-Optional-
- TOC-5
- TOC-6.-Connect-Remaining-Vent-Pipe
- TOC-7.-Install-Drain
- TOC-8.-Seal-All-Vent-Connections
- TOC-9.-Insulate-Exposed-Pipe
- TOC-6
- TOC-10.-Attach-Rain-Cap-or-Wind-Turbine
- TOC-Protect-from-the-Elements
- TOC-Install-Rigid-Vent-Pipe-not-supplie
- TOC-Connect-Flexible-Vent-and-Rigid-Pip
- TOC-Attach-Wind-Turbine-Ventilator-
- TOC-Seal-All-Vent-Connections
- TOC-Install-Vacuum-Toilet
- TOC-Install-Drain
- TOC-Connect-Three-Components-of-System
- TOC-Start-Here
- TOC-Position-the-System
- TOC-Connect-Vacuum-Toilet-to-Vacuum-Gen
- TOC-Connect-Vacuum-Generator-to-Compost
- TOC-Fasten-Vacuum-Generator-Unit-and-Co
- TOC-Connect-Vacuum-Generator-to-12v-Pow
- TOC-Connect-Composting-System-to-AC-Ele
- TOC-Plug-Play-Wiring-Connection
- TOC_Do_Not_Add__3175881415145758
- TOC_Rated_Capacity_4164048674046512
- TOC_Operation_is_Easy_8826685531918387
- 1_System_Operation_09638061436967571
- TOC_1_Initial_System_Start_Up_1095042459
- TOC-1.-Initial-System-Start-Up
- TOC_2_Power_Control_42472747931111743
- TOC-2.-Power-Control
- Non_Electric_SystemsNot_applic_933833838
- FlushSmart_VF_models_Always_tu_554945394
- TOC_12VDC_Systems_12964841970897056
- TOC-12VDC-Systems
- FlushSmart_VF_models_Always_tu
- 5_Weekly_Operation_5923775715714038
- TOC-Typical-Emptying-Times
- TOC-Indications-of-Emptying-Required
- TOC-Before-you-Empty
- TOC_Introduction_3353822634090_525738961
- Proper_System_Operation_1312612757753413
- TOC_Outside_Odour_901114465392_444162368

Use as directed. To ensure proper performance, please be sure to contact us if you have installation or operation questions.
ENVIROLET®/SG INSTALLATION & OPERATION MANUAL (7MINS11D 12.15) • Envirolet® is a registered trademark. ©2016, Sancor Industries Ltd.
20
System Installation
Please follow the installation guidelines for your specific system type.
Envirolet®/SG Waterless Self-Contained System Installation
PLEASE READ THIS SECTION CAREFULLY.
Envirolet®/SG Composting Unit refers to the complete Envirolet®/SG Waterless Self-Contained System.
Important Notices
IMPORTANT
Do not connect Envirolet®/SG Composting Unit (System) to power supply until instructed (after all components have been
individually installed).
WARNING
The Vent system must always be securely attached to your Envirolet®/SG Composting Unit before any operation. Failure to
comply could result in an unsafe electrical hazard and/or inside odour.
IMPORTANT
Do not remove the Paper Mat located in Envirolet®/SG Composting Unit. This is not packing material. It is an important
component to proper system start-up. If you accidentally remove the Paper Mat, please refer to Initial System Start-Up
section for replacement tips before using system.
90° Bends in Vent
IMPORTANT
It is recommended that the 100mm/4” vent pipe be installed straight up, with little or no angles/bends in the venting system.
This will ensure proper vent draft and evaporation, and prevent any inside odour.
Do not install any 90° bends (or greater) in your vent installation.
Ready to Go!
It’s time to begin installation of the Envirolet Compost Unit component of your Envirolet®/SG Waterless Self-Contained System. Here
are the main steps:
A. Position Toilet
B. Cut Vent Hole in Roof/Ceiling
C. Vent/Roof Stack Installation
D. Insert Vent Pipe into System
E. Attach Union Coupling
F. Connect Vent Pipe
G. Install Drain