
Use and Care Guide
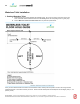
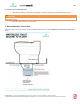
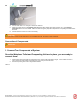
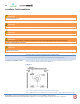
Table Of Contents
- TOC-Important-Installation-Guidelines
- TOC-Model-Differences
- TOC-Check-Contents-of-Box
- TOC-Do-Not-Remove-Paper-Mat
- TOC-Important-Notices
- TOC-Ready-to-Go-
- TOC-90-Bends-in-Vent
- TOC-1.-Position-Toilet
- TOC-1
- TOC-2.-Cut-Vent-Hole-in-Roof-Ceiling
- TOC-2
- TOC-3.-Vent-Roof-Stack-Installation
- TOC-3
- TOC-4.-Insert-Vent-Pipe-into-System
- TOC-4
- TOC-5.-Attach-Union-Coupling-Optional-
- TOC-5
- TOC-6.-Connect-Remaining-Vent-Pipe
- TOC-7.-Install-Drain
- TOC-8.-Seal-All-Vent-Connections
- TOC-9.-Insulate-Exposed-Pipe
- TOC-6
- TOC-10.-Attach-Rain-Cap-or-Wind-Turbine
- TOC-Protect-from-the-Elements
- TOC-Install-Rigid-Vent-Pipe-not-supplie
- TOC-Connect-Flexible-Vent-and-Rigid-Pip
- TOC-Attach-Wind-Turbine-Ventilator-
- TOC-Seal-All-Vent-Connections
- TOC-Install-Vacuum-Toilet
- TOC-Install-Drain
- TOC-Connect-Three-Components-of-System
- TOC-Start-Here
- TOC-Position-the-System
- TOC-Connect-Vacuum-Toilet-to-Vacuum-Gen
- TOC-Connect-Vacuum-Generator-to-Compost
- TOC-Fasten-Vacuum-Generator-Unit-and-Co
- TOC-Connect-Vacuum-Generator-to-12v-Pow
- TOC-Connect-Composting-System-to-AC-Ele
- TOC-Plug-Play-Wiring-Connection
- TOC_Do_Not_Add__3175881415145758
- TOC_Rated_Capacity_4164048674046512
- TOC_Operation_is_Easy_8826685531918387
- 1_System_Operation_09638061436967571
- TOC_1_Initial_System_Start_Up_1095042459
- TOC-1.-Initial-System-Start-Up
- TOC_2_Power_Control_42472747931111743
- TOC-2.-Power-Control
- Non_Electric_SystemsNot_applic_933833838
- FlushSmart_VF_models_Always_tu_554945394
- TOC_12VDC_Systems_12964841970897056
- TOC-12VDC-Systems
- FlushSmart_VF_models_Always_tu
- 5_Weekly_Operation_5923775715714038
- TOC-Typical-Emptying-Times
- TOC-Indications-of-Emptying-Required
- TOC-Before-you-Empty
- TOC_Introduction_3353822634090_525738961
- Proper_System_Operation_1312612757753413
- TOC_Outside_Odour_901114465392_444162368

Use as directed. To ensure proper performance, please be sure to contact us if you have installation or operation questions.
ENVIROLET®/SG INSTALLATION & OPERATION MANUAL (7MINS11D 12.15) • Envirolet® is a registered trademark. ©2016, Sancor Industries Ltd.
26
C. Attach rubber gasket seal to bottom of Waterless Toilet. Place adhesive side of gasket inside recessed area of bottom of
toilet.
D. Insert Waterless Toilet into hole in floor. The chute (bottom part of the Waterless Toilet) should fit through hole in floor.
E. Centre/align Waterless Toilet in desired position.
F. Using included mounting hardware (bolts, nuts, washers) secure Waterless Toilet to floor.
G. Insert large bolt through open slot on Waterless Toilet and through bathroom floor.
H. Place washer between bolt and Waterless Toilet.
I. Place another washer between bottom of floor and nut.
J. Secure with tight fit.
K. From below (under bathroom floor) affix front and rear corner brackets (“L” brackets) to bottom of Waterless Toilet to
help keep toilet in place.
L. Once secure, slide Flex Drain Hose over Waterless Toilet chute (bottom of toilet). Use gear clamp to secure.
M. Do not attach to Composting Unit until Composting Unit installation is complete.
Composting Unit Installation
1. Position Envirolet®/SG Composting Unit
Locate in Covered Structure
Position the Envirolet®/SG Composting Unit in a covered structure (work shop, basement, garden shed, utility shed, box, etc.) in area
that is free of obstructions (pipes, electric boxes, wires, etc.).
Temperature
Try to keep Composting Unit in area with an ambient temperature above 12°C (55°F) for optimum composting. Refer to the Winter
Use section if you plan to use the system in freezing or near-freezing temperatures.
Protect from the Elements
For safety and performance, the Envirolet®/SG Composting Unit must sit horizontally on a flat dry surface and must be installed in a
vented covered structure (work shop, basement, garden shed, utility shed, box, etc.) to protect from the elements (water, rain, snow,
etc.) and to protect from electrical damage or hazard. Refer to the Safety Guidelines section for more info on safe installation and
operation.
Directions
A. Place the Envirolet®/SG Composting Unit directly below the hole in floor for Waterless Toilet (or where it will be) for a
gravity drop.
B. Do not secure Envirolet®/SG Composting Unit or Waterless Toilet until vent installation is complete. This will allow for
any placement modifications, if required.
2. Connect Flex Vent to Composting Unit
A. Place 4”/110mm Flex Vent pipe section over vent opening on the Top Panel of Envirolet®/SG Composting Unit (tank)
using the supplied 4”/110mm stainless steel Gear Clamp.
B. Tighten Gear Clamp over Flex Vent to secure to plastic opening for proper seal.
C. Based on your individual installation requirements, you may wish to increase or decrease the length of the 100mm/4”
Flex Vent pipe (4’/1.2m is standard).
IMPORTANT
Seal vent connection on Top Panel securely with 4”/110mm Gear Clamp and Silicone Sealant provided to prevent odours.
IMPORTANT
Install minimum of 12”/30cm of 4”/110mm Flexible Vent Pipe that connects Composting Unit to 4”/110mm rigid pipe section(s). This
will prevent rigid pipe breakage due to possible ground shifting caused by freezing temperatures or other movement.