JFV60 (6901-002009 <00>) Wall Floor OPT OPT 003082.eps JFV60 Assembled (floor/onwall) Sanus Systems 2221 Hwy 36 West, Saint Paul, MN 55113 USA Customer Service Americas: 800-359-5520 • 651-484-7988 • info@sanus.com Europe, Middle East, and Africa: 31 (0) 40 26 68 619 • sanus.europe@sanus.com Asia Pacific: 86 755 8996 9226 • 800 999 6688 (mainland China only) • sanus.ap@milestone.com sanus.com ©2009 Milestone AV Technologies, a Duchossois Group Company. All rights reserved.
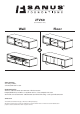
EN DE IMPORTANT SAFETY INSTRUCTIONS - SAVE THESE INSTRUCTIONS WICHTIGE SICHERHEITSHINWEISE – BEWAHREN SIE DIESE HINWEISE SORGFÄLTIG AUF Thank you for choosing the Sanus Foundations JFV60. The JFV60 is designed to support audio/video equipment. The JFV60 can be used as freestanding floor Vielen Dank, dass Sie sich für Sanus Foundations JFV60 entschieden haben. furniture or mounted on wall furniture. Das JFV60 ist ideal für Ihre AV-Geräte.
IT PT INSTRUÇÕES DE SEGURANÇA IMPORTANTES – GUARDE ESTAS INSTRUÇÕES ISTRUZIONI DI SICUREZZA IMPORTANTI - CONSERVARE CON CURA QUESTE ISTRUZIONI Obrigado por escolher a Sanus Foundations JFV60. A JFV60 foi concebida para Grazie per aver scelto il Sanus Foundations JFV60. Il JFV60 è stato progettato suportar equipamento de áudio e de vídeo. O JFV60 pode ser usado como per sostenere apparecchiature audio e video. Il JFV60 può essere utilizzato móvel de chão ou montado como móvel de parede.
NO SV VIKTIGE SIKKERHETSINSTRUKSJONER – TA VARE PÅ DISSE INSTRUKSJONENE VIKTIGA SÄKERHETSANVISNINGAR – SPARA DESSA ANVISNINGAR Takk for at du har valgt Sanus Foundations JFV60. JFV60 er konstruert for lydog videoutstyr. JFV60 kan brukes som et frittstående møbel på gulvet eller montert på veggen. Tack för att du väljer Sanus Foundations JFV60. JFV60 är designad för att stödja audio- och videoutrustning. JFV60 kan användas fristående eller väggmonterad.
PL TR WAŻNE INSTRUKCJE DOTYCZĄCE BEZPIECZEŃSTWA — NIE WYRZUCAĆ ÖNEMLİ GÜVENLİK TALİMATLARI - BU TALİMATLARI SAKLAYIN Dziękujemy za wybór marki Sanus Foundations JFV60. Regał JFV60 zaprojektowano jako podstawę pod sprzęt audio i wideo. JFV60 może być wykorzystany jako mebel wolnostojący na podłodze albo zamontowany na ścianie. Sanus Foundations JFV60 ürününü seçtiğiniz için teşekkür ederiz. JFV60, ses ve görüntü ekipmanlarını desteklemek üzere tasarlanmıştır.
MD 重要安全说明 – 保存这些说明 感谢您选择 Sanus Foundations JFV60。JFV60 是为支承音频和视频设备 而设计的。JFV60 可用作自立的落地式家具或墙壁安装式家具。 地板 — 如果您要将 JFV60 用作自立的落地式家具,则总承重量为 158.8 kg(350 磅)。 顶层架板的最大承重量为 124.7 kg(275 磅)。 各中层架板的最大支承重量为 22.5 kg(50 磅)。各底层架板的最大支 承重量为 34 kg(75 磅)。 墙壁 — 如果您要将 JFV60 用作墙壁安装式家具,则墙壁的总承重量为 90.7 kg(200 磅)。 顶层架板的最大承重量为 22.5 kg(50 磅)每个 中层架板和下层架板的最大承重量各为 22.
EN This page intentionally left blank. FR Page laissée vierge intentionnellement DE Diese Seite wurde absichtlich leer gelassen. ES Esta página se dejó en blanco intencionalmente. PT Esta página deixada em branco intencionalmente. NL Deze pagina werd leeg gehouden. IT Pagina lasciata intenzionalmente vuota EL Σκόπιμα κενή σελίδα. NO Denne siden skal være blank. DA Denne side er bevidst tom. SV Denna sida har avsiktligt lämnats tom. RU Данная страница намеренно оставлена пустой.
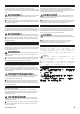
1/8 in. EN PT Supplied Parts and Hardware Before starting assembly, verify all parts are included and undamaged. If any parts are missing or damaged, do not return the damaged item to your dealer; contact Sanus Systems Customer Service. Never use damaged parts! WARNING! This product contains small items that could be a choking hazard if swallowed. Keep these items away from young children! OPT Hardware and procedures for multiple mounting configurations are OPT included.
NO CS Medfølgende deler og utstyr Se til at alle deler følger med og er uskadde før du begynner med monteringen. Hvis noen deler mangler eller er defekte, skal du ikke returnere dem til forhandleren. Kontakt Sanus Systems kundeservice. Bruk aldri defekte deler! ADVARSEL! Dodané součásti a montážní materiál Před začátkem montáže zkontrolujte, že jsou v balení všechny díly a že nejsou poškozeny.
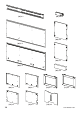
[01] x 1 [02] x 2 [05] x 2 [03] x 1 [06] x 1 [04] x 1 [07] x 2 10 [08] x 1 [09] x 1 [10] x 1 [12] x 1 [13] x 1 [14] x 3 [11] x 1 6901-002009 <00>
0 1/4-20 x 2.5 in. 1/4-20 [15] x 12 [16] x 12 M8 x 30 [17] x 4 M8 [18] x 4 #10 x 2 in. [19] x 8 [20] x 16 1/4 x 2 in. 1/4 in. [23] x 6 [24] x 6 [21] x 10 [22] x 12 8/32 x 1 [25] x 2 [26] x 2 003081.eps JFV60 - Parts 6801-002014-XXX rev 01 hardware bag [27] x 8 M8 x 30 n. [28] x 1 M8 8/32 x 1 003081.
1 [28] EN NO Assemble the bottom [04], side [08]/[09], and middle [12]/[13] panels. Monter bunn- [04], side- [08]/[09] og midtpanelene[12]/[13]. FR DA Assemblez les panneaux du dessous [04], des côtés [08]/[09], et du centre [12]/[13]. DE Bauen Sie das untere Brett [04], die seitlichen [08]/[09] und die mittleren Bretter [12]/[13] zusammen. Montér paneler i bund [04], side [08]/[09] og midten [12]/[13]. SV Montera ihop neder- [04], sido- [08]/[09] och mittenpanelerna [12]/[13].
[09] [13] [12] [04] [08] [09] [20] [16] [04] 003084.
2 EN DA 2.1 Insert dowels [20] into side [08]/[09] and middle [12]/[13] panels. 2.1 Indsæt dyveler [20] i panelerne på side [08]/[09] og midte [12]/[13]. 2.2 Insert cam screws [21] into top panel [03]. 2.2 Indsæt monteringsbolte [21] i det øverste panel [21]. 2.3 Attach the top [03] to the side [08]/[09] and middle [12]/[13] panels, and 2.3 Fastgør toppen [03] til panelerne på siden [08]/[09] og [12]/[13] midten then tighten cam locks. og spænd derefter monteringshuset. FR 2.
2.1 [08] [20] [12] [13] [09] [04] [20] [12] 003103.ep JFV60 Step 1/4-20 x 2.5 in. 1/4-20 M8 x 30 M8 #10 x 2 in. [20]x8 1/4 x 2 in. 6901-002009 <00> 1/4 in. 8/32 x 1 003081.eps JFV60 - Parts 6801-002014-XXX rev 01 hardware bag 003103.
2.2 [21] [03] [21] [03] 003112.eps JFV60 - step 2 1/4-20 x 2.5 in. 1/4-20 M8 x 30 M8 #10 x 2 in. [21]x10 1/4 x 2 in. 16 1/4 in. 8/32 x 1 003081.eps JFV60 - Parts 6801-002014-XXX rev 01 hardware bag 003112.
2.3 [03] [08] [12] [13] [09] 10x 165° 6901-002009 <00> 17 003111.
3 EN SV 3-Floor — If you are using the JFV60 as floor furniture, attach feet [07] to bottom panel [04]. 3-Golv — om du använder JFV60 som en fristående möbel, montera fötterna [07] på nederpanelen [04]. 3-Wall — If you are using the JFV60 as on wall furniture, attach wall brackets [02] to middle panels [12]/[13]. 3-Vägg — om JFV60 är monterad på väggen, montera väggfästena [02] på mittenpanelerna [12]/[13].
3-Floor [07] [19] [04] 003113.eps JFV60 - step 4 [19] [04] [07] 1/4-20 x 2.5 in. 1/4-20 M8 x 30 M8 #10 x 2 in. [19]x8 1/4 x 2 in. 1/4 in. 8/32 x 1 19 6901-002009 <00> 003081.
3-Wall [12] [02] [13] [02]x2 20 6901-002009 <00>
[02] [17] [18] 003121.eps JFV60 [17] [02] [18] 1/4-20 x 2.5 in. #10 x 2 in. 1/4 x 2 in. 1/4-20 x 2.5 in. 1/4-20 6901-002009 <00> M8x 30 M8 [17]x4 #10 x 2 in. 1/4 x 2 in. M8 x1/4-20 30 1/4 in. 1/4 in. M8 [18]x4 8/32 x 1 8/32 x 1 003081.eps 003081.
4 EN ES 4-Floor — Install back panels [14]. 4-Piso — Coloque los paneles posteriores [14]. 4.1-Wall — Attach wall plate [01] to wood stud wall. 4.1-Pared — Fije la placa mural [01] a la pared de montantes de madera. CAUTION: damage! Avoid potential injuries or property ÙÙ Do not mount the top shelf higher than 99 cm (39 in.) above the floor. ÙÙ Any material covering the wall must not exceed 16 mm (5/8 in.).
IT DA 4-Pavimento — Installazione dei pannelli posteriori [14]. 4-Gulv — Montér de bageste paneler [14]. 4.1-Parete — Collegare una piastra a muro [01] alla parete con montanti di legno. 4.1-Væg — Fastgør vægpladen [01] til træprofilvæggen. AVVERTENZA: alle persone o danni alle cose! Evitare la possibilità di lesioni ÙÙ NON montare il ripiano superiore ad un’altezza superiore a 99 cm (39 in.) dal pavimento.
PL JP 4 – Podłoga — Zamontować panele tylne [14]. 4-床の場合 — 背面板[14]を取り付けます。 4.1 – Ściana — Przymocować płytę ścienną [01] do ściany z drewnianymi słupami. 4.1-壁の場合 — 木製スタッドの壁にウォールプレート [01] を取り付け ます。 OSTROŻNIE: uszkodzenia sprzętu! 注:ケガや破損が起こらないように注意してください。 Uwaga na możliwość obrażeń i ÙÙ 床上99cm以上に、最上段の棚を取り付けないでください。 ÙÙ Górnej półki NIE należy montować wyżej nić 99 cm nad podłogą.
3 4-Floor 2 1 3 1 2 3 2 [14] 1 2 1 3 2 1 [14] 3 2 3 1 2 1 [14] 6901-002009 <00> 2 1 25
4.1-Wall 1/8 in. 406 mm (16 in.) 1 406 mm (16 in.) < 99 cm (39 in.) < 16 mm (5/8 in.) 2 [01] [01] [01] 3 50 mm (2 in.) 4 1/4-20 x1/4-20 2.5 in.x 2.5 in. 1/4-20 1/4-20 M8 x 30M8 x 30 M8 M8 #10 x 2 #10 in. x 2 in. [23] 1/4 x 2 in. 1/4 x 2 in. [23]x6 1/4 in. 1/4 in. [24]x6 8/32 x 18/32 x 1 [24] [01] 003122.eps JFV60- Mount to wood stud 003081.eps 003081.eps JFV60JFV60 - Parts - Parts 6801-002014-XXX rev 01 hardware bag bag 6801-002014-XXX rev 01 hardware 26 6901-002009 <00> 003122.
4.
5 EN SV Insert shelf pins [22] into side [08]/[09] and middle [12]/[13] panels and then Sätt i hyllpinnarna [22] i sido- [08]/[09] och mittenpanelerna [12]/[13] och install shelves [05]/[06]. montera sedan hyllorna [05]/[06]. Feet apply to the JFV60 — floor only. FR Fötter gäller JFV60 – endast golv.
[08] [22] [12] [13] M8 x 30 [09] M8 [22] [22] [22]x12 8/32 x 1 003081.
6 EN DA 6.1 Attach knobs [25] and bumps [27] to doors [10]/[11]. 6.1 Montér håndtag [25] og bump [27] på døre [10]/[11]. 6.2 Install doors [10]/[11]. 6.2 Montér døre [10]/[11]. 6.3 If necessary, adjust glides. 6.3 Om nødvendigt justeres dørglideskinnerne. Feet apply to the JFV60 — floor only. Ben skal kun anvendes til JFV60, hvis det skal stå på gulv. FR SV 6.1 Fixez les poignées [25] et les bosses [27] sur les portes [10]/[11]. 6.
6.1 [26] [25] [10]/[11] 2x [27] OPT OPT 1/4-20 x 2.5 in. 1/4-20 M8 x 30 1/4-20 M8 M8 x 30 M8 #10 x 2 in. 1/4 in. 1/4 x 2 in. 1/4 in. 8/32 x 1 8/32 x 1 003081.eps 003081.eps JFV60 - Parts JFV60 - Parts 6801-002014-XXX rev 01 hardware bag 6801-002014-XXX rev 01 hardware bag [25]x2 1/4-20 x 2.5 in. [26]x2 1/4-20 M8 x 30 [27]x8 M8 31 6901-002009 <00> #10 x 2 in.
6.2 1 1 2 2 1 1 2 2 003116.eps JFV60 - step ? 32 003116.
6.3 1 2 3 003140.eps JFV60 - install door knobs and adjust glides 6901-002009 <00> 003140.
EN Milestone AV Technologies and its affiliated corporations and subsidiaries (collectively, “Milestone”), intend to make this manual accurate and complete. However, Milestone makes no claim that the information contained herein covers all details, conditions, or variations. Nor does it provide for every possible contingency in connection with the installation or use of this product. The information contained in this document is subject to change without notice or obligation of any kind.