
Owner manual


(6901-002111 <02>)
5
002545.eps
LF228-Center column
002545.eps
LF228-Center column
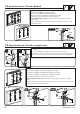
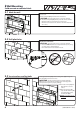
Before You Begin - Determine Your TV Hole Pattern
002947.eps
LF220 - Install monitor to arm
(c)
For all hole patterns other than 400 x 400mm,
proceed to parts A, B, C, and D below. For TVs with
400 x 400mm spacing, first remove the support
tubes and release the locking carriages (c). Then
continue to parts A, B, C, and D below.
[01]
002543.eps
LF228 - adjust monitor bracket size
002543.eps
LF228 - adjust monitor bracket size
[L]
A
D
B
C
[01]
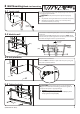
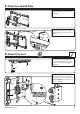
14 - 81 cm
(5-32 in.)
[U]
A. Loosen the upper [U] and lower [L] fasteners.
B. Adjust the TV plate [01] to fit the hole pattern of your TV.
C. Be sure that the center column is aligned with the center of your TV.
D. Tighten the upper [U] and lower [L] fasteners. Do not overtighten.
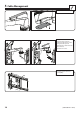
1 Select TV Hardware and Mount TV Brackets
Your TV type will help you determine which hardware configuration to
use. Match your type of TV to the suggested hardware configuration
on the next page.
A. Installation option without spacers (TVs with flat backs)
B. Installation option using 14mm spacers (TVs with irregular backs)
C. Installation option using 24mm spacers (For TVs with irregular
backs that require more length than the 14mm spacer provides.)
Hand thread screws into the threaded inserts on the back of your TV
to determine the correct screw diameter (M4, M6, or M8).
CAUTION: Avoid potential personal injuries and property
damage! Verify that there are adequate threads to secure the brackets
to the monitor. If you encounter resistance, stop immediately
and contact customer service. Use the shortest screw and spacer
combination to accommodate your needs. Using hardware that is too
long may damage your TV.
B C
1-1 Select the hardware diameter and length
A
[23]