VLL10 (6901-002034 <02>) Wood Stud Concrete 10mm (3/8 in.) Sanus Systems 2221 Hwy 36 West Saint Paul, MN 55113 USA Customer Service Americas: 800-359-5520 • 651-484-7988 • info@sanus.com Europe, Middle East, and Africa: + 31 40 2324700 • europe.sanus@milestone.com Asia Pacific: 86 755 8996 9226 • sanus.ap@milestone.com sanus.com ©2009 Milestone AV Technologies, a Duchossois Group Company. All rights reserved. Sanus is a division of Milestone.
A English Norsk IMPORTANT SAFETY INSTRUCTIONS – SAVE THESE INSTRUCTIONS – PLEASE READ ENTIRE MANUAL BEFORE USING THIS PRODUCT Specifications VIKTIGE SIKKERHETSINSTRUKSJONER – TA VARE PÅ DISSE INSTRUKSJONENE – LES HELE HÅNDBOKEN FØR DU BRUKER DETTE PRODUKTET Spesifikasjoner Ù Weight capacity: 56.6 kg (125 lbs) Ù Vektkapasitet: 56.
B ? English Concrete/Concrete Block Walls Choose an Option Do Not Murs en béton coulé ou en blocs de béton Sélectionnez une option Interdit Beton-/Betonsteinwände Wählen Sie eine Option Tun Sie Folgendes nicht Paredes de hormigón o de bloques de hormigón Elija una opción Prohibido Paredes de concreto/Paredes de bloco de concreto Escolha uma opção Não Muren van beton/ betonblokken Kies een optie Niet Pareti in calcestruzzo/blocchi di calcestruzzo Scegliere un'opzione Divieto Τοίχοι από σ
English WARNING: This product contains small items that could be a choking hazard. Caution / Warning Repeat Step Heavy! Assistance Required. Ce produit contient de petites pièces qui peuvent représenter un risque d’étouffement. ATTENTION/ AVERTISSEMENT! Répétez l’étape TRÈS LOURD ! Cette étape requiert deux personnes. Dieses Produkt enthält kleine Teile, die zum Erstickungstod führen können.
C CAUTION: English Português CAUTION: Avoid potential personal injuries and property damage! ATENÇÃO: Evite possíveis ferimentos pessoais e danos à propriedade! ! Ù Do not use this product for any purpose not explicitly specified by Sanus Systems. Ù Não use este produto para uma finalidade diferente daquela explicitamente especificada pela Sanus Systems. Ù The wall must be capable of supporting five times the weight of the TV and mount combined.
CAUTION: Ελληνικά Русский ΠΡΟΣΟΧΗ: Αποφύγετε την πιθανή πρόκληση τραυματισμού ή υλικής βλάβης! ОСТОРОЖНО! Соблюдайте правила безопасности, чтобы предотвратить возможные травмы и повреждение имущества! Ù Μη χρησιμοποιείτε αυτό το προϊόν για οποιονδήποτε σκοπό που δεν ορίζεται ρητά από τη Sanus Systems. Ù Не используйте изделие для какой-либо цели, явно не оговоренной компанией Sanus Systems.
CAUTION: ᮹ᴀ䁲 ⊼˖ȹȴșຕ䴶ȃ⸈᧡ǡ䍋ǨȞǿǙȝǛȀ⊼ᛣǬǻǤǵǪǙDŽ Ù Sanus SystemVǡᯢ⺎ȀᣛᅮǬǻǙȠҹȃⳂⱘǼᴀ㻑કȧՓ⫼Ǭ ǿǙǼǤǵǪǙDŽ Ù পȟҬǦܜȃຕȄǃɪɓɇόǽɦȮɻɐȃ㎣䞡䞣ȃ סȧᬃǝȞ ȡǿǦȡȅǿȟȓǰȨDŽ Ù ᴀ㻑કȄ䞥ሲɁɇɋɑȃຕǼȃՓ⫼ȀȄ䘽ǬǻǙȓǰȨDŽ Ù ǨǨȀ㿬䓝ǪȡȠ䂀ᯢȧ⧚㾷ǼǢǿǙจড়ǃȓǴȄ㻑કȃপȟҬ Ǧǃ㌘ȔゟǻǃՓ⫼ȀǹǙǻ䊾ଣǡǗȠจড়ǃ6DQXV 6\VWHPVȳ ɁɇɦόȽόɛɁȓǴȄ䁡ᅮὁ㗙ȀǟଣǙড়ȤǰǤǵǪǙDŽ Ù Sanus SystemVȄǃϡ䘽ߛǿ㌘ȔゟǻșՓ⫼ȀȝǸǻ䍋ǢǴ⸈᧡ȓ ǴȄȹȴȀᇒǬǻ䊀ӏȧ䉴ǙȓǰȨDŽ խ֮ ࣹრ; ᝩ܍䊝ڇԳߪ䣣୭ࡉ凗䣈䮦䀜Μ Ù 冉֎㰒ڼ䣈شՊ˦˴́̈̆ ˦̌̆̇˸̀̆ ࣔ┛ਐࡳא؆ऱࠡؾהऱΖ Ù 䩗ᕻऱࢭૹԺؘ和۟֟㧃ࠩ䯲قᕴࡉ䩗ᕻ֭ਮ䭇ૹၦऱնΖ Ù ء䣈լ⃰شՊ८㺉囅䩗Μ Ù ڕ൞լᇞ㪤ࠄ円ࣔΔࢨ㢑ء䣈ऱڜ٤ڜ僞Εࣈ࠵ࢨࠌڶژشጊ 向Δ冉侶ߓ˦˴́
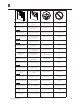
D English Norsk Supplied Parts and Hardware Before starting assembly, verify all parts are included and undamaged. If any parts are missing or damaged, do not return the damaged item to your dealer; contact Sanus Systems Customer Service. Never use damaged parts! NOTE: Not all hardware included will be used. Medfølgende deler og utstyr Se til at alle deler følger med og er uskadde før du begynner med monteringen. Hvis noen deler mangler eller er defekte, skal du ikke returnere dem til forhandleren.
[01] x 1 [02] x 2 [04] x 4 [03] x 1 [05] x 4 M4 x 12mm M4 x 30mm M4 x 40mm [06] x 4 [07] x 4 [08] x 4 M5 x 12mm [09] x 4 M5 x 30mm M5 x 40mm [10] x 4 [11] x 4 M6 x 14mm M6 x 40mm [12] x 4 [13] x 4 M8 x 16mm M8 x 45mm [16] x 4 [17] x 4 [18] x 4 14mm 24mm [19] x 4 [20] x 4 6901-002034 <02> M4 / M5 M6 / M8 [14] x 4 [15] x 4 9
1 ? CAUTION: English Español Install Brackets Instale los soportes 1. Determine the bolt diameter for your TV and your TV type. 1. Ù For TVs with a flat/unobstructed back, see 1-1. Antes de instalar los soportes, determine el diámetro de los pernos según el tipo de televisor que tiene: Ù For TVs with an irregular/obstructed back, see 1-2 or 1-3. Ù Si la parte posterior del televisor es plana o no presenta obstrucciones, continúe con el paso 1-1.
Italiano Dansk Installare i bracci Montering af beslag 1. Prima di installare i bracci, determinare il diametro corretto per il televisore e per il tipo di televisore: 1. Find diameteren på skruebolten på dit TV, og undersøg TV-typen: Se trin 1-1 for TV-apparater med flad/uhindret bagside. Ù Ù Per televisori a dorso piatto/libero, vedere il passo 1-1. Ù Se 1-2 eller 1-3- for TV-apparater med irregulær/blokeret bagside. Ù Per televisori a dorso irregolare/ostruito, vedere il passo 1-2 o 1-3.
polski ᮹ᴀ䁲 Montaż wsporników ɞɱȹɋɐȃপȟҬǦ 1. Przed rozpoczęciem montażu wsporników, określić średnicę śruby telewizora i typ telewizora: ɞɱȹɋɐȧপȟҬǦȠࠡȀǃɎɴɛȃ。串ȀᖰǭǴɤɳɐᕘȧ ߸ᮁǬȓǮDŽ Ù Dla telewizorów z płaskim tyłem/bez przeszkód, patrz punkt 1-1. Ù Ù Dla telewizorów z nieregularnym tyłem/z przeszkodami, patrz punkty 1-2 lub 1-3.
1-1 [02] [02] 4x M4 M5 [02] [02] [14] [14] [06] M6 M8 [02] [02] [15] 6901-002034 <02> [09] [12] [15] [16] 13
1-2 [02] [02] 4x M4 M5 [19] [19] [18] [14] [18] [07] M6 [10] M8 [20] [20] [18] 14 [14] [15] [18] [13] [15] [17] 6901-002034 <02>
1-3 [02] [02] 4x M5 M4 [20] [20] [18] 6901-002034 <02> [18] [14] [08] [14] [11] 15
2 English Adjust Cord Length Dansk For ease of access, cords should be level with bottom of TV. For at lette adgangen bør kabler flugte med den nederste del af tv. Français Svenska Réglez la longueur du câble Justera sladdlängd Pour faciliter l’accès, les câbles doivent être au même niveau que le bas du téléviseur. För enklare åtkomst ska sladdar vara i linje med TV:ns undersida. Deutsch Kabellänge anpassen Für einen leichteren Zugang sollten Kabel am Boden des Fernsehers ausgerichtet werden.
2x 6901-002034 <02> 17
3 ? 10 mm (3/8 in.) 5 mm (3/16 in.) CAUTION: English Português Wall Mounting For assistance in determining wall plate location, see Height Finder at sanus.com. Montagem na parede Para obter assistência na determinação da localização da placa de parede, ver Altura Finder no sanus.com. CAUTION: Avoid potential injuries or property damage! Ù Do not over-tighten the lag bolts [04]. Ù Tighten the lag bolts only until they are pulled firmly against the wall plate [01].
Norsk polski Veggmontering For hjelp til å avgjøre veggen plate sted, se Høyde Finder på sanus.com. Montaż na ścianie Aby uzyskać pomoc w określeniu lokalizacji płytki ścienne, patrz Wysokość Wyszukiwarka na sanus.com. FORSIKTIG Unngå potensiell skade på person eller materiell! Ù Ikke trekk sekskantboltene for hardt til [04]. Ù Trekk sekskantboltene til bare så hardt at de sitter godt inntil veggplaten [01].
3-1 5 mm (3/16 in.) English Nederlands 1. Locate studs. Verify the center of the stud with an awl or thin nail or use an edge to edge stud finder. 1. Zoek de dragers. Controleer het midden van de drager met een priem of een dunne spijker, of gebruik een balkzoeker van rand tot rand. 2. Level the wall plate [01] and mark the hole locations. 2. Plaats de wandplaat [01] en markeer de locaties van de gaten. 3. Drill pilot holes as illustrated. 3.
Svenska խ֮ 1. Leta upp reglarna. Markera regelns mitt med en pryl eller en smal spik, eller använd en regelsökare (kant till kant). ˄ˁ ┛ࡳ䩗ਪۯᆜΖ ࠌڞش十ࢨ伟匏ࢨृࠌش㤈ࠩ㤈䩗ਪބᕴ┛ࡳ䩗 ਪऱխ֨Ζ 2. Se till att väggplattan [01] är rak och markera hålplatserna. ˅ˁ 㰒ᕻࣨ [01] ࣋ᆜֽؓΔྥٿ䰬ࣹ֞ۯΖ 3. Borra styrhål enligt bilden. ˆˁ ਊᅃ䨞ؚق十䪰֞Ζ 4. Använd en borr med borrspets sexkant [03] för att dra åt träskruvarna [04] tills de är tätt åtskruvade mot väggplattan.
1 2 41 - 61cm (16 - 24 in.) [01] 3 < 16 mm (5/8 in.) 63.5mm 2.5 in. 63.5 mm (2.5 in.
6901-002034 <02> 23
3-2 10 mm (3/8 in.) English Italiano 1. Mettere a livello la piastra a muro [01] e contrassegnare le posizioni dei fori. 2. Praticare i fori guida come illustrato. 3. Inserire le protezioni delle viti [05]. Quindi, inserire le viti [04] con un trapano avvitatore e inserto esagonale [03]. 1. Level wall plate [01] and mark the hole locations. 2. Drill pilot holes as illustrated. 3. Insert lag bolt anchors [05]. Then insert lag bolts [04] using a drill and the Allen Driver Bit [03].
polski 1. Wyrównać płytę ścienną [01] i zaznaczyć położenie otworów. 2. Wywiercić otwory prowadzące. 3. Włożyć śruby kotwiczące [05]. Włożyć śruby do drewna [04] za pomocą wiertarki i końcówki imbusowej [03]. UWAGA: Sprawdzić, czy kotwy [05] są równe z powierzchnią ściany betonowej. Česky 1. Vyrovnejte nástìnnou desku [01] a oznaète si umístìní otvorù. 2. Podle ilustrace vyvrtejte vodicí díry. 3. Vložte kryty kotvicích šroubů [05].
1 [01] 2 < 16 mm (5/8 in.) 63.5 mm (2.5 in.
6901-002034 <02> 27
4 English Dansk Hang the TV onto the Wall Plate Hæng tv’et på vægpladen Français Svenska Suspendez le téléviseur sur la plaque murale Häng TV:n på väggplattan Deutsch Русский Aufhängen des Fernsehgeräts an der Wandplatte Крепление телевизора к настенной пластине Español polski Cuelgue el televisor en la placa de la pared Zawieś telewizor na płycie ściennej Português Česky Suspenda a televisão na Placa de Parede Zavěste televizor na nástěnnou desku Nederlands Türkçe Hang de tv aan de mu
[02] [01] 6901-002034 <02> 29
5 English Nederlands Cable management Kabelbeheer 1. Pull down on cord to release ClickStands. 1. Trek het snoer omlaag om de ClickStands op te tillen. 2. Gently pull TV away from wall. ClickStands will fall into place. 2. 3. Complete cabling. Trek de tv voorzichtig weg van de wand. De ClickStands vallen op hun plaats. 4. Pull down on cord to lift ClickStands. 3. Voltooi de bekabeling. Ease the TV back to the wall. ClickStands will slide upward. 4.
Svenska ᮹ᴀ䁲 Kabelhantering ȹόɞɳㅵ⧚ 1. Dra snöret nedåt för att frigöra ClickStands. ȻόɑȧϟȀǦǻᓩǢǃ&OLFN6WDQGVȧᣕǶϞǧȓǮDŽ 2. Dra försiktigt ut tv:n från väggen. ClickStands klickar på plats. ຕǠȞɎɴɛȧDzǸǽࠡȀᓩǸᔉȟȓǮDŽ&OLFN6WDQGVǡ᠔ᅮ ȃจ᠔ȀঢȓȟȓǮDŽ ȹόɞɳ䜡㎮ȧᅠњǬȓǮDŽ ȻόɑȧϟȀǦǻᓩǢǃ&OLFN6WDQGVȧᣕǶϞǧȓǮDŽ 3. Sätt i alla sladdar. 4. Dra snöret nedåt för att lyfta ClickStands. 5. Skjut försiktigt tillbaka tv:n mot väggen. ClickStands skjuts uppåt.
2 1 3 32 6901-002034 <02>
4 6901-002034 <02> 5 33
English Norsk Milestone AV Technologies and its affiliated corporations and subsidiaries (collectively, “Milestone”), intend to make this manual accurate and complete. However, Milestone makes no claim that the information contained herein covers all details, conditions, or variations. Nor does it provide for every possible contingency in connection with the installation or use of this product. The information contained in this document is subject to change without notice or obligation of any kind.