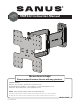
n llatio Insta ilable at a v a video nus.com Sa VMF322 Instruction Manual We are here to help! Please contact Customer Service with any questions. Customer Service Americas: 800-359-5520 • 952-225-6013 • info@sanus.com Europe, Middle East, and Africa: + 31 40 2324700 • europe.sanus@milestone.com Asia Pacific: 86 755 8996 9226 • sanus.ap@milestone.com SANUS • 6436 City West Parkway • Eden Prairie, MN 55344 USA ©2012 Milestone AV Technologies, a Duchossois Group Company. All rights reserved.
English - How to use this manual Suomi - Oppaan käyttäminen For best results, reference both the text and illustrations. OR Select one item or the other. OPT This item is optional English Text Pages 3-13 Saavutat parhaan tuloksen tutustumalla sekä tekstiin että kuviin. Leikkaa katkoviivaa pitkin ja yhdistä kuvat ja suomenkielinen teksti. OR Valitse toinen vaihtoehdoista. OPT Tämä vaihtoehto on valinnainen.
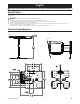
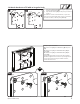
English IMPORTANT SAFETY INSTRUCTIONS – SAVE THESE INSTRUCTIONS – PLEASE READ ENTIRE MANUAL PRIOR TO USE Specifications Ù Ù Ù Weight capacity-DO NOT EXCEED: 27.2 kg (60 lb.) includes TV and any accessories Tilt: –10° Level: ±1.5° CAUTION: Avoid potential personal injuries and property damage! Ù Ù Ù Ù Ù Do not use this product for any purpose not explicitly specified by manufacturer. The wall must be capable of supporting five times the weight of the monitor and mount combined.
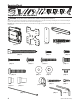
Required Tools 13 mm (1/2 in.) 5.5 mm (7/32 in.) 5 mm (3/16 in.) 10 mm (3/8 in.) Supplied Parts and Hardware WARNING: This product contains small items that could be a choking hazard if swallowed. Before starting assembly, verify all parts are included and undamaged. If any parts are missing or damaged, do not return the damaged item to your dealer; contact Customer Service.
(6901-002142 <02>) 5
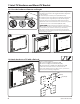
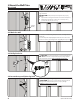
1 Select TV Hardware and Mount TV Bracket 1-1 Select the hardware diameter and length Your TV type will help you determine which hardware configuration to use. Match your type of TV to the suggested hardware configuration on the next page. A. Installation option without spacers (TVs with flat backs) B. Installation option using 14mm spacers (TVs with irregular backs) C. Installation option using 24mm spacers (For TVs with irregular backs that require more length than the 14mm spacer provides.
1-2 Attach bracket to a TV with an irregular back 1 1. 2 [17, 18] 2. [02] [02] [16] Push the shoulder washer [16] through the appropriate openings of the brackets [02]. Snap shoulder washer [16] into the spacer you selected in step 1-1. If your TV has a curved or obstructed back, or if you need more room to accommodate cables, recesses, or protrusions, use either the 14mm, or 24mm spacer [17 or 18]. [16] In step 1-1 if you selected the: M4 x 30mm screw [09] use the M4 washer [14] and spacer [17].
2 Mount the Wall Plate Wood stud 13 mm (1/2 in.) 2-1 Locate stud 5½ mm (7/32 in.) Verify the center of the stud using an awl, a thin nail, or an edge to edge stud finder. CAUTION: Avoid potential personal injuries and property damage! Ù Ù Any material covering the wall must not exceed 16 mm (5/8 in.). Minimum wood stud size: common 51 x 102 mm (2 x 4 in.) (nominal 38 x 89 mm (1½ x 3½ in.)) < 16 mm (5/8 in.
2-5 Hang the wall plate onto the lag bolt Hang the wall plate [01] over the top lag bolt [06]. [01] [06] [01] [06] 2-6 Tighten wall plate lag bolts CAUTION: Improper use could reduce the holding power of the lag bolt. To avoid potential injuries or property damage: [06] [01] Ù Ù DO NOT over-tighten the lag bolts [06]. Tighten the lag bolts [06] only until they are pulled firmly against the wall plate [01].
2 Mount the Wall Plate Solid concrete or concrete block 13 mm (1/2 in.) 10 mm (3/8 in.) 5 mm (3/16 in.) 2-1 Mark the wall For assistance in determining wall plate location, see Height Finder at sanus.com. Level the wall plate template [03] and mark the hole locations. The third hole is for the cable management clamp [19] and is optional. OPT CAUTION: Avoid potential injuries or property damage! Ù Ù Ù [03] Mount the wall plate [01] directly onto the concrete surface.
2-5 Hang the wall plate onto the lag bolt Hang the wall plate [01] over the top lag bolt [06]. [05] [01] [06] [05] [21] 2-6 Tighten lag bolts [06] [06] [01] Insert lag bolts [06] through the wall plate [01] and into the anchors [05]. CAUTION: Improper use could reduce the holding power of the lag bolt. To avoid potential injuries or property damage: Ù Tighten the lag bolts [06] only until they are pulled firmly against the wall plate [01]. Ù DO NOT over-tighten the lag bolts [06].
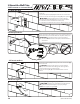
3 Hang your TV onto the Wall Plate (B) (S) HEAVY! You will need assistance with this step. Move the TV interface buttons (B) over and into the keyhole slots (S) on the arm [01]. Secure with the safety screws [07] using allen key [24]. [01] (S) [02] [01] (B) [02] (B) [07] [24] 4 Adjustments 1. Adjust tilt tension tension using either the finger tip tilt function OR by turning the tilt adjustment knob by by hand or with the M3 allen key [23]. 2. Adjust level using the 5/32 in, allen key [24].
5 Cable Management 1 1. Thread cable ties [22] through the slots in the arm [01]. Route cables alongside the arm [01] and secure with cable ties [22]. 2. Attach cable covers [04] to the arm [01]. 3. Route cabels through the cable clamp [19].
English Suomi Milestone AV Technologies and its affiliated corporations and subsidiaries (collectively, “Milestone”), intend to make this manual accurate and complete. However, Milestone makes no claim that the information contained herein covers all details, conditions, or variations. Nor does it provide for every possible contingency in connection with the installation or use of this product. The information contained in this document is subject to change without notice or obligation of any kind.
VMF322 Wall Plate Template Suomi English Please refer to the instruction manual for additional instructions and important cautions and warnings. Katso kayttoohjekirjasta lisaohjeita, tarkeita huomautuksia ja varoituksia. Fran~ais Svenska Veuillez consulter le manuel d'instructions pour obtenir des directives supplementaires, des mises en gardes et des avertissements importants. Se bruksanvisningen for ytterligare instruktioner och viktiga forsiktighetsatgarder och varningar.