
Owner's Manual
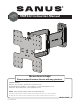

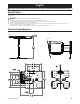
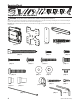

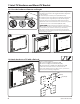
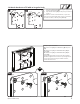
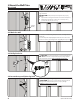

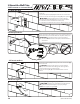
Table Of Contents

(6901-002142 <02>)
10
2 Mount the Wall Plate
Solid concrete or concrete block
2-1 Mark the wall
2-2 Drill pilot holes
2-3 Insert anchors
Use the 10mm (3/8 in.) bit to drill the top two holes to a depth of 75mm (3 in.)
Use the 5mm 3/16 in.) bit to drill the third hole to a depth of 32mm (1¼ in.)
CAUTION:
Avoid potential injuries or property damage!
Ù Pilot holes MUST be drilled to the depth, and with the drill bits,
stated above.
Ù Never drill into the mortar between blocks.
Insert lag bolt anchors [05] into the top two holes. Insert anchor [21]
into the last hole.
CAUTION:
Avoid potential injuries or property damage!
Improper use could reduce the holding power of the lag bolt. To
avoid potential injuries or property damage:
Be sure the anchors [05, 21] are seated ush with the concrete
surface.
For assistance in determining wall plate location, see Height Finder at
sanus.com.
Level the wall plate template [03] and mark the hole locations. The
third hole is for the cable management clamp [19] and is optional.
CAUTION:
Avoid potential injuries or property damage!
Ù Mount the wall plate [01] directly onto the concrete surface.
Ù Minimum solid concrete thickness: 203mm (8 in.)
Ù Minimum concrete block size: 203 x 203 x 406 mm (8 x
8 x 16 in.)
13 mm
(1/2 in.)
10 mm
(3/8 in.)
[03]
5 mm
(3/16 in.)
2-4 Insert lag bolts
[05]
[05]
[21]
[05]
[06]
[05]
[21]
Insert only the top plate lag bolt [06] at this time.
CAUTION:
Improper use could reduce the holding power of
the lag bolt. To avoid potential injuries or property damage:
DO NOT over-tighten the lag bolt [06].
OPT
OPT
75 mm (3 in.)
32 mm (1¼ in.)