Sonos One ® ™ ™ Sonos PLAY:1 ® ™ Sonos PLAY:3 ® ™ Sonos PLAY:3 ® WSSA1 / WSSA2 SPEAKER STAND INSTRUCTION MANUAL We’ll Make It Stress-Free If you have any questions along the way, just give us a call. 1-800-359-5520.
IMPORTANT SAFETY INSTRUCTIONS – PLEASE READ ENTIRE MANUAL PRIOR TO USE – SAVE THESE INSTRUCTIONS Before getting started, let’s make sure this product is perfect for you! This stand is designed to support only Sonos® One™, PLAY:1™ and PLAY:3™ speakers. CAUTION: Avoid potential personal injuries and property damage! • • • • • Check your speaker owner’s manual to see if there are any special requirements for mounting your speaker.
Dimensions PLAY:1™ SPEAKER BRACKET TOP VIEW 11.00 279.4 10.90 276.9 FRONT VIEW ONE™ SPEAKER BRACKET [with PLAY:1™ BRACKET] ADJUSTABLE RANGE PLAY:3™ VERTICAL SPEAKER BRACKET 24.66 626.4 42.00 1066.8 PLAY:3™ HORIZONTAL SPEAKER BRACKET 25.00 635.
Parts and Hardware WARNING: This product contains small items that could be a choking hazard if swallowed. Before starting assembly, verify all parts are included and undamaged. If any parts are missing or damaged, do not return the damaged item to your dealer; contact Customer Service. Never use damaged parts! NOTE: Not all hardware included will be used. Quantities shown are for one speaker stand.
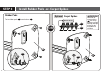
STEP 1 Route Power Cables STEP 2 Attach Base to Shaft 03 04 02 02 01 Ethernet (if needed) 5
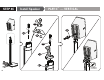
STEP 3 Install Rubber Pads -or- Carpet Spikes Rubber Pads Optional Carpet Spikes Twist rubber pads 05 into the base 02 . WARNING: HEIGHT ADJUST 07 OR = = 06 = The ends of carpet spikes 06 are sharp and may scratch flooring, damage wiring, or be hazardous to children.
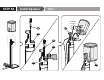
STEP 4 Attach Speaker to Shaft Based on your speaker model, follow the correct STEP 4.
STEP 4A Install Speaker One™ ETHERNET (if needed) 08 09 09 08 10 09 10 8
STEP 4B Install Speaker PLAY:1 ™ ETHERNET (if needed) 09 13 09 9
STEP 4C ™ Install Speaker PLAY:3 — VERTICAL 09 13 08 10 08 11 01 ETHERNET (if needed) 10
STEP 4D Install Speaker ™ PLAY:3 — HORIZONTAL 09 08 10 08 13 12 ETHERNET (if needed) 01 11
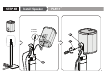
Height Adjustment PLAY:3 shown LOWER PLAY:3 shown CAUTION: Avoid potential personal injuries and property damage! RAISE 01 15 Hold upper post 01 BEFORE pressing trigger button 15 . PLAY:3™ (HORIZONTAL) 01 Trigger button 15 is removable to prevent accidental lowering, or to route cables into post 01 (STEP 5).
STEP 5 Secure Cables 4X PLAY:3 shown 14 15 14 13
ESPAÑOL INSTRUCCIONES IMPORTANTES DE SEGURIDAD: GUARDE ESTAS INSTRUCCIONES Y LEA TODO EL MANUAL ANTES DE UTILIZAR ESTE PRODUCTO. Antes de comenzar, verifiquemos que este producto sea el ideal para sus necesidades. PRECAUCIÓN: Evite posibles lesiones personales y daños materiales. ƕ Consulte el manual del usuario de su altavoz para ver si existe algún requisito especial para instalar su altavoz en la pared.
ESPAÑOL PASO 1 Pasar el cable de alimentación de los altavoces PASO 2 Ajustar la base en el tubo PASO 3 Instalar las almohadillas de aislamiento de goma o las puntas para alfombras (consulte la página 5) (consulte la página 5) (consulte la página 6) ALMOHADILLAS DE AISLAMIENTO DE GOMA - Gire las almohadillas de aislamiento de goma 05 hacia la base 02 .
Thank you for choosing SANUS! Please take a moment to let us know how we did: Call us: 1-800-359-5520 Email us: info@sanus.com Leave a review: sanus.com Milestone AV Technologies and its affiliated corporations and subsidiaries (collectively, “Milestone”), intend to make this manual accurate and complete. However, Milestone makes no claim that the information contained herein covers all details, conditions, or variations.