
Manual
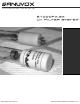


COMMERCIAL SYSTEMS
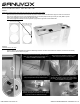
STEP #1
Install Inlet / Outlet Collars (each collar are a pair of 2 x 8” round inlets and outlets)
- Open the three (3) access doors and insert the two pairs of collars into the S1000FX-GX. Align the holes and screw down
each pair of collars from the top of the S1000FX-GX with the included philips screws (6 screws per collar) Make special
notice of the orientation of the notch on the right side collar.
The notch (highlighted in black) should be pressed up against the right side of the S1000FX-GX.
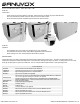
STEP #2
Installation of the UV Lamp
- The UV Lamp is to be installed in the Aluminum Reflecting Chamber. To slide out the Aluminum Chamber, remove the two butterfly
bolts and screws which secure it in place.
Inlet Collar (left side)
Outlet Collar (right side)
Carefully pull the wire-set out to allow for enough
“slack” as to slide the Reflecting Chamber out to
allow for installation of the UV Lamp
Slide the Aluminum Reflecting Chamber out to
allow easy access to the UV Lamp Clamp.
Plug the white-plug onto the UV Lamp’s 4 pins.
The plug will only fit on in two of four ways. Either
way is fine. The exposed wire-set is Teflon coated
and is resistant to UV exposure.
Insert the end-cap with foam gasket into the clamp
assembly and tighten. Be careful not to over tighten
as you do not want to break the end-cap.
Adhere the included foam gasket (incl. in the Lamp
box) to the porcelain end-cap with the 4 pins.
1-888-726-8869 www.sanuvox.com SANUVOX TECHNOLOGIES INC. COPYRIGHT 2010 v.1.0