TABLE OF CONTENTS Introduction 2 Safety Instructions 3 Location of Controls 4 Remote Control Use 5 Antenna Connection 6 Cable TV(CATV) Connection 7 Video/Audio Connections 8 Basic Operation 10 Basic Menu Operation 11 Set-Up 13 Antenna Selection Auto Channel Programming Manual Memory (Channel Add/Delete) Fine Tuning LNA Effects Picture Adjustment 18 P.STD Button Custom(Manual) Adjustment Sound Adjustment 20 Using S.
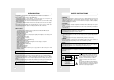
INTRODUCTION SAFETY INSTRUCTIONS Congratulations on your purchase of this Sanyo MTS stereo TruFlat TM screen television. Sanyo's TruFlat TM screen offers these important benefits... Distortion-Free Images - Sanyo TruFlat TM recreates the theater screen experience by eliminating distortion that a curved conventional TV screen produces. Wider Viewing Angle - No curves mean that the full picture can be seen from a wider seating range in your room.
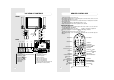
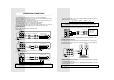
LOCATION OF CONTROLS REMOTE CONTROL USE FRONT Point to remote control sensor of the TV set. The maximum operable distance is approximately 20 feet from the remote control sensor, and not more than 30 to either side of center. The operation of the remote control is most effective when there is nothing between it and the remote control sensor. The duration of the batteries is approximately 6 months to 1 year. Replace the batteries when the remote operation becomes unstable.
ANTENNA CONNECTION CABLE TV (CATV) CONNECTION ANTENNA A 75-ohm coaxial cable connector is built into the set for easy hookup. When connecting the 75 ohm coaxial cable to the set, screw the 75-ohm cable to the COAXIAL CABLE CONNECTOR. Some cable TV companies offer "premium pay channels". Since the signals of these premium pay channels are scrambled, a cable TV converter/descrambler is generally provided to the subscriber by the cable TV company.
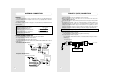
VIDEO/AUDIO CONNECTIONS Prior to making any connections to your TV set, be sure to turn the POWER off. For a more detailed understanding of each connection, it is recommended that you read the instruction manual for each connected component. If you use video or audio equipment placed near the TV, picture and/or sound may become distorted due to interference between these components. In such case, separate each piece of equipment at a sufficient distance.
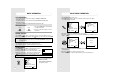
BASIC OPERATION BASIC MENU OPERATION FIRST PREPARATIONS Connect either Antenna or Cable TV according to "ANTENNA CONNECTION" instructions on page 6. Insert batteries into the remote control unit according to "REMOTE CONTROL USE" instructions on page 5. Insert the AC Cord Plug into a standard 120V, 60Hz polarized AC outlet. 1. Press POWER button to turn the TV on. 2. Press MENU button and move the cursor to "SETUP" option and press VOL + button. The "SET UP" menu is displayed.
BASIC MENU OPERATION SET-UP You can execute every operation by pressing CH / buttons and VOL +/- buttons alternately. If you learn one menu, you can easily operate other functions by viewing pictures. 1. Pressing these buttons alternately makes every operation easy. 2. MOVE Press CH / buttons to move cursor. 3. SELECTION Press VOL +/-buttons to change your selection.
SET-UP SET-UP AUTO CHANNEL PROGRAMMING MANUAL MEMORY (channel add/delete) This function allows the channels to be memorized automatically to match the TV broadcasts and cable channels in your area. 1. Press MENU button, move the cursor to "SETUP" option and press VOL + button. The "SET UP" menu is displayed. MENU SETUP PICTURE SOUND TIME SETUP FUNCTION LANGUAGE : ENGLISH ANTENNA : CATV2 AUTOPROGRAM FINE TUNE :0 LNA : ON : SEL. + : ENTER 2. Press CH / VOL + button. : EXIT : SEL. + : ENTER 1.
SET-UP SET-UP FINE TUNING LNA (Low Noise Amplifier) EFFECTS If the reception is clear, you do not have to fine-tune the channel, because this is done automatically during auto program and manual memory. If, however, the signal is weak or distorted, you may have to fine-tune the channel manually. Set LNA ON to increase a weak incoming signal. However, if you are located in a strong signal area, such as nearby a broadcasting station, and if the picture is distorted, set LNA OFF. 1.
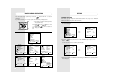
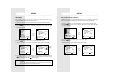
PICTURE ADJUSTMENT PICTURE ADJUSTMENT CUSTOM (MANUAL) ADJUSTMENT P.STD (Picture Standard) BUTTON By pressing the P.STD button on the remote control, you can sequentially select one of four preset picture standards. You can sequentially select and adjust one of five picture properties. Contrast, Brightness, Sharpness , Color, or Tint. 1 (1) CUSTOM mode (2) STANDARD mode (3) DYNAMIC mode (4) MILD mode MODE CUSTOM Select this mode to use your customized picture setting. See next page.
SOUND ADJUSTMENT SOUND ADJUSTMENT USING S.STD BUTTON USING ON-SCREEN MENU There is a choice of five audio settings. By pressing the S.STD button, the five settings can be viewed in the sequence illustrated. You can also select a sound setting by using the on-screen menu. 1 1. Press S.STD button. Whenever this button is pressed, the mode will change as follows. CUSTOM CUSTOM STANDARD STANDARD MUSIC MOVIE SPEECH Select this mode to hear the adjusted sound you want. See EQUALIZER page 22.
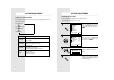
SOUND ADJUSTMENT SOUND ADJUSTMENT EQUALIZER HEADPHONES You can adjust five frequency ranges to your preference. Follow these instructions to select the audio source (main screen or PIP channel) that you want to receive through the headphones. If you want to listen to sound from the PIP, make sure that sound from the PIP is being received. 1 1 MENU PICTURE SOUND TIME SETUP FUNCTION LANGUAGE : ENGLISH : SEL. + : ENTER 2 Press PIP button to display a PIP.
SOUND ADJUSTMENT 4 SURROUND SOUND HEADPHONE SELECT VOLUME : MAIN : 30 : SEL. + : SET 5 SOUND ADJUSTMENT Move the cursor to SELECT by pressing VOL+ button. Each time you press, the audio source changes between main picture and PIP. SOUND MENU 1 : PREV. HEADPHONE SELECT VOLUME : SEL. : MAIN : 30 : ADJ Move the cursor to VOLUME and press VOL+/- buttons, the headphone sound level is adjusted. MENU PICTURE SOUND TIME SETUP FUNCTION LANGUAGE : ENGLISH : SEL. + : ENTER 2 : PREV. : SEL.
SOUND ADJUSTMENT SOUND ADJUSTMENT MTS MTS USING MTS BUTTON : Your TV set incorporates an MTS (Multichannel Television Sound) decoder to receive stereo broadcasts and any accompanying SAP (Second Audio Program) such as another language sound track). USING SOUND MENU : 1 MENU PICTURE SOUND TIME SETUP FUNCTION LANGUAGE : ENGLISH 1.
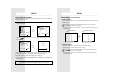
CLOCK/TIMER CLOCK/TIMER CLOCK ON/OFF TIMER You can set the television’s clock so that the current time will be displayed when you press the MENU button on the remote control. You must set the current time before you can set the automatic On/Off timer. The ON/OFF timer lets you use alarm and automatic off functions. 1 MENU PICTURE SOUND TIME SETUP FUNCTION LANGUAGE : ENGLISH : SEL. + : ENTER 2 WHITE TIME CLOCK TIMER ON TIME OFF TIME ON CHANNEL : MOVE 3 : : : : : : : : : : : SEL.
CLOCK/TIMER CLOCK/TIMER 4 ON TIME CHANNEL NUMBER TIME CLOCK TIMER ON TIME OFF TIME ON CHANNEL : : : : : AM 06:00 ON AM 07:30 AM 12:00 TV 2 : SEL. + : ENTER 5 You can select the channel on which the TV turns on as programmed by ON-TIMER. This function will not work if the TIMER is set to OFF or the current time has not been set. Move the cursor to ON TIME by using CH / buttons and press the VOL + / buttons to set the time. (Refer to page 28) TIME CLOCK TIMER ON TIME OFF TIME ON CHANNEL : PREV.
OTHER FUNCTIONS OTHER FUNCTIONS BLUE BACKGROUND CCD : This TV set incorporates a CCD (Closed Caption Decoder) to enable viewing closed captions and TEXT broadcasts. Closed caption and TEXT each has 2 channels (CH1 & CH2). Closed caption and TEXT information can only be viewed if they are being broadcast by a television station, or contained in a videotape or videodisc. Press the CCD button to select CCD mode.
PICTURE-IN-PICTURE (PIP) AVM-32F9 ONLY PICTURE-IN-PICTURE (PIP) AVM-32F9 ONLY In this mode, you can enjoy viewing two programs at the same time. PIP STILL NOTE Your TV set must be connected to a VCR for PIP to function. Press STILL to freeze-frame the picture. Press STILL again to resume normal PIP screen. PIP PICTURE STILL MAIN PIP Press PIP on the remote control. When it is ON, the PIP screen appears in the lower right corner. Press PIP again to clear the PIP screen from the main screen.
V-CHIP OPERATION V-CHIP OPERATION WHAT IS THE V-CHIP? The V-CHIP is a microprocessor control circuit which recognizes TV and Motion Picture Ratings. These ratings are contained in a special electronic identification signal that is part of many television programs and recorded videotapes. An on-screen menu allows the parent to set a secret 4-key combination ACCESS CODE and choose which programs are suitable for viewing, and which programs should be blocked.
V-CHIP OPERATION MOTION PICTURE RATING V-CHIP OPERATION MOTION PICTURE RATING. This procedure allows parents to block programs which contain MOTION PICTURE ratings that they consider inappropriate see next page for Motion Picture ratings. RATING N/A (No rating) 1. Press VOL +, CH / button and select the rating which you wish to block. 2. Press VOL + button. VIEW (yellow) changes to LOCK (red) 3. To change the rating, press CH / button and select N/A, and then press VOL+ button.
V-CHIP OPERATION V-CHIP OPERATION TV PARENTAL GUIDE RATING N/A(No Rating): This procedure allows parents to block programs which contain TV Parental guide ratings that they consider inappropriate. Content labels are designed to indicate specific contents of TV programs within each TV Parental Guide rating. For example, if a program is rated TV-Y7 but has strong Fantasy Violence content, the program will be labeled as TV-Y7-FV.
V-CHIP OPERATION V-CHIP OPERATION TV-Y7 (FV;Directed to older children): This program is designed for children age 7 and above. TV-G (General audience): Most parents would find this rating suitable for all ages. Although this rating does not signify a program designed specifically for children, most parents may let younger children watch TV-G programs unattended. It contains little or no violence, no strong language and little or no sexual dialogue or situations.
V-CHIP OPERATION TV-14 (D/L/S/V: Parental caution recommended): This rating contains some material that many parents would find unsuitable for children under 14 years of age. Parents are strongly urged to exercise great care in monitoring the programs and are cautioned against letting children under the age of 14 watch unattended. TV-14 rated progams contain one or more of the following: Intense violence (V), intense sexual situations (S), strong coarse language (L), or intensely suggestive dialogue (D).
V-CHIP OPERATION V-CHIP OPERATION CANADIAN ENGLISH RATING TO ACTIVATE V-CHIP FUNCTION BLOCK CANADIAN ENGLISH RATING RATING REMARKS E Exempt CANADIAN ENGLISH RATING C Children C8+ Children eight years and older G General programming, PG Parental Guidance E C C8+ G PG 14+ 18+ 14+ Viewers 14 years and older 18+ Adult Programming suitable for all audience : SEL. + : SET 1. Press MENU. 2. Use CH / to select BLOCK. 3. Press VOL+ button to set BLOCK ON.
RECEPTION DISTURBANCE The most common types of television interference are as follows: TROUBLESHOOTING GUIDE Before requesting service, please refer to the following chart for the symptom and possible solution. For more information, see the corresponding page in this manual. SYMPTOM IGNITION : TV does not operate Black spots or horizontal lines may appear ; picture may flutter or drift.
THE SANYO COMFORT WARRANTY COLOR TELEVISION WARRANTY APPLICATION New, unused Sanyo Color Television products purchased in Canada through a Sanyo authorized dealer are warranted against manufacturing defects in materials and workmanship for ONE YEAR for parts and labor, from the date of purchase by the original retail purchaser. This warranty only applies in favor of the original retail purchaser of the warranted product. SANYO CANADA INC.'S RESPONSIBILITY During the warranty period, SANYO Canada Inc.