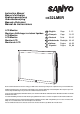
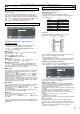
Instruction Manual Manuel d'utilisation Bedienungsanleitung Gebruiksaanwijzing Manuale d'Istruzioni CE32LM5R Manual de instrucciones LCD Monitor Moniteur d'affichage à cristaux liquides LCD-Monitor LCD-Monitor Monitor LCD Monitor de LCD GB English Page 2~12 F Français Page 13~22 D Deutsch Seite 23~32 NL Nederlands Bladzijde 33~42 I Italiano Pagine 43~52 E Español Página 53~68 Please read this Instruction book before using your LCD monitor.
GB SAFETY PRECAUTIONS GB CAUTION: Please read and retain for your safety. This unit has been engineered and manufactured to assure your personal safety, but improper use can result in potential electric shock or fire hazards. In order not to defeat the safeguards incorporated in this monitor observe the following basic rules for its installation, use and servicing. Installation and Use Important: (UK only) Do not allow anything to rest on the power cord.
SERVICING GB GB Servicing Your monitor is fully transistorised and does not contain any user serviceable components. You must not remove the rear cover of the monitor by yourself. The apparatus is working with high voltages and could damage objects or even endanger people. Leave all required repair and service jobs to an authorised service technician. He will exclusively use such spare parts that are complying with the same safety standards as applicable to the original parts.
GB GB End-User License The product (meaning the equipment or appliance to which this documentation relates) incorporates Software (the software applications, utilities and modules embedded within the Product) which is owned by Sanyo or its licensors. Before using the product, please read the End-User License Conditions detailed below.
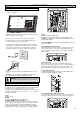
GB GB INSTALLATION Step : 1 Mains Connection ■ Connect the display unit to VGA, BNC and Scart connector as required. /DVI-D DVI-D 1. Connect the IEC power connector to the mains coupler at the rear of the LCD monitor as shown above. 2. Connect the power cord of the LCD monitor to a wall outlet. ✐ ✐ As this product does not have a mains On/Off switch, please ensure your mains plug is easily accessible. The LCD monitor is prepared for a mains voltage AC100~240V, 50Hz/60Hz.
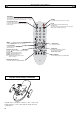
REMOTE CONTROL GB GB TV/AV button To switch from AV1, RGB, AV2, AV3, DVI or PC mode press repeatedly or Press and hold in a few seconds, an AV selection Standby menu appears. Select the mode you require using the 56 buttons To switch the monitor on and off. Also see page 7 Screen mode selector To select the screen mode, Auto, Natural, Full Zoom 16:9, Title 16:9,Zoom 14:9,title 14:9 or Normal. Refer to page 10 Recall To display Input selection information and the OFF Timer if set.
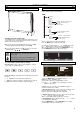
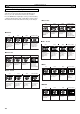
INSTALLATION GB GB Controls and Menus Menu Operation Many of your monitors functions are controlled through the menu function, using the remote control handset. Sound 1 2 Switching into/from standby mode ● To turn the monitor into standby mode, press the 4 button. The blue power indicator illuminates more brightly. ● To turn the monitor ON from standby mode, press any of the following buttons: 4, 5, 6 or 0-9 buttons.
MENU OPERATION GB Sound menu ■ AV2 setting Press the MENU button and select Sound using the 5 or 6 buttons, press the1 button to enter. Sound Volume Balance Bass Treble Preset Surround Press the MENU button. Select Setting using the 5 or 6 button press the 1 button to enter. Select AV2 setting using the 5 or 6 button. Press the 1 or 2 button to select either Y,Pb,Pr or RGB H/V. Press the MENU button to exit, this automatically stores your changes. Press the MENU button again to exit the main menu.
PC OPERATION / INSTALLATION MENU GB RS232C settings PC menu settings OSD Language, Timer and AV2 settings are the same as in all input modes (pg 8). Power save if turned ON will switch the monitor into Powersave mode after 1 minute if no signal is detected, the LED light will turn a brighter blue to indicate stand by. The monitor will automatically turn back on when a signal has been detected (PC input / RGBHV / DVI). Use1 or 2 buttons to select power save ON or OFF.
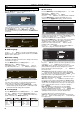
OPERATION GB GB Selecting of picture size ■ Screen options Today there are various transmission formats with different size ratios, eg. 4:3 ,14.9, 16:9 and video formats such as letterbox. Press the WIDE button repeatedly to select your desired setting. ✐ When in High Resolution (720p / 1080i) YPbPr or DVI, the picture will remain fixed in 16:9 format ‘Full size’ and may not be changed. ■ Zoom 16:9 4:3 ■ Natural 4:3 14:9 Stretches the picture horizontally to fill the screen.
SPECIFICATIONS / HELPFUL HINTS GB GB Specification Common specification Power source Colour system 100~240V 50Hz/ 60Hz PAL NTSC3.58 ,SECAM AV terminal AV1: Scart CENELEC Standard Input: Composite video, RGB (5V RGB with 5V sync to pin 14) and audio-L/R Output: Composite video, audio L/R AV2: BNC Input: RGB, H and V / Y, Pb, Pr and audio L/R Output: RGB, H and V / Y, Pb, Pr AV3: BNC Input: Composite video Output : Composite video Audio In (DVI/AV2): Cinch L/R Audio Monitor.
GB PC/DVI-D / COMPONENT SIGNAL SUPPORT TIMING LIST PC signal support timing Horizontal Freq uency Vertica l Freq uency (kHz) (Hz) 720_ 400 31.47 70.09 DOS(VGA ) 640_ 480 31.50 60.00 DOS(VGA VESA 60Hz) 640_ 480 37.50 75.00 VGA VESA 75Hz 640_ 480 37.86 72.81 VGA VESA 70Hz 640_ 480 37.86 74.38 VGA 640_ 480 35.00 67.00 Mac. Res olution 640_ 480 34.97 66.60 Mac LC 13" 800_ 600 35.16 56.25 SVGA VESA 56Hz 800_ 600 37.90 60.32 SVGA VESA 60Hz 800_ 600 46.90 75.
F CONSIGNES DE SÉCURITÉ F ATTENTION : Pour votre sécurité, lisez attentivement ce qui suit. Ce moniteur a été conçu et fabriqué pour garantir votre sécurité personnelle, mais peut poser un risque de choc électrique ou d'incendie en cas d'utilisation incorrecte. Afin de faciliter le bon fonctionnement des dispositifs de sécurité intégrés, veuillez observer les règles de base suivantes, relatives à l’installation, l’utilisation et l'entretien de votre moniteur.
F ENTRETIEN F Entretien Votre moniteur LCD est entièrement transistorisé et ne contient aucun composant réparable. Vous ne devez pas enlever le capot arrière du moniteur par vos propres moyens. L’appareil fonctionne sous haute tension et vous risqueriez d'endommager ses composants ou de provoquer un accident. Confiez les réparations nécessaires à un technicien agréé. Celui-ci utilisera exclusivement des pièces de rechange conformes aux normes de sécurité des pièces d'origine.
LICENSE DE L’UTILISATEUR FINAL F License de l'utilisateur final Le Produit (soit l'équipement ou l'appareil auquel se réfère la présente documentation) comprend un Logiciel (applications, utilitaires et modules du logiciel vendus avec le Produit) qui est la propriété de Sanyo ou de ses concédants de license. Lire les conditions d'utilisation de la license de l'utilisateur final décrites ci-dessous avant d'utiliser le Produit.
INSTALLATION F Etape 1 : Connexion à la prise secteur ■ Raccordez le moniteur au connecteur VGA, BNC et péritel selon les besoins. F 3. Connexion Y/ Pb/Pr / RGBHV (AV2) Ce moniteur LCD possède toute une gamme de connexions, Y, Pb, Pr ou RGB H/V. Vous pouvez raccorder votre lecteur DVD aux sorties Y, Pb, Pr au lieu d’utiliser un câble péritel .Ces sorties peuvent supporter une haute définition en format analogique. Les sorties RGB H/V peuvent être utilisées comme entrée PC via la sortie BNC.
TÉLÉCOMMANDE F Touche TV/AV Permet de permuter entre les modes AV1, RGB, AV2, AV3 , PC or DVI Appuyez à plusieurs reprises. Maintenez la touche enfoncée pendant quelques secondes. Une barre de sélection AV s'affiche. Sélectionnez le mode souhaité via les touches 56 F Mode de veille / Fonction Marche/Arrêt Pour allumer et éteindre le téléviseur.
F INSTALLATION F UTILISATION DES MENUS Commandes et terminaux De nombreuses fonctions de votre moniteur sont accessibles depuis la fonction de menu de votre télécommande. Menu principal Image Lumière Contraste Couleur Netteté Présélection Standard / Eco / Personnel / Dynamique Ton couleur (uniquement si un équipement NTSC est détecté) Réduction Bruit Arret / Min / Mid. / Max/ Auto Dyn.
UTILISATION DES MENUS F Menu son ■ Réglages AV2 Appuyez sur le bouton MENU et sélectionnez le menu Son en appuyant sur le bouton 5ou 6 , puis appuyez sur le bouton 1 pour entrer.
FONCTIONNEMENT DU PC F Les réglages Minuterie et AV2 sont les mêmes que dans tous les autres modes d'entrée (page 19). Réglages Langue OSD Minuterie AV2 Épargne énergie : Sélection F des boutons situés en bas du moniteur. Effectuez votre sélection à l'aide de la touche 5ou 6 Appuyez sur la touche 1 pour désactiver/activer cette fonction. ✐ Cette fonction sera annulée si le moniteur est débranché de la prise secteur.
FONCTIONNEMENT F F Sélection de la taille de l'image. ■ Options d’écran Aujourd’hui, plusieurs formats de transmission sont utilisés, avec différentes proportions, comme 4:3, 14.9,16:9 et des formats vidéo comme “ boîte aux lettres “. Appuyez plusieurs fois sur le bouton WIDE pour sélectionner le réglage désiré. ✐Lorsque la résolution est élevée (720p / 1080i) YPbPr ou DVI, le format de l’image sera un format 16:9 ‘image totale’ et ne pourra peut-être pas être modifié.
CARACTERISTIQUES / CONSEILS PRATIQUES F CARACTERISTIQUES Caractéristiques communes Caractéristiques communes Alimentation 100~240V 50Hz/60Hz Système couleurs PAL/SECAM/NTSC 3.58 AV1 : Péritel CENELEC standard Entrée : vidéo composite, RGB (5 V RGB avec 5 V synch.
SICHERHEITSMASSNAHMEN / AR TUNG D D ACHTUNG: Bitte lesen und zu Ihrer Sicherheit aufbewahren. Dieses Gerät wurde so konstruiert und hergestellt, daß Ihre persönliche Sicherheit gewährleistet ist. Unsachgemäßer Gebrauch kann jedoch zu elektrischem Schlag oder zu Feuergefahr führen. Beachten Sie die folgenden Grundregeln für den Anschluß, den Gebrauch und die Wartung, um die in diesen Monitor eingebauten Schutzvorrichtungen nicht außer Kraft zu setzen.
WAR TUNG D D Wartung Ihr LCD-Monitor ist voll transistorisiert und enthält keine vom Benutzer zu wartenden Teile. Sie dürfen die Rückwand des LCD-monitors nicht selber entfernen. Der Apparat arbeitet mit hohen Spannungen und könnte Sachen beschädigen oder sogar Menschen gefährden. Überlassen Sie alle erforderlichen Reparaturen und Servicearbeiten einem autorisierten Servicetechniker.
LIZENZVEREINBARUNG D D Lizenzvereinbarung Lizenzablauf Das Produkt (d. h. das Gerät bzw. die Anlage, auf die sich diese Dokumentation bezieht) beinhaltet Software (die in das Produkt eingebetteten Softwareprogramme, Hilfsprogramme und Module), die Eigentum von Sanyo oder dessen Lizenzgebern ist. Lesen Sie sich vor dem Gebrauch dieses Produkts bitte die Bedingungen für die Lizenzvereinbarung für Endnutzer durch.
ANSCHLUSS D Schritt : 1 Netzanschluss D Beide Optionen unterstützten eine Vielzahl von Auflösungen (Seite 63). ■ Monitor nach Bedarf mit VGA-, BNC- und SCART-Steckern verbinden. /DVI-D DVI-D 1. Integrierten Stromstecker mit dem Netzeingang an der Rückseite des LCD-Monitors verbinden (siehe Abbildung oben). 2. Stromkabel des LCD-Monitors an eine Wandsteckdose anschließen. 4.
D FERNBEDIENUNG TV/AV-Taste D Standby / Ein- und Ausschalten Zum EIN- oder AUSSCHALTEN des Monitors. Siehe auch Seite 28 Programminformation Zur Anzeige der Programminformationen. Im AV-Modus kann hier auch das Farbsystem wir folgt ausgewählt werden: Auto -> PAL -> SECAM -> NTSC3.58 Zum Umschalten zwischen den Modi TV, AV1, RGB AV2, AV3 , PC oder DVI drücken Sie die Taste mehrmals.Halten Sie die Taste einige Sekunden gedrückt, bis ein AV-Auswahlbalken erscheint.
ANSCHLUSS D D Bedienungselemente / Anschlüsse MENÜBETRIEB Wenn Sie die Menübedienung aufrufen, wird unten auf dem LCD Monitor angezeigt, welche Bedientasten zur Verfügung stehen. Zum Aufrufen des Hauptmenüs die Taste u drücken. Hauptmenü 1 Bild Helligkeit Kontrast Farbe Schärfe Persönlich / Dynamisch / Standard / Eco Preset Farbton (Farbton, falls HTSC-Geräte festgestellt wurden) Rauschunterdr. Aus / Min. / Mittel / Max. Dyn. Hautfarbe Min / Mitte / Max. Helligkeit Text Min / Mitte / Max.
MENÜBETRIEB D Ton menu Drücken Sie MENU, um zum Hauptmenü zurückzukehren. Bei Beenden des Menüs werden die Einstellungen automatisch gespeichert. Ton .. Lautstarke Balance Tiefen ..
RS232C BETRIEB/ANSCHLUSSMENÜ D Einstellungen PC-Menü Einstellung .. Menu Sprache Timer AV2 Einstelling Energiesparen Einstellungen RS232C RGB HV / Y Pb Pr Aus / Ein .. ungewollten Betrieb des LCD-Monitors verhindern. Auswahl über die Tasten 5oder 6 anschließend mit der Taste 1 EIN/AUS wählen. ✐ Bei Abziehen des Netzsteckers wird diese Funktion storniert.
D BEDIENUNG D Bildgröße auswählen. ■ Bildschirmeinstellungen Heutzutage gibt es viele verschiedene Übertragungsformate in verschiedenen Größenverhältnissen, z.B. 4:3, 14.9,16:9 und Videoformate wie Letterbox Drücken Sie die WIDE-Taste wiederholt, um Ihre gewünschte Einstellung vorzunehmen. ✐ Im hochauflösenden (720p / 1080i) YpbPr- oder DVI-Modus, bleibt das Bild im 16:9-„Vollbild”-Format und kann nicht gewechselt werden.
D TECHNISCHE DATEN / NÜTZLICHE HINWEISE Technische Daten D Nützliche Hinweise Allgemeine Daten Netzspannung Farbsysteme 100~240V 50Hz/60Hz PAL NTSC3.
VEILIGHEIDSMAATREGELEN / ONDERHOUD NL NL LET OP: De onderstaande informatie voor uw eigen veiligheid goed doorlezen en bewaren. Dit toestel is ontworpen en gemaakt met het oog op uw persoonlijke veiligheid. Verkeerd gebruik kan echter een elektrische schok veroorzaken of brandgevaar opleveren. Om te voorkomen dat de beveiligingen die in dit toestel zijn ingebouwd buiten werking worden gezet, dient u de volgende basisregels voor installatie, gebruik en onderhoud in acht te nemen.
ONDERHOUD NL NL Onderhoud Uw LCD-Monitor is volledig getransistoriseerd en bevat geen onderdelen die door de gebruiker kunnen worden vervangen. Gelieve de achterzijde van deLCD-Monitor niet zelf te verwijderen. Het apparaat werkt met hoge spanningen en kan objecten schade toebrengen en zelfs mensen in gevaar brengen. Laat alle nodige reparaties en ander onderhoud over aan bevoegde technici. Zij gebruiken enkel onderdelen die voldoen aan de veiligheidsprocedures van de originele onderdelen.
EINDGEBRUIKERSLICENTIE NL NL Eindgebruikerslicentie Het product (d.w.z. de uitrusting of het apparaat waarnaar deze documentatie verwijst) bevat Software (de toepassingen, hulpprogramma’s en modules die deel uitmaken van het product) die in eigendom is van Sanyo of zijn licentiegevers. Voordat u het product in gebruik neemt, moet u eerst de onderstaande voorwaarden van de eindgebruikerslicentie lezen.
INSTALLATIE NL Stap : 1 Netaansluitingen ■ Sluit het toestel naar wens aan op de VGA-, BNC- of Scartaansluiting. NL definition in analoge vorm. RGB, H/V kan worden gebruikt als een PC-ingang via de BNC-klem.Beide opties ondersteunen vele verschillende resoluties (pagina 63). /DVI-D DVI-D 1. Sluit de IEC-netsnoerkoppeling aan op de connector van het toestel zoals hierboven weergegeven. 2. Sluit het netsnoer van de LCD-Monitorl aan op een wandcontactdoos. 4.
NL AFSTANDSBEDIENING NL Stand-by / Power aan-uit Om de TV IN of UIT te schakelen. TV/AV-knop Om over te schakelen naar TV, AV1, AV2 BNC, AV3, PC of DVI Herhaaldelijk drukken Een paar seconden ingedrukt houden, waarna er een AV-selectiebalk verschijnt. Selecteer de gewenste functie met behulp van de toets 5 6 Programma-informatie oproepen Om de programma-informatie weer te geven. U kunt in de AV-modus ook op de volgende manier kleurensystemen selecteren: Auto-> PAL-> SECAM-> NTSC4.43-> NTSC3.
NL NL INSTALLATIE Bedieningsknoppen en menu’s MENUWERKING De meeste functies van uw LCD-monitor worden ingesteld via het menu, met behulp van de afstandsbediening. Algemeen menu Beeld Helderheid Contrast Kleur Scherpte Voorinstelling Huidskleur aanpassen Geluid Instelling 1 2 1. De rode Standby-lamp van uw LCD-Monitor wijst op de aanwezigheid van stroom. Standby in-/uitschakelen Standby wordt gebruikt om het LCD-monitor korte tijd uit te schakelen.
NL MENUWERKING Geluidsmenu ■ AV2 Instelling Druk op de toets MENU en selecteer Geluidsmenu door op de toets 5of 6 te drukken. Druk op de toets1 om het geluidsmenu op te roepen. Geluid Volume Balans Bass Treble Voorinstelling Surround Druk op de toets MENU. Selecteer Instelling met de toets 5of 6. Druk op de toets 8 om het instellingenmenu op te roepen. Selecteer AV2 met de toets 5of 6.Druk op de toets 1 of 2 om Y,Pb,Pr of RGB, H/V te selecteren. Druk op de toets MENU om het instellingenmenu te verlaten.
BESTRURING VIA PC NL NL Instellingen RS232C Menu-instellingen pc Als de functie Spaarstand AAN staat dan gaat de LCD-Monitor na 1 minuut in de spaarstand staan als er geen signaal wordt gedetecteerd. Het LED lampje wordt blauw om aan te geven dat het toestel op standby staat. De LCD-Monitor gaat automatisch weeraan wanneer er een signaal wordt gedetecteerd (PC input / RGBHV / DVI). Gebruik de knoppen1 of 2 buttons om AAN of UIT te selecteren.
WERKING NL NL Selectie van het beeldformaat ■ Schermopties Er bestaan meerdere transmissieformaten met verschillende beeldverhoudingen, bijv. 4:3, 14.9,16:9, en videoformaten zoals letterbox. De WIDE-toets herhaaldelijk indrukken om uw gewenste instelling te selecteren. ✐ Bij een hoge resolutie (720p / 1080i) YPbPr of DVI blijft het beeld vaststaan op beeldformaat 16:9 (volledig scherm). Dit formaat mag niet worden gewijzigd.
NL Specificaties Algemene specificaties Stroomvoorziening 100~240V 50Hz/60Hz Kleursysteem PAL NTSC 3.
PRECAUZIONI DI SICUREZZA / MANUTENZIONE I I ATTENZIONE: Leggere e conservare per motivi di sicurezza. Questo apparecchio è stato progettato e fabbricato per garantire la sicurezza dell’utilizzatore ma un uso inappropriato può causare scariche elettriche o rischio d’incendio. Al fine di non invalidare i circuiti di sicurezza incorporati nel monitor, osservare le seguenti regole di base durante la sua installazione, utilizzo e manutenzione.
I PRECAUZIONI DI SICUREZZA / MANUTENZIONE I Manutenzione Il monitor LCD è totalmente transistorizzato e non contiene alcun componente da sottoporre a manutenzione. Non e assolutamente consentito all’utente di rimuovere in parte o interamente, parti aderenti all apparecchio, come ad esempio il retro del mobile. Durante la funzione dell’apparecchio, sono presenti all’interno, tensioni ad alto livello. Esposti ad oggetti o a persone, questi livelli d’alta tensione, possono danneggiare o creare gravi ferite.
Licenza per l’utente finale I I Licenza per l’utente finale Limitazione di responsabilità Il prodotto (ossia l’attrezzatura o l’apparecchio cui si riferisce la presente documentazione) contiene Software (le applicazioni software, utility e moduli incorporati nel Prodotto) di proprietà della Sanyo o dei propri licenziatari. Prima di utilizzare il prodotto, leggere le condizioni della licenza per l’utente finale descritte in seguito.
I INSTALLAZIONE I Passaggio 1: Connessioni (Essenziale) ■ Collegare l'unità di visualizzazione a una presa VGA, BNC e SCART, secondo necessità. /DVI-D DVI-D 1.Collegare la presa di alimentazione IEC alla presa di rete sul retro del monitor LCD, come mostrato sopra. 2. Collegare il cavo di alimentazione dell'unità di visualizzazione a una presa a muro. 4.
I TELECOMANDO Interruttore TV/AV Consente di scegliere tra le modalità TV, AV1, AV2 BNC, AV3, PC e DVI. Premere più volte. Tenere premuto per alcuni secondi. Verrà visualizzata una barra di selezione AV. Selezionare la modalità desiderata utilizzando il tasto 5 6 Standby/Accensione-Spegnimento Per accendere e spegnere il monitor. Ampiezza Premere per scegliere le seguenti modalità di immagine: Autom. – Natural - Zoom 14:9 – Sottotitoli 14:9 Zoom 16:9 – Sottotitoli 16:9 – Completo - Normale.
INSTALLAZIONE I Comandi / Terminali I FUNZIONAMENTO DEL MENU Molte delle funzioni del monitor LCD sono controllate da menu. Menu principale Immagine Suono 1 2 1. Il monitor LCD a cristalli liquidi è dotato di una spia rossa di Standby per indicare che l’alimentazione elettrica è collegata. Attivazione/disattivazione del modo di standby Il modo di standby va utilizzato per spegnere il monitor LCD per un breve periodo di tempo.
I FUNZIONAMENT O DEL MENU/ FUNZIONAMENT O PC Menu suono I ■ Impostazione AV2 Premere il pulsante MENU e selezionare Audio utilizzando i pulsanti 5o 6. Premere il pulsante 1 per accedere. Selezionare e regolare le impostazioni audio più appropriate all'ambiente utilizzando i pulsanti 5o 6 o 12. Premere il pulsante MENU. Selezionare Impostazioni mediante il pulsante 5o 6, quindi premere il pulsante1 per entrare. Selezionare AV2 mediante il pulsante 5o 6.
I FUNZIONAMENT O RS232C/ FUNZIONAMENT O DEL MENU Impostazioni menu PC Dopo aver impostato la risoluzione desiderata, spegnere e riaccendere il monitor per salvare le impostazioni. Per selezionare il menu Impostazioni, premere il pulsante menu sul telecomando e utilizzare i pulsanti 5o 6 per selezionare Impostazioni. Con il pulsante 1 è possibile accedere al menu impostazioni. Le impostazioni Blocco bambini / Timer e AV2 sono le stesse della modalità TV (pag.
FUNZIONAMENT O I I Schermo ■ Opzioni per lo schermo Attualmente ono disponibili vari formati di trasmissione con diversi rapporti di dimensioni, ad esempio 4:3, 14.9,16:9 e formati video quali Letterbox. Zoom 16:9 4:3 14:9 16:9 Formato video Letterbox Premere più volte il pulsante WIDE per selezionare l'impostazione desiderata. ✐ Se è impostata la modalità YPbPr o DVI ad alta risoluzione (720p/1080i), l'immagine resterà fissa in formato 16:9, "Schermo intero", e non potrà essere modificata.
SPECIFICHE TECNICHE / CONSIGLI UTILI I Specifiche TV QSpecifiche generali Alimentazione Sistema a colori CA 100~240V 50Hz/60Hz PAL/SECAM (PAL/SECAM/NTSC3.58 in modalità AV) Terminale AV AV1: standard CENELEC Input: video composito, RGB (5V RGB con 5V sync in 14 poli) e audio-L/R Output: video composito, audio L/R AV2: BNC Input: RGB, H e V/ Y,Pb,Pr. audio-L/R Output: RGB, He V/ Y,Pb,Pr. AV3: Input: video composito Output: video composito Audio input (DVI / AV2) Cinch L/R Audio M.
PRECAUCIONES DE SEGURIDAD E E PRECAUCION: Le rogamos que lea y conserve este manual para su seguridad. Este aparatose ha diseñado y fabricado para asegurar su seguridad personal, pero la utilización indebida puede dar como resultado descargas eléctricas o riesgos de incendio. Para evitar situaciones peligrosas que no puedan evitar las medidas de seguridad de este monitor, cumpla las siguientes normas básicas para su instalación, utilización y mantenimiento.
MANTENIMIENT O E E Mantenimiento Su monitor está totalmente transistorizado y no contiene ningún componente en el que pueda realizar labores de mantenimiento el usuario. No debe retirar la tapa trasera de su monitor. El aparato trabaja con tensiones elevadas que podrian dañar objetos o incluso poner en peligro a las personas.
LICENCIA DE USUARIO FINAL E Licencia de usuario final El producto (concretamente el equipo o el aparato al que se refiere la presente documentación) incluye software (las aplicaciones, utilidades y módulos de software integrados en el producto) propiedad de Sanyo o de terceros que le hayan otorgado la licencia a Sanyo. Antes de utilizar el producto, sírvase leer las Condiciones de la licencia de usuario final que se detallan a continuación.
INSTALACIÓN E E Paso 1: Conexión a la alimentación ■ Conecte el monitor a los conectores VGA, BNC y euroconector según sea preciso. /DVI-D DVI-D 1.Conecte el conector IEC a la toma de alimentación situada en la parte trasera del monitor de LCD, tal y como se muestra en la ilustración anterior. 2. Conecte el cable de alimentación del monitor a una toma de pared. AC Mai ns Outle t 4.
E MANDO A DISTANCIA ( TELECONTROL ) E Paso : 3 Instalación de las pilas del mando a distancia Instale dos pilas tipo “AA” de 1,5 voltios de modo que las marcas “+” y “-” de las pilas se correspondan con las marcas “+” y “-” en el interior del alojamiento del mando a distancia.
INSTALACIÓN E Controles y menús E FUNCIONAMIENTO DEL MENÚ Muchas de las funciones de su monitor se controlan mediante la función “menú” MENU Imagen Brillo Contraste Color Realce Sintonia Filtro de Ruida Tono Piel Brillo del TXT Sonido 1 2 1.El monitor LCD mostrará una luz roja de Standby para señalar que está encendida. Cómo entrar y salir del modo de espera El modo de espera se utiliza para apagar el monitor durante breves periodos de tiempo.
FUNCIONAMIENT O DEL MENÚ E Pulse el botón 1 o 2 para seleccionar Oeste, Este,Cirílico o Griego.Pulse el botón MENU para salir. Menú de Sonido Pulse el botón MENU para volver al Menú Principal. Las opciones configuradas quedarán guardadas automáticamente al salir del menú. Sonido Volumem Balance Graves Agudos ■ Opción AV2 Pulse el botón MENU. Seleccione Opciones sirviéndose del botón 5o 6 y pulse el botón1 para acceder a esta opción.
FUNCIONAMIENT O DEL PC E Opciones Idioma del OSD Temorizador AV2 opciones Ahorro de energia : Seleccion E Ajustes del RS232C Este monitor puede controlarse a través del conector RS232C utilizando un ordenador adecuado y comandos de control. Espanol RGB HV / Y, Pb, Pr SI/No : Ajustar MENU : Atras La luz La luz LED se volverá de un azul más intenso para indicar que está en modo de espera. El monitor volverá a encenderse automáticamente cuando se detecte una señal (entrada de PC o RGBHV / DVI).
FUNCIONAMIENT O E E Selección del tamaño de imagen ■ Opciones de pantalla En la actualidad existen varios formatos de transmisión con distintas proporciones, p.ej. 4:3, 14.9, 16:9 y formatos de video como el de buzón. Pulse el botón ANCHO repetidamente para seleccionar la configuración que desee. ■ Zoom 16:9 4:3 14:9 16:9 Letterbox Video Se mantiene el ancho correcto de imagen, pero se recorta el extremo superior e inferior. Aumenta levemente la imagen recortando el extremo superior e inferior.
E ESPECIFICACIONES / CONSEJOS ÚTILES Especificaciones Especificación común Fuente de alimentación Sistema de color 100~240V 50Hz/60Hz PAL / SECAM (PAL / SECAM / NTSC3.58 en modo AV) Terminal AV AV1: Norma CENELEC Entrada:Vídeo compuesto, RGB (RGB de 5V con sincr. a clavija 14) y audio i/D. Salida: vídeo compuesto,Salida de audio I/D AV2: BNC Entrada: RGB, H y V / Y,Pb,Pr. audio-I/D Salida: RGB, H y V / Y,Pb,Pr.
COMPONENT SIGNAL SUPPORT TIMING LIST PC signal support timing Horizontal Freq uency (kHz) Vertica l Freq uency (Hz) 720_ 400 31.47 70.09 DOS(VGA ) 640_ 480 31.50 60.00 DOS(VGA VESA 60Hz) 640_ 480 37.50 75.00 VGA VESA 75Hz 640_ 480 37.86 72.81 VGA VESA 70Hz 640_ 480 37.86 74.38 VGA 640_ 480 35.00 67.00 Mac. Res olution 640_ 480 34.97 66.60 Mac LC 13" 800_ 600 35.16 56.25 SVGA VESA 56Hz 800_ 600 37.90 60.32 SVGA VESA 60Hz 800_ 600 46.90 75.
RS-232C COMMAND TABLES 64
Part No. 1KA6P1P0379-68 N4HR Printed in U.K.