INSTRUCTION MANUAL LCD Monitor Please read this Instruction book before using your LCD monitor. We wish you many hours of pleasure from your new LCD monitor.
TABLE OF CONTENTS GB TABLE OF CONTENTS . . . . . . . . . . . . . . . . . . . . . . . . 2 SAFETY PRECAUTIONS . . . . . . . . . . . . . . . . . . . . . . . 3 Installation and Use . . . . . . . . . . . . . . . . . . . . . . . . . . . . . . 3 SERVICING. . . . . . . . . . . . . . . . . . . . . . . . . . . . . . . . . . 4 Servicing . . . . . . . . . . . . . . . . . . . . . . . . . . . . . . . . . . . . . . 4 GB Time menu. . . . . . . . . . . . . . . . . . . . . . . . . . . . . . . . . . . . . 9 Setup menu .
SAFETY PRECAUTIONS GB GB CAUTION: Please read and retain for your safety. This unit has been designed and manufactured to assure your personal safety, but LPSURSHU XVH FDQ UHVXOW LQ SRWHQWLDO HOHFWULF VKRFN RU ¿UH KD]DUGV ,Q RUGHU QRW WR GHIHDW WKH VDIHJXDUGV LQFRUSRUDWHG LQ WKLV PRQLWRU REVHUYH WKH following basic rules for its installation, use and servicing. Installation and Use Do not allow anything to rest on the power cord.
SERVICING GB GB Servicing Your monitor is fully transistorised and does not contain any user serviceable components. You must not remove the rear cover of the monitor by yourself. The apparatus is working with high voltages and could damage objects or even endanger people. Leave all required repair and service jobs to an authorised service technician. He will exclusively use such spare parts that are complying with the same safety standards as applicable to the original parts.
GB SERVICING GB AC Power Cord Requirement The AC Power Cord supplied with this LCD monitor meets the requirement for use in the country in which you purchase it. AC Power Cord for the United States and Canada: $& 3RZHU &RUG XVHG LQ WKH 8QLWHG 6WDWHV DQG &DQDGD LV OLVWHG E\ WKH 8QGHUZULWHUV /DERUDWRULHV 8/ DQG FHUWL¿HG by the Canadian Standard Association (CSA).
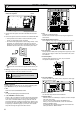
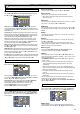
INSTALLATION GB GB Step: 1 Mains Connection N &RQQHFW WKH GLVSOD\ XQLW WR 9*$ %1& DQG 6FDUW FRQnector as required. LD-Net 7KLV ¿JXUH LV &( /+ :3 1. Connect the in-line power connector to the Mains Inlet as shown above. 2. Connect the power cord of the LCD monitor to a suitable wall outlet. As this product does not have a mains On/Off switch, please ensure your mains plug is easily accessible. 4. AV3 Composite (CVBS) signal input.
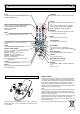
GB INSTALLATION GB Remote control Input Standby To switch input source from AV1, RGB, AV2, AV3, PC, DVI or Network mode. To switch the monitor on and off. Also see page 8. Recall Wide To select the screen mode Full, Full All, Zoom 16:9, Title in 16:9, Zoom 14:9, Title in 14:9, Normal or Natural wide. Refer to page 12. Menu To enter and exit the main menu, and sub menu. To display input selection information and the Time set.
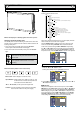
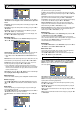
GB INSTALLATION GB Controls and Menus Menu Operation Many of your monitors functions are controlled through the menu function, using the remote control.
MENU OPERATION GB Picture menu GB N Current Weekday 8VH WR VHW FXUUHQW ZHHNGD\ XVLQJ WKH or button. N Advanced settings Use the or button to select Advanced settings and press the or button to enter the sub menu as follows. N Current Time Use to set the current time using the Numeric buttons. Other items in Time Menu should not be selected until Current Time has been set.
GB MENU OPERATION GB H_Sets is used to divide the horizonal picture into more than one part, but the most is 5 parts (5 monitors). V_Sets is used to divide the vertical picture into more than one part, and the most is also 5 parts (5 monitors). Using the or button to set. H Location is used to select one part of the horizonal picture to display on the current LCD Monitor using the or button. Language is used to select the preferred language.
INSTALLATION MODE GB Installation Mode Installation Mode On program Tuner Menu Max Volume Winter mode RC inhibition Child Lock Address Baud rate Panel protection AV Auto shut off Network Standby On Timer Function LED light setting DCR Network initial Temperature Error IP Address Subnet Gateway DNS Select Adjust G2.02 0000 Off Off 63 Off Off Off 0 19200 Off Off On Off Off Off >>> 0 000000000000 000000000000 000000000000 000000000000 MENU GB N Address Set the address for the LCD monitor (0 ~ 999).
GB GB OPERATION 6HOHFWLRQ RI SLFWXUH VL]H Select screen size from FULL, FULL ALL, ZOOM 16:9, TITLE IN 16:9, ZOOM 14:9, TITLE IN 14:9, NORMAL or NATURAL WIDE by pressing the WIDE button repeatedly on the Remote Control. When in AV2 (RGBHV) or PC mode FULL or NORMAL can be selected. Note: Full - Set display area 100% Only in DVI or AV2 (YPbPr) displaying high resolution content FULL and FULL ALL are selectable.
GB OPERATION GB PIP/POP Operation Using this function, you can enjoy a DVI or Network program and an image (AV1, AV2, AV3 or PC input) at the same time. Press the ON/OFF button on the Remote Control repeatly to select PIP1, PIP2, POP or OFF mode. During the PIP/POP mode, press the Main/Sub Picture Swap button will switch the location for main and sub picture.
OPERATION (IN TEXT MODE) GB Teletext Operation Teletext is only available via external sources. Teletext mode can be operated by the following buttons on the Remote Control. Some buttons have dual functions. GB Text Cancel Press the TEXT CANCEL button in TEXT or MIX mode, the TV picture appears on the screen. Press this button once again or press TXT/TV button, CANCEL mode will be cancelled. In CANCEL mode, “CAN” is always displayed on the upper left of the screen.
SPECIFICATIONS/HELPFUL HINTS GB 6SHFL¿FDWLRQ GB Helpful hints &RPPRQ VSHFL¿FDWLRQ N NO PICTURE NO SOUND Power source: 100 ~ 240V 50Hz/60Hz L &KHFN LI PRQLWRU LV SOXJJHG LQ Colour system: PAL/NTSC/NTSC4.43/SECAM L &KHFN PRQLWRU LV QRW LQ VWDQGE\ PRGH AV terminal AV1: Scart CENELEC Standard Input: Composite video, RGB (5V RGB with 5V sync to pin 14) and audio-L/R Output: composite video from AV3 and audio L/R N POOR PICTURE L Adjust BRIGHTNESS/CONTRAST levels (too low). N 12 &2/285 3,&785( 2.
DIMENSIONS GB GB N CE42LH2WP Unit: mm 989.0 925.4 (WALL MOUNT SCREW) 10 x M6, 1.0 PITCH x 12MM 418.4 1027.0 953.0 930.25 VIEWING AREA(H) 165.9 126.0 418.4 400.0 200.0 100.0 50.8 41.8 523.0 VIEWING AREA(V) 400.0 200.0 Handles x 2 292.0 300.6 546.0 620.0 17.6 178.5 402.9 417.9 ø4.2 (RC RECEIVER) ø4.2 (LED INDICATOR) 16 Control buttons 43.
GB PC/DVI-D/COMPONENT SIGNAL SUPPORT TIMING LIST N PC signal support timing Resolution +RUL]RQWDO Frequency N+] Vertical Frequency +] GB N DVI-D signal support timing Remark Resolution +RUL]RQWDO Frequency N+] Vertical Frequency +] Remark 720 x 400 31.47 70.09 DOS (VGA) 640 x 480 31.43 59.88 VGA VESA 60Hz 640 x 480 31.43 59.88 VGA VESA 60Hz 640 x 480 37.86 72.81 VGA VESA 72Hz 640 x 480 37.50 75.00 VGA VESA 75Hz 640 x 480 37.5 75 VGA VESA 75Hz 640 x 480 37.86 72.
RS232C COMMAND TABLES GB N Functional Execution Command Table Command Item GB N Image control Read Command Table Status read command Item C00 POWER ON CR BRIGHT Status of Brightness. C01 POWER OFF CR CONT Status of Contrast. C03 POWER ON/ OFF (toggle) CR COLOR Status of Color. C10 Wide toggle CR TINT Status of Tint. C22 Input CR SHARP Sharpness. C24 Wide “Natural” direct CR WBAL C25 Wide “Zoom 16:9” direct Status of White Balance Mode information.
GB RS232C COMMAND TABLES GB N Time Read Command Table Status read command CR PANELH CR MONH N UK5 Read Command Table (Basic Command) Item Status of accumulated lifetime of panel. (The same as CR_LAMPH Command) Status of accumulated lifetime of monitor. 7KH VDPH DV &5B352-+ &RPPDQG N Sound control Read Command Table Status read command Item Command Item Note CR0 Power On, Standby, power error, CR1 Input Mode AV1, AV2, . . . , DVI, PC CR WIDE Wide mode Auto, Normal, Full, . . .
N7RAK/ N7RBK/ N7RPK 6$1<2 (OHFWULF &R /WG
INSTALLATION GUIDELINES CONSIGNES D’INSTALLATION INSTRUCCIONES DE INSTALACIÓN INSTALLATIONSRICHTLINIEN CE42LH2WP CE42LM6WP CE42SR2 CE52LH2WP CE52SR2 CE52SR3 INSTALLATIEHANDLEIDING WICHTIG BITTE LESEN SIE DIESE RICHTLINIEN VOR DEM AUSPACKEN UND DER INSTALLATION. BELANGRIJK LEES DEZE HANDLEIDING VOOR HET UITPAKKEN EN INSTALLEREN. IMPORTANTE LEGGERE ATTENTAMENTE LE SEGUENTI ISTRUZIONI PRIMA DI DISIMBALLARE E INSTALLARE IL PRODOTTO.
English IMPORTANT!! To All Installers, This monitor is sealed to IP66 standard. The integrity of the enclosure MUST NOT be tampered with or breached. The following guide lines highlight those areas of the product that require particular care and attention in order to ensure the integrity of the enclosure. REMOVAL FROM OUTER CARTON • We strongly advise that 2 ~ 4 PEOPLE handle the monitor when removing it from the carton.
BACK OF MONITOR LD-NET COVER SECURITY FIXING POINT (42 inch model only) TERMINAL COVER MAINS LEAD * This photo is 42 inch model. • There are labels to inform users that the vents MUST NOT be loosened or removed otherwise the sealing of the set will be compromised. Adhesive applied to the vent threads provides added seal security and a visual indication of tampering. In the event that this adhesive sealing is broken when the set is returned, SANYO can not accept liability for the condition.
ANTI-TAMPER INK • Anti-tamper ink has been placed on the screws on the back plate, AV insert and outer back cabinet. • This is to identify if the screws have been removed. Any attempt to remove the anti-tamper ink will be CLEARLY visible. • In the event that the back plate is removed, the sealing of the set will be compromised, therefore, SANYO can not accept liability for any related failure.
REAR A.V.SHIELD COVER/TERMINAL COVER $IWHU FDEOH LQVWDOODWLRQ 3/($6( HQVXUH DOO VHDOV DUH FRUUHFWO\ ÀWWHG DV VKRZQ EHORZ SULRU WR UHÀWting the terminal cover and rear A.V.cover. ALL À[LQJ VFUHZV PXVW EH UHSODFHG DQG WLJKWHQHG Check point 1 Check point 2 &DEOHV PXVW ÀW LQ WKH VKDSH RI WKH recess of the terminal base. English Check gasket is in place inside the cover. Gasket is important to seal cable area.
MAINS LEAD • The mains lead is secured to the back plate using a weatherproof cable gland. Do not loosen the gland as this will impair the weatherproof sealing. VIEW INSIDE ENCLOSURE RUBBER WASHER ADHESIVE TREATMENT 7KH FDELQHW FRUQHUV DUH VHDOHG XVLQJ D VSHFLDO DGKHVLYH WR PD[LPLVH WKH VHDO • Sets must be handled with EXTREME care to ensure that this seal is not damaged. Please take particular care not to drop or bump the set during handling/installation.
INSTALLING POSITION When the monitor installed outside, it SHOULD NOT set in a position where the screen is subjected to direct sun light. If it can’t be done, please prepare adequate shading. Direct sun light can cause the screen surface temperature WR ULVH DERYH WKH PD[LPXP RSHUDWLQJ UDQJH This causes a black shadow to appear on the screen, which will disappear when the screen temperature returns WR ZLWKLQ VSHFLÀFDWLRQ WIRE ASSEMBLY 1.
SAFETY PRECAUTIONS GB GB CAUTION: Please read and retain for your safety. This unit has been designed and manufactured to assure your personal safety, but LPSURSHU XVH FDQ UHVXOW LQ SRWHQWLDO HOHFWULF VKRFN RU ÀUH KD]DUGV ,Q RUGHU QRW WR GHIHDW WKH VDIHJXDUGV LQFRUSRUDWHG LQ WKLV PRQLWRU REVHUYH WKH following basic rules for its installation, use and servicing. Installation and Use Do not allow anything to rest on the power cord.
SERVICING GB GB Servicing Your monitor is fully transistorised and does not contain any user serviceable components. You must not remove the rear cover of the monitor by yourself. The apparatus is working with high voltages and could damage objects or even endanger people. Leave all required repair and service jobs to an authorised service technician. He will exclusively use such spare parts that are complying with the same safety standards as applicable to the original parts.
GB SERVICING GB AC Power Cord Requirement The AC Power Cord supplied with this LCD monitor meets the requirement for use in the country in which you purchase it. AC Power Cord for the United States and Canada: $& 3RZHU &RUG XVHG LQ WKH 8QLWHG 6WDWHV DQG &DQDGD LV OLVWHG E\ WKH 8QGHUZULWHUV /DERUDWRULHV 8/ DQG FHUWLÀHG by the Canadian Standard Association (CSA).
INSTALLATION GB GB Step: 1 Mains Connection N &RQQHFW WKH GLVSOD\ XQLW WR 9*$ %1& DQG 6FDUW FRQnector as required. LD-Net 7KLV ÀJXUH LV LQFK PRGHO 2. Connect the power cord of the LCD monitor to a suitable wall outlet. As this product does not have a mains On/Off switch, please ensure your mains plug is easily accessible.
GB INSTALLATION GB Remote control Input Standby To switch input source from AV1, RGB, AV2, AV3, PC, DVI or Network mode. To switch the monitor on and off. Also, refer to the INSTRUCTION MANUAL on page 8. Recall Wide To select the screen mode Full, Full All, Zoom 16:9, Title in 16:9, Zoom 14:9, Title in 14:9, Normal or Natural wide. Refer to the INSTRUCTION MANUAL on page 12. Menu 7R HQWHU DQG H[LW WKH PDLQ PHQX DQG VXE PHQX To display input selection information and the Time set.
INSTALLATION GB GB Controls and Menus Menu Operation Many of your monitors functions are controlled through the menu function, using the remote control.