INSTRUCTION MANUAL DVD HOME THEATER DC-HT210W
Contents For your Attention..........................................................................2 Features & Package Contents .....................................................3-4 Remote Control..........................................................................5-6 Panel............................................................................................7 Connections.............................................................................8-10 System Setup............................
For Your Attention IMPORTANT NOTES Please read through this manual before making connections and operating this product. Retain this manual for future reference. Don't open the cabinet of this unit. No user-serviceable parts inside. Refer servicing to qualified personnel only. Switch off the unit when you don't use it. Switch off the unit and disconnect it from the AC power supply when it is not being used for a long time.
Features &Package Contents Thank you for purchasing our product. Please read this manual carefully before connection and operation and keep it for future reference. This DVD player is a new generation home player which can produce high quality video and audio for your continued enjoyment. Built in Dolby Digital , LPCM, MPEG etc.
Features &Package Contents DVD REGION CODES: DVD discs and players are covered by a worldwide agreement which limits playback of DVD discs to specific regions as determined by the software manufacturer. Most DVDs come marked with a region coding. A disc specified as playable in one region may not play on a player designed for a different region. A disc specified as universal or with no region coding (Code ALL)may be played in any region. The regions are: Region 1: Canada, USA Region 2: Europe, Japan, Mid.
Remote Control Remote Control Operation Insert the batteries into the remote control. Point the remote control at the remote sensor on the front panel. The remote control works within a distance of about 7 metres from the sensor and within an angle of about 30 degrees from the left and right side. Battery Installation 1 Remove the battery compartment cover on the back of the remote control. 2 Load two AAA/1.
Remote Control 1 1 STANDBY/ON 2 DIGIT KEYS 3 GOTO 4 SETUP 5 A-MODE 6 PROGRAM 7 VOLUME+/8 FAST FORWARD/REWIND 9 TITLE 10 DIRECTION KEYS [ ]/[ ]/[ ]/[ ] 11 AUDIO 12 S.
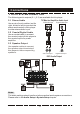
Panel FRONT PANEL: 1. MICROPHONE SOCKETS 2. DISC TRAY 3. MEMORY CARD SLOT 4. USB PORT 5. OPEN/CLOSE ( ) 6. PLAY/PAUSE ( ) 7. STANDBY/ON ( ) 8. STOP ( ) 9. VOLUME ADJUSTING KNOB 10. DISPLAY SCREEN REAR PANEL: 4 5 6 7 8 9 10 1. SPEAKER OUTPUT 7. LINE INPUT 2. FM ANTENNA JACK 8. 2CH AUDIO OUTPUT 3. AM ANTENNA JACK 9. COAXIAL DIGITAL AUDIO OUTPUT 4. SCART OUTPUT 10. COMPOSITE VIDEO OUTPUT 5. COMPONENT VIDEO OUTPUT 11. POWER ON/OFF 6.
Connections 1 VIDEO SYSTEM CONNECTION The following video outputs are available for this player. 1.1 Composite Video Use the yellow plug of an AV cable to connect the composite video output of this player to the video input of a TV/monitor. 1. 2 Component Video Use a 3-core AV cable to connect the component outputs of this player to the corresponding inputs of a TV/monitor. 1.3 HDMI HDMI output presents the highest possible resolutions and video quality. If an HDMI is present on your television, use it.
Connections 2 AUDIO SYSTEM CONNECTION The following audio outputs(2.1 2.3) are available for this player. TV/Monitor/Amplifier Audio Input 2.1 Stereo Audio 2CH Audio Input Use a pair of audio cables (red for right, white for left) to connect the stereo audio output of this player to other stereo audio input. L R L R Digital Audio Input COAXIAL 2.2 Coaxial Digital Audio Use a coaxial cable to connect the coaxial output of this player to the coaxial input of a power amplifier. 2.
Connections Audio Output of Extra Devices 2.4 Audio Input This player has a group of audio input terminals. You can input the analogue stereo audio signals from extra devices such as DVD, VCD, CD player, etc. Use the audio cable (red for right, white for left) to connect the stereo audio output terminals of a DVD, VCD, CD player, etc to the stereo input terminals of this player.
System Setup MENU OPERATION: 1. In DVD mode, press [SETUP] on the remote control to display the setup menu. 2. Press [ ]/[ ] to select an item. The submenu of the selected item will be displayed below instantly. 3. Press [ ]/[ ] to select an item you desire to set in the submenu, then press [ENTER] /[ ]to enter. Use [ ]/[ ] to select an option, then press [ENTER] to confirm it, or press [ ] to cancel. 4. Then you can press [ ]/[ ] to continue to set other items in the submenu. 5.
System Setup 1.5 SCREEN SAVER ON: If the image remains motionless on the screen, for example the disc is paused, stopped etc, for several minutes, a screen saver will appear on the screen. You can press any key or button except [STANDBY/ON] to wake it up. OFF: Disable the screen saver function. 1.6 HDCD(High Definition Compatible Digital) HDCD (High Definition Compatible digital) is a patented encode/decode process for delivering the full richness and details of the sound from HDCD-encoded CDs.
System Setup 2.1.4 D.R.C. (Dynamic Range Control) You can set this item to AUTO, ON or OFF. 2.2. DIGITAL AUDIO SETUP 2.2.1 DIGITAL OUTPUT SPDIF/OFF: There will be no digital audio signal output. (Coaxial off) SPDIF/RAW: The digital audio signal output will be in its raw format. Normally, this m ode is used for DTS & Dolby Digital 5.1 signals. SPDIF/PCM: The digital audio signal output will be in PCM format. Normally, this mode is used for audio CD signals. 2.2.
System Setup 2.5 3D PROCESSING 3D processing provides a virtual surround sound experience using just two speakers. 2.5.1 PRO LOGIC II Pro Logic II: This unit allows you to configure Dolby Pro Logic II to expand 2-channel source audio into full 5.1-channel surround sound. NOTE: Pro Logic II functionality is effective only when DOWNMIX is set to 5.1CH . 2.5.1.1 PRO LOGIC II This item is used to turn on or off the Pro Logic II processing. ON: Pro Logic II processing is always on.
System Setup 2.6 KARAOKE SETUP 2.6.1 MIC SETUP 2.6.1.1 MIC Set this item to ON/OFF to switch on/off the connected microphone(s). 2.6.1.2 MIC VOL Enter this item, then use direction key [ ]/[ press [ENTER] to confirm your adjustment. ] to adjust the microphone volume. Then 2.6.1.3 ECHO LEVEL Enter this item, then use direction key [ ]/[ press [ENTER] to confirm your adjustment. ] to adjust the microphone echo level. Then 3 DOLBY DIGITAL SETUP 3.
System Setup 4.3.4 LUMA DELAY There are two options (0T and 1T) for you to choose in this item. 4.4 HDMI SETUP About HDMI HDMI (High-Definition Multimedia Interface) is the newest interface for audiovisual equipment such as high-definition television and home theater systems. With 19 wires wrapped in a single cable that resembles a USB wire, HDMI is able to carry a bandwidth of 5 Gbps (gigabits per second).
System Setup 5.2 PBC (Play Back Control) ON: Activate the PBC function. When playing a disc encoded with PBC function such as VCD 2.0,etc, press [MENU] to return to the PBC menu. OFF: Disable the PBC function. NOTE: This function only works with those discs encoded with PBC function. DVD, VCD1.1, CD-DA and MP3 disc have no PBC menu. 5.3 AUDIO, SUBTITLE and DISC MENU Select a preferred audio language, subtitle language and disc menu language in these items.
Basic Playback STANDBY/ON Press to switch on the unit. Press it again to put the unit in standby mode. USB/SD FUNCTION Press repeatedly to switch to the available extra signal source USB or SD CARD, or to return to the DVD mode. Press repeatedly to switch among TUNER mode, LINE mode and DVD mode. Press to open /close the disc tray. 1 4 7 2 5 8 3 6 9 0/10 10+ ENTER The digit keys can be used to input numbers or make selection of a track or a chapter, etc.
Basic Playback A-B MUTE You can repeat a specific section of a disc with this button. During playback, press this button to mark down the starting point (A) and press it again to mark down the ending point (B). Then, the unit will playback this section over and over again. Press it for once more to cancel A-B repeat and resume the normal playback. Note: Points A and B must be in the same title/ track. Press this button to switch off the sound temporarily. Press it again to switch it on.
Basic Playback USB DRIVE AND MEMORY CARD PLAYBACK Insert a USB drive in the USB port, then press [USB/SD] to enter the connected USB drive and you can playback the readable files in it. Press [USB/SD] again to switch back to DVD mode. Insert an SD card into the memory card slot, then press [USB/SD] to access the connected memory card and you can playback the readable files in it. Press [USB/SD] again to return to DVD mode.
Basic Playback KARAOKE PLAYBACK Set MIC to ON to enable the connected microphone(s) and set the microphone volume at a low level in the karaoke setup menu. Insert two microphones or just one into the microphone sockets on the front panel. Adjust the microphone volume and echo level to your desired level in the karaoke setup menu. Place a karaoke disc in the disc tray. Press [AUDIO] to include or eliminate the original singing voice.
Basic Playback MP3 DISC PLAYBACK Insert an MP3 disc into the player, then a content menu will display on the screen. MENU OPERATION: Use the direction key [ ]/[ ] to select a folder or a file, then press [ENTER] to enter the selected folder or play the selected file. You can also use the digit keys to make selection of a folder to enter or a file to play. In the content menu, press [ ] to return to the upper menu; press [ ]/[ ] to turn over to the previous/next the menu page.
Basic Playback Tuner Operation The following buttons are used in tuner mode. Press [FUNCTION] to select tuner mode. AM/FM Press to switch between AM mode and FM mode. MO/ST Press to switch between Mono and Stereo reception of the broadcast signal in FM mode. MEMORY After tuning in a new frequency, press [MEMORY], then select a preferred station by inputting the corresponding numbers to save it as a preset station. AUTO Press to do auto scanning for the broadcasting radio channels.
Troubleshooting Before resorting to maintenance service, please kindly check by yourself with the following chart. Symptom Cause(s) Remedy The AC power cord is not connected to the power supply or is not connected to a power supply securely. Please check that the AC power cord is connected securely. Video input mode of the connected Picture There is no TV isn't correctly set. picture or the Video output mode isn't correctly set. picture is distorted. Set an appropriate video output mode.
Specifications Power supply AC ~240V/50Hz Power consumption 90W Temperature Working environment Relative humidity TV System 5~35 Frequency Response Audio output S/N(A weight) Output level Tuner 5%~90% PAL/NTSC 20Hz~20KHz 80dB(1KHz) 2.0V(rms) AM band range 522KHz~1620KHz FM band range 87.5MHz~108MHz Power output 30WX5+60W (Y) Component Video output 0.7V (P-P),75 (Cb) 0.7V (P-P),75 (Cr) 0.7V (P-P),75 Composite Video output 1.
Your SANYO product is designed and manufactured with high quality materials and components which can be recycled and reused. This symbol means that electrical and electronic equipment, at their end-of-life, should be disposed of separately from your household waste. Please dispose of this equipment at your local community waste collection/recycling centre. In the European Union there are separate collection systems for used electrical and electronic products.
Printed in China