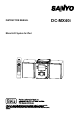
INSTRUCTION MANUAL Micro Hi-Fi System for iPod DC-MX40i
TABLE OF CONTENTS SAFETY PRECAUTIONS..........................................................................................................................................1 FEATURES AND CONTROLS............................................................................................................................................3 REMOTE CONTROL ................................................................................................................................................
SAFETY PRECAUTIONS To achieve the utmost in enjoyment and performance, please read this manual carefully before attempting to operate the unit in order to become familiar with its features, and assure you years of faithful, trouble free performance and listening pleasure. Important Notes * Read instructions - All the safety and operating instructions should be read before the apparatus is operated * Retain instructions - The safety and operating instructions should be retained for future reference.
This symbol indicates that dangerous voltage constituting a risk of electric shock is present within this unit. CAUTION RISK OF ELECTRIC SHOCK DO NOT OPEN This symbol indicates that there are important operating and maintenance instructions in the information accompanying this unit. WARNING: SHOCK HAZARD - DO NOT OPEN AVIS:RISQUE DE CHOC ELECTRIQUE NE PAS OUVRIR You can see this carved picture on the bottom of the main unit.
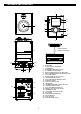
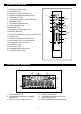
FEATURES AND CONTROLS 2 13 3 4 12 5 1 6 11 7 10 9 8 Universal Dock adapter connection 14 15 16 20 19 17 1. SPEAKER 2. LCD DISPLAY WINDOW 3. IR SENSOR 4. STANDBY LED INDICATOR 5. STANDBY/ON BUTTON 6. SKIP/TUNE SEARCH UP BUTTON 7. SKIP/TUNE SEARCH DOWN BUTTON 8. VOLUME KNOB 9. EARPHONE OUTPUT JACK 10. STOP/MENU BUTTON 11. PLAY/PAUSE/ENTER BUTTON 12. BAND BUTTON 13. FUNCTION BUTTON 14. CD DOOR 15. SD/MMC MEMORY CARD IN SLOT 16. USB DEVICE IN PORT 17. iPod CONNECTOR DOCK 18. MEM/C-ADJ.
REMOTE CONTROL 1. STANDBY/ON BUTTON 2. MUTE BUTTON 3. PRESET/FOLDER UP BUTTON 4. PRESET/FOLDER DOWN BUTTON 5. RANDOM BUTTON 6. SKIP/TUNE SEARCH DOWN BUTTON 7. INTRO BUTTON 8. VOLUME DOWN BUTTON 9. FUNCTION BUTTON 10. BAND BUTTON 11. ID3/MONO/STEREO BUTTON 12. REPEAT BUTTON 13. PLAY/PAUSE/ENTER (only in iPod ) BUTTON 14. EQ BUTTON 15. SKIP/TUNE SEARCH UP BUTTON 16. STOP/MENU (only in iPod ) BUTTON 17. iPod /MEM/C- ADJ. BUTTON 18. TIMER BUTTON 19. SLEEP BUTTON 20. NUMBER SEARCH BUTTON 21.
PUTTING THE BATTERIES INTO THE REMOTE CONTROL UNIT Press down the compartment cover, and slide the cover off to open the compartment. Place the two (UM4), (AAA), (R03) batteries in the remote control according to the polarity markings ("+" and "-”) inside the compartment and on the batteries. Place the cover over the compartment, press down lightly, and push it upward until it snaps on. **BATTERIES NOT INCLUDED** BATTERY PRECAUTIONS Follow these precautions when using a battery in this device: 1.
CLOCK SETTING During in the STANDBY mode. 1. Press and hold the MEM/C-ADJ./iPod button until the time displays will change to 24-hour digit and flash. 2. Press or button to select 12-hour or 24-hour. 3. Press the MEM/C-ADJ./iPod button again, the HOUR digit will flash on the display, press or button to adjust HOUR digit. 4. Press the MEM/C-ADJ./iPod button once more, the MINUTE digit will flash on the display, press or button to adjust minute digit. 5. Press the MEM/C-ADJ.
Mono/stereo select (on the remote control) You can select the MONO/STEREO only in FM mode. 1. When you want to select FM stereo station, press the ID3/MONO/ST. button on the remote control. When you receive a FM stereo station the " " indicator will appear on the display, you can receive FM stereo transmission . 2. When you press the ID3/MONO/ST. button on the remote control again, the FM STEREO indicator will turn off and switch to MONO FM status.
F5 F6 - MP3/WMA 1. Insert the MP3/WMA disc into the CD compartment, and then press FUNCTION button to select CD mode, t he main unit will automatically read the total number of the folders and tracks at the same time. Press /ENTER button, the unit will play the first track of the MP3/WMA disc automatically.(F7) Press /ENTER button once again, the time elapsed indicator will flash.(F8) To change Track NO., Press or button once. And press and hold or button to skip fast backward or forward of each song.
Note: 1. In any time, the USB DEVICE or SD CARD must be fixed well under in the STANDBY mode to avoid the main unit and USB DEVICE or SD CARD were damaged. 2. This unit can support most of USB devices and SD/MMC cards. The memory capacity up-to 2GB. It can not access (or access a longer time) the memory capacity over 2GB. Otherwise, make an others to access it. 3. It can support USB version 1.1 and 2.0. 4. Not support all kinds of “ dual voltage-MMC” card nor “MMC-Plus” card. 5.
4) 5) Press or button, the track number will be changed. Press the MEM/C-ADJ./iPod button to confirm the favorite track number. F17 F19 F18 2. PROGRAM PLAY Press /ENTER button on the unit (or remote control). The unit will play the first track of the program. When all tracks have been played, the unit will stop automatically. If you want to listen program play again. Press /ENTER again. 3. 1. 2.
During the unit in STANDBY mode: 1. Insert the iPod players in the iPod docking bracket on the top of the main unit fixedly. 2. Power on the main unit, and then press the FUNCTION button to select iPod mode, the iPod indicator will appear on the main unit display. (F22) F22 During the unit in iPod mode: 1. Press /ENTER (only in iPod ) button once to start the iPod playing. Adjust the volume control by turning the VOLUME (+ or -) knob. or press the VOLUME (+ or -) on the remote control.
AUX IN PLAY 1. Use a cable with RCA jack to connect external audio source (DVD player, Mini Disc player, Cassette Deck etc.) to the AUX IN jack on the rear of the unit. 2. Press the FUNCTION button repeatedly until the “AUX” appears on the display. 3. Turn your auxiliary source “ON” and operate it as usual. The sound from the auxiliary source will be heard through the speakers of the unit. Note: Aux in cable not included. TO SET SLEEP FUNCTION(on the remote control) 1.
COMPACT DISC 1. Always use a compact discs bearing the mark as shown. 2. Notes on handling discs Removing the disc from its storage case and loading it. * Do not touch the reflective recorded surface. * Do not stick paper or write anything on the surface. * Do not bend the disc. 3. Storage * Store the disc in its case. * Do not expose discs to direct sunlight or high temperatures, high humidity or dusty places. 4.
SPECIFICATION POWER SUPPLY : OUTPUT POWER : UNIT DIMENSION : SPEAKER BOX DIMENSION : N. W. : AC 240V~50Hz 4.5 Watts x 2 135 (W) x 249 (D) x 170 (H) mm 130 (W) x 160 (D) x 170 (H) mm 3.75kg RADIO SECTION FREQUENCY RANGE : FM 87.5 - 108 MHz AM 522 - 1620 kHz COMPACT DISC SECTION CD Media Supported format Type Pickup Laser output Wave length Wow/Flutter MP3 Decode File Bit rate (kbps) ID3 tag Max folder / file no.
TROUBLE SHOOTING SYMPTOM POSSIBLE CAUSE CORRECTIVE ACTION No sound. Volume control is set to minium. Turn up the volume. The wrong function is selected. Select the correct function. Faulty speaker connections. Connect the speaker wires firmly to the speaker terminals. No power No mains lead plug connection at the AC outlet. Insert the plug into the AC outlet. The power is on, but the CD player does not work. No disc is loaded. Load a disc. Sound is heard from one speaker.
The unit supports the listed iPods **iPod charge and operation only** ***iPods shown are not included*** Made for iPod mini (4GB, 6GB only) Made for iPod (4th generation) (20GB only) Made for iPod (4th generation) (40GB only) Made for iPod with color display (4th generation) (20GB, 30GB only) Made for iPod with color display (4th generation) (40GB, 60GB only) Made for iPod with video (5th generation) (30GB only) Made for iPod with video (5th generation) (60GB, 80GB only) Made for iPod nano (1st gene
CODE NO.:116403062 SANYO Electric Co., Ltd.