DRW-500 INSTRUCTION MANUAL DVD Video Recorder REMOTE CONTROLLER RB-DRW500 ® TM TM SANYO’S HELP-LINE Call the toll-free number below if you have any difficulties operating this product. 1-800-813-3435 (Weekdays: 7:30 AM - 4:00 PM Central Time) Please Read This Manual. We recommend that you read this manual carefully before connecting your DVD Video Recorder and operating it for the first time. Keep the manual in a safe place for future reference.
CONTENTS Important Safety Instructions ............................................ E2 Safety Certification ............................................................. E4 Accessories ......................................................................... E4 Controls ............................................................................... E5 Remote Control ................................................................... E6 For Safe and Efficient Operation .......................................
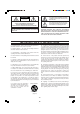
CAUTION This symbol indicates that dangerous voltage constituting a risk of electric shock is present within this unit. RISK OF ELECTRIC SHOCK DO NOT OPEN CAUTION: TO PREVENT THE RISK OF ELECTRIC This symbol indicates that there are important operating and maintenance instructions in the literature accompanying this unit. SHOCK, DO NOT REMOVE COVER (OR BACK). NO USER-SERVICEABLE PARTS INSIDE. REFER SERVICING TO QUALIFIED SERVICE PERSONNEL.
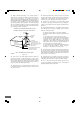
15. Outdoor Antenna Grounding – If an outside antenna or cable system is connected to the product, be sure the antenna or cable system is grounded so as to provide some protection against voltage surges and built-up static charges.
SAFETY CERTIFICATION Note: This equipment has been tested and found to comply with the limits for a Class B digital device, pursuant to Part 15 of the FCC Rules. These limits are designed to provide reasonable protection against harmful interference in a residential installation. This equipment generates, uses and can radiate radio frequency energy and, if not installed and used in accordance with the instructions, may cause harmful interference to radio communications.
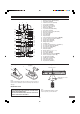
CONTROLS Front Panel 1 2 3 4 12 1. 2. 3. 4. 5. 6. 7. 8. 1 19 23 4 5 RW TITLE CH 6 7 11 Power button (POWER) Disc tray Open/Close button (q OPEN/CLOSE) FL display Record mode button (REC MODE) TV channel scanning button (- CHANNEL +) Skip/Next/Previous buttons (f , e) Stop button (n) FL Display 5 10 9. Play button (a) 10. 2nd AV input jacks (AV2 IN) S-video input jack (S-VIDEO) Video input jack (VIDEO) Audio input jacks (L-AUDIO-R) 11. Record button and indicator (m REC) 12.
REMOTE CONTROL 1 2 1. 2. 3. 4. 5. 6. 7. 8. 9. 10. 11. 12. 13. 14. 15. 16. 17. 18. 19. 20. 21. 22. 23. 24. 25. 26. 27. 28. 29. 30. 31. 32. 33. 34. 35.
FOR SAFE AND EFFICIENT OPERATION • • • • • • • • • Do not damage the power cord. When not in use, disconnect the power cord from the outlet. Grasp the plug, not the cord, when disconnecting the unit. If water should enter the unit, electrical shock or a malfunction may result. Use in an area where there is low humidity and little dust. Do not disassemble or alter the unit in any way.
BASIC CONNECTION Notes: • Unpack the unit and insert the two AA size batteries in the remote control (See page E6). • Do not connect the power cord to a 120VAC 60Hz outlet until all connections have been made. Need help? Call 1-800-813-3435 Before Connection This guide will help you to connect the unit. Step 1: Connecting the Antenna Cable (See page E8.) Step 2: Connecting the Video Cables (See page E11.) Step 3: Connecting the Audio Cables (See page E12.
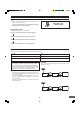
RF OUTPUT CHANNEL Example: Basic Antenna/Cable Connections DVD recorder (Partial back panel) 3 2 4 RF OUTPUT CHANNEL AV 1 IN 1 3 VIDEO 4 L ANTENNA or VHF/UHF ANTENNA IN R 75-ohm coaxial antenna cable (not supplied) IN OUT S-VIDEO AUDIO TV 3 Cable TV wall jack 75-ohm coaxial antenna cable (supplied) 1. Connect an antenna (or a cable TV system) to the unit. 2. Set the RF OUTPUT CHANNEL switch to “3” or “4”. 3.
Example: Connecting a Cable Box This unit can receive all unscrambled cable channels without the use of a cable box. If you wish to view and record scrambled cable channels, you must connect a cable box as described below. Your local cable TV company will advise you of the channels available in your area. We recommend that you consult your cable TV company to make sure that the cable is properly connected.
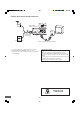
Step 2: Connecting the Video Cable Connect the unit to your TV. Select one of the following examples. (If the TV has an antenna input jack only, skip this step.) Note: For AUDIO connection, see page E12. Need help? Call 1-800-813-3435 Example: Connecting to the VIDEO OUT jack Connect the yellow plug of the Audio/Video cable to the video (yellow) jack. You can enjoy standard picture images.
Step 3: Connecting the Audio Cables Select the audio connection that best suits your system. (If the TV has an antenna input jack only, skip this step.) Note: For VIDEO connection, see page E11. Example: Connecting to your TV (or Audio System) The built-in speakers in your TV will sound.
Example: Connecting to an Amplifier with Dolby Digital Decoder or DTS Decoder Connect the audio cable and/or coaxial digital cable or optical digital cable.
Step 4: Connecting the Power Cord Connect the power cord to a 120VAC 60Hz outlet. This unit is equipped with a polarized plug. If you have difficulty inserting the plug, turn it over and reinsert it. If the unit will not be used for a long time, disconnect the AC plug from the AC outlet. Notes: • Before plugging the power cord into an AC outlet, make sure that all the connections have been made. • The unit is not disconnected from the AC power unless the power cord is unplugged from the AC outlet.
Connecting a VCR or Similar Recording Equipment to This Unit You can use this unit as the source player or as the recording deck. First, disconnect the AC power cord from an AC outlet. Connect a VCR or similar recording equipment to this unit as shown below. See also the owner’s manual supplied with the connected equipment. CAUTION: Pictures containing copyright protection signals cannot be recorded.
Example: Connection for recording to other equipment Connect a VCR or similar recording equipment to the OUT jacks. Notes: • Do not connect the video (yellow) jack when using an S-video cable (not supplied). • If you pass the DVD recorder signals via the VCR, you may not receive a clear image on the TV screen. S-VIDEO VIDEO R-AUDIO-L S-VIDEO VIDEO A/V OUTPUT JACKS R-AUDIO-L A/V INPUT JACKS VCR, etc.
Connecting to a Satellite Receiver or a Cable Box Connect a satellite receiver, digital cable box, or cable box to this unit using the AV1 IN jacks. First, disconnect the AC power cord from an AC outlet. See also the owner’s manual supplied with the connected equipment. A/V OUTPUT JACKS VIDEO TO TV R-AUDIO-L ANT. IN CHANNEL 3 4 Satellite receiver or Cable box, etc.
SETTING THE CLOCK When the unit is first connected to the AC outlet (“-- : --” may brink on the FL display), or after the power has failed, please follow the steps below. Important Note: POWER This unit uses the International Time System (24-hour display). Therefore the unit does not have Daylight Saving Time (DST) function. You must set the clock when summer switches to winter and vice versa.
TUNER SETTING This unit is equipped with a channel memory feature which allows channels to skip up or down to the next channel set into memory, skipping over unwanted channels. Before selecting channels, they must be programmed into the memory. In addition to normal VHF and UHF channels, this unit can receive up to 125 Cable TV channels. To use this unit with an antenna, set the “Channel Setup” menu. Important Note: • • • The antenna must be connected to this unit. See pages E8 ~ E10.
Auto CH Scan Channel List 1) Select “Auto CH Scan”. 1) Select “Channel List”. Recording Setup Recording Setup Record Mode Record Mode b Auto Chapter Auto Chapter Auto CH Scan Auto CH Scan 5 b Set Clock Channel List Set Clock Channel Setup Modify Channel Channel Setup 4 Channel List 5 Tuner Select Tuner Select MTS Select MTS Select Press SETUP to exit Press SETUP to exit 2) Press [ENTER] (or [a]). A message screen appears. b Auto Chapter Modify Channel 2) Press [ENTER] (or [a]).
Modify Channel MTS (Multi-channel TV Sound) Select 1) Select “Modify Channel”. This unit is equipped with a feature known as Multi-channel TV Sound or MTS. MTS broadcasts greatly enhance TV viewing by bringing you programs with high fidelity stereo sound. MTS also provides an extra channel called the Second Audio Program or SAP which broadcasters can use to transmit a second language for bilingual transmission or for other purposes.
BEFORE INITIAL SETTING Common Procedure Important Note: • • • • See “SETTING THE CLOCK” on pages E18 and “TUNER SETTING” on pages E19 first. Turn on the TV and select the appropriate video input to suit the connections to this unit. (Refer to your TV’s owner manual.) Press [n] before setting if the unit is receiving the TV program. 1. Press [POWER] to turn on the power. • “POWER ON” appears briefly on the FL display. • “SANYO” logo appears on the TV screen.
INITIAL SETTINGS Setting “Record Mode” Recording Setup 1. Select “Record Mode”. This is a setup for recording on a DVD+RW or DVD+R disc. Recording Setup a Preparations Record Mode (Recording Setup ---> Record Mode & Auto Chapter) Auto Chapter SP Set Clock LP Channel Setup EP 1. Select “Setup Menu” in “Menu” screen. See page E22. EP+ Menu Play/Edit Disc Record Program HQ 5 Recording Setup a Setup Menu Current selection Press SETUP to exit DVD Control 4 General 2.
Setting “Auto Chapter” When recording starts, the chapters in the title are made automatically on the disc by this setting. 1. Select “Auto Chapter”. Recording Setup Record Mode 4 a Auto Chapter 4 Min. 5 Set Clock 10 Min. Channel Setup 20 Min. SETUP 4, 5, a, b 30 Min. ENTER OFF Press SETUP to exit Current selection 2. Press [ENTER] (or [a]) to select the sub menu. 3. Press [p] or [o] to select the desired time. 4. Press [ENTER]. “√” appears. 5. Press [b] to return to “Auto Chapter”.
Setting “Disc Menu” DVD Control 1. Select “Disc Menu”. This is a setup for playing back DVD-Video discs. DVD Control Setup a Disc Menu Preparations (DVD Control ---> Disc Menu, Angle Mark, Audio, Subtitle & Parental Control) 1. Select “Setup Menu” in “Menu” screen. See page E22. English Audio German Subtitle Italian Parental Control Spanish French Menu Press SETUP to exit Play/Edit Disc Record Program Disc 5 Angle Mark Current selection Recording Setup DVD Control 4 a Setup Menu 2.
Setting “Angle Mark” Setting “Audio” To show the angle mark when playing back DVD-Video discs (recorded with multi-angle), select this setting. 1. Select “Audio”. DVD Control Setup 1. Select “Angle Mark”. Disc Menu Angle Mark DVD Control Setup Disc Disc Menu English 4 a Audio German 5 4 a Angle Mark ON 5 Audio Subtitle Italian Parental Control Spanish OFF French Subtitle Press SETUP to exit Parental Control Current selection 2. Press [ENTER] (or [a]) to select the sub menu.
Setting “Parental Control” Notes: • “Password” is set to “0000” before shipping from the factory. • You may need extra instructions during the setting. If a message appears, please follow the instructions displayed on the TV screen. 4) Press [p] to select “Done”. 5) Press [ENTER]. The parental lock level screen appears. Example: Parental Control Set a Choose Rating 1G 5 1. Select “Parental Control”.
7) Press [ENTER]. “New Password” screen appears. Set Password 1) Select “Set Password”. 2) Press [ENTER] (or [a]). “Parental Control Set” screen appears.
Setting “Menu Language” General 1. Press [ENTER] (or [a]) to select the sub menu. This is on-screen language setting. In this instruction manual, the language in on-screen display is English. If you change the language, please follow the selected language in on-screen display. General Setup Menu Language b English 5 Spanish Preparations (General ---> Menu Language) Press SETUP to exit 1. Select “Setup Menu” in “Menu” screen. See page E22.
Setting “TV Display” Video 1. Press [ENTER] (or [a]) to select the sub menu. In this section, select the playback picture size according to the aspect ratio of the TV, Video Setup TV Display Preparations 4:3 PS b 4 4:3 LB 5 16:9 Wide (Video ---> TV Display) 1. Select “Setup Menu” in “Menu” screen. See page E22. Menu Press SETUP to exit Play/Edit Disc Record Program Setup Menu Current selection Recording Setup DVD Control 4 a 2.
Setting “Digital Out” Audio If the coaxial or optical DIGITAL AUDIO OUT jack is connected to the digital amplifier, you must set as follows: Preparations (Audio ---> Digital Out & DRC) 1. Select “Digital Out”. 1. Select “Setup Menu” in “Menu” screen. See page E22. 2. Press [ENTER] (or [a]) to select the sub menu.
Setting “AV1 Select” and “AV2 Select” AV Select When the 1st AV input (AV1 IN) or 2nd AV input (AV2 IN) jacks are connected, you must set as follows: 1. Press [p] or [o] to select “AV1 Select” or “AV2 Select”. AV1 Select: When AV1 IN jacks are used AV2 Select: When AV2 IN jacks are used 2. Press [ENTER] (or [a]) to select the sub menu. Preparations AV Select (AV Select ---> AV1 Select & AV2 Select) AV1 Select 1. Select “Setup Menu” in “Menu” screen. See page E22.
Setting “Record Time” Record Status The program timer switches the unit on and off to record a TV program at a preset time. You can program a total of 15 times slots to be recorded, during the next one-year period. These settings are retained in the program memory and will repeat as long as a recordable disc is loaded in the unit. Note: If you have set “Record Status” already, open “Record List” to check the list. Remove the unnecessary program from the list first. See page E37. 1. Select “Record Time”.
Setting “Record Day” 1. Select “Record Day”. Example: Record Show Verify the settings. Press ENTER to edit. Start End Record Time 21:30 22:00 Record Day 2004/05/01 Input Source Tuner TV 10 Record Mode SP Title 20040501 Press SETUP to exit Done Cancel 2. Press [ENTER]. The calendar screen appears. 4, 5, a, b ENTER Record Show Press 4 5 or use the number keys on remote to change settings.
Setting “Input Source” Setting “TV” 1. Select “Input Source”. Example: Select the TV channel number. Note: If “AV1” or “AV2” is selected for the Input Source, the channel number does not appear. Skip this section. Record Show Verify the settings. Press ENTER to edit. Start End Record Time 21:30 22:00 Record Day 2004/05/03 Input Source Tuner TV 10 Record Mode SP Title 20040503 Press SETUP to exit Done 1. Select “TV”. Example: Record Show Verify the settings. Press ENTER to edit.
Setting “Record Mode” Setting “Title” 1. Select “Record Mode”. Example: 1. Select “Title”. Example: Record Show Record Show Verify the settings. Press ENTER to edit. Start End Record Time 21:30 22:00 Record Day 2004/05/03 Input Source Tuner TV 12 Record Mode SP Title 20040503 Press SETUP to exit Done Verify the settings. Press ENTER to edit. Start End Record Time 21:30 22:00 Record Day 2004/05/03 Input Source Tuner TV 12 Record Mode HQ Title 20040503 Cancel Press SETUP to exit 2. Press [ENTER].
8. Press [ENTER]. “Title” screen returns. The new title name appears. Example: Record List 1. Select “Record List” in “Menu” screen. (See pages E22 and E33.) Record Show Menu Press ENTER to edit. The title is generated based on the date you set. Play/Edit Disc Record Program Title love Done Record Status b Setup Menu 4 Record List Back 2. Press [ENTER] (or [a]). “My Record List” screen appears. Example: Press SETUP to exit 9. Press [a] to select “Done”. My Record List 10. Press [ENTER].
DISC INFORMATION Recordable Discs Playable Discs The following types of discs can be recorded on this unit. The following types of discs can be played on this unit. Disc type and logo mark Disc type and logo mark DVD+RW DVD-Video TM DVD+R DVD+RW We recommend the discs as shown below. DVD+RW: Rewritable disc You can re-record/erase the disc approximately 1,000 times. CMC (2.4x) Infodisc (2.4x) Mitsubishi (2.4x/4x) Moser Bare India (2.4x) Optdisc (2.4x) Philips (2.4x/4x) Prodisc (2.4x) Richo (2.
Region Number (DVD-Video disc only) Region number (Regional restriction code) is built-in to the unit and DVD-Video discs. Region number “1” or “ALL” of DVD-Video discs can be used on this unit. 1 ALL Handling, Storing and Cleaning Discs • • DVD-Video Disc DVD-Video discs are divided into titles, and the titles are subdivided into chapters. Title 1 Chapter 1 Title 2 Chapter 2 Chapter 1 Chapter 2 • Chapter 3 • There are the marks on some DVD-Video disc package.
RECORDING Preparations • • • • • • • • • This instruction manual explains the basic instruction of this unit using the remote control unit. Turn on the TV and select the video input source. Refer to your TV’s owner manual. Check that the disc has enough available space for recording. Set “Record Mode” and “Auto Chapter” (See pages E23 and E24). Select “Stereo” in “MTS (Multi-channel TV Sound) Select” on page E21. Do not touch the disc tray while it is moving.
Recording TV Programs To pause recording • Press [k] during recording. • “RECORDING PAUSE” appears on the TV screen. Press it again to restart recording. Before pressing [TV], select the Record Mode (“HQ”, “SP” “LP”, “EP” or “EP+”) first. See the previous page. 1. Press [TV] to receive the TV program. “MONITOR” appears briefly on the TV screen. To stop recording Press [n] during recording. Please wait until “CLOSING...” ---> “PLEASE WAIT...” ---> “STOP” disappears on the TV screen.
To watch another TV while recording Press [TV/DVD] repeatedly to select “ANTENNA SOURCE TV” on the TV screen. • “TV” appears on the FL display. Use your original TV remote control to select the channel on your TV. Note: If you do not want to watch TV while recording, you can turn off the TV. If using a cable box, make sure to leave it on. Recording stereo program and SAP (Second Audio Program) 1. Select the recording sound. 1) Select “Stereo”, “SAP” or “MONO” in “MTS Select”.
Timer Recording Note: This unit uses the International Time System (24-hour display). Therefore the unit does not have Daylight Saving Time (DST) function. You must set the clock when summer switches to winter and vice versa. See page E18. 1. Set the program(s) first. (See “Record Status” on page E33. ) My Record List b Date 2004/05/03 2004/05/01 2004/05/10 Start 21:30 17:05 10:00 • • Connect a VCR or other equipment to the AV1 IN or AV2 IN jacks first. See page E15.
DISC PLAYBACK • Important Note: • • • • This instruction manual explains the basic instruction of this unit using the remote control unit. Some DVD-Video discs have different functions that may not be explained in this instruction manual. You may need extra instructions. In this case, please follow the instructions displayed on the TV screen or jacket or case of the disc. If “ ” appears on the TV screen during operation, the operation is prohibited by the unit or the disc.
[DVD-Video] Press [a] (Play) to start playback. • Elapsed playing time appears on the TV screen. • If a menu screen appears on the TV screen... 1) Press [o], [a], [p] or [b] (or the number buttons) to select the desired menu. 2) Press [ENTER]. Playback of the selected menu starts. Note: For more details, please refer to the jacket or case of the disc. Basic Playback Notes: • Do not touch the disc tray while it is moving. • Never place anything except a disc on the disc tray.
Selecting a Top Menu Title or Chapter Search Notes: • The operation may differ depending on the disc used. • Selecting a menu may not be possible on some discs. 1. Press [SEARCH MODE] once during playback or in the stop mode. The title/chapter search screen appears on the TV screen. Example: TITLE 01 / 28 CHAPTER 015 / 035 1. Press [TOP MENU]. The menu screen will appear (if the disc contains it). 2. Press [a] or [b] to select “TITLE” or “CHAPTER”. 2.
Time Search [CD] Fast Playback 1. Press [SEARCH MODE] once during playback. “GOTO --:--” appears on the TV screen. During playback, press [c] or [d]. Each time the button is pressed, the playback speed changes as follows: [DVD-Video] [DVD+RW] [DVD+R] c: Fast forward FF 2X v FF 4X v FF 6X v FF 8X (4 steps) d: Fast reverse FR 2X v FR 4X v FR 6X v FR 8X (4 steps) 2. Press the number button(s) to enter the time. Example: 2 minutes 5 seconds: Press [0], [2], [0], then [5].
Picture Zoom Repeat Playback Press [ZOOM] during normal/slow playback or still picture. The central part of the picture is magnified, and “ZOOM X 1.5” appears on the TV screen. • Each time you press [ZOOM], the zoom mode will be changed as follows: Press [REPEAT] during playback (or programmed playback) of the title (or track) you want to repeat. Each time the button is pressed, the repeat mode will be changed as follows. ZOOM X 1.
Selecting Subtitle Language This operation works only with discs on which multiple subtitle languages are recorded. Press [SUBTITLE] repeatedly during playback until the desired subtitle language appears on the TV screen. Example: SUBTITLE 01/03 : ENGLISH SUBTITLE AUDIO After a few seconds, it disappears. Notes: • In some cases, the subtitle language is not changed to the selected one.
Shuffle Playback [CD] To Check the Disc Playing Time 1. Press [SHUFFLE] in the stop mode. • “SHUFFLE ON” appears briefly on the TV screen. • “SHUFF” appears on the FL display. Press [DISPLAY] during playback. Each time the button is pressed, the various playing times will appear on the TV screen. Examples (DVD-Video, DVD+RW, DVD+R): TITLE 01/02 CHAPTER 015/035 00 : 50 : 09 2. Press [a] (Play) to start shuffle playback. The unit will automatically select tracks at random.
MP3 CD OPERATION Before Starting MP3 CD Playback This unit can play back the CD that has recorded music data, MP3 files. • The file system is ISO9660 Level 1 and Level 2. • It would take 30 seconds or more for this unit to read MP3 files depending on its structure. • This unit can recognize up to 999 files or folders per disc. The CD with 1000 files or folders and over is not available to this unit. • MP3 CDs may not be played in the recorded order. 1.
Pause Press [k] during playback. • “Pause” appears on the TV screen. • “k” appears on the FL display. Note: The sound is muted. Press [a] (Play) (or [k]) to return to normal playback. REPEAT File Skip ENTER Skipping forward Press [e] during playback to skip to the next file. “Next” appears briefly on the TV screen. 5 k (Pause) e f Skipping backward Press [f] during playback to skip back to the previous file. “Previous” appears briefly on the TV screen.
PICTURE DISC OPERATION KODAK Picture CD Playback With KODAK Picture CD, it’s easy to turn film into pictures you can email from your PC and view on this unit! Just bring your film in for processing, and check the box for KODAK Picture CD. You’ll get back your prints and negatives as usual - plus you’ll get a special CD that contains your pictures along with software that lets you view, enhance, share, and print your pictures from your computer and view them on this unit. 4.
JPEG CD Playback Picture Zoom You can also view digital images from JPEG files on disc created by your computer. • It would take 30 seconds or more for this unit to read the JPEG files depending on its structure. • Some JPEG files cannot be played back depending on the recording conditions. 1. Press [k] at the desired picture (KODAK Picture CD or JPEG CD). 2. Press [ZOOM]. “ZOOM ON” appears briefly on the TV screen. 3. Press [aa] or [bb] to select the desired picture size.
EDITING Important Note: • • • Check carefully before proceeding. You may need extra operations during this editing. If a message appears, please follow the instructions displayed on the TV screen. This unit may not be able to edit a disc if it was recorded on other DVD recorders or PCs. For improvement, on-screen display subject to change without notice. Play/Edit Titles 1. Select “Play/Edit Titles”. Menu b Play/Edit Disc Play/Edit Titles 5 Record Program Edit Disc Setup Menu Preparations 1.
TITLE DELETE [DVD+RW] TITLE RENAME [DVD+RW] [DVD+R] Note: Select the title first. See the previous page. Note: Select the title first. See the previous page. 1) Select “TITLE DELETE”. 1) Select “TITLE RENAME”. Disc: Untitled Disc 04 Titles PLAY TITLE Disc: Untitled Disc 04 Titles PLAY TITLE 4 a TITLE DELETE TITLE DELETE 5 RENAME 01 UntitledTITLE 02 Untitled 03:25 SP CANCEL 02:28 HQ 05/01/04 05/01/04 a 03 Untitled 03:21 SP 05/01/04 2) Press [ENTER]. A message appears.
Erase Disc [DVD+RW] Check carefully before proceeding. You can erase all titles on the disc. Note: If it is a title menu screen, press [n] twice. 1) Select “Erase Disc”. 2) Press [ENTER]. A message appears. Edit Disc Disc Operations 1. Select “Edit Disc” in “Menu” screen. (See page E55.) Format Disc Menu Play/Edit Disc Play/Edit Titles b Record Program 4 Erase Disc 5 Finalize Disc confirm the Erasing of this Please Disc. All titles will be permanently Rename Disc deleted.
Rename Disc [DVD+RW] [DVD+R] Protect Disc [DVD+RW] You can enter up to 10 characters for a disc name. You can protect a disc from accidental erasure or editing. 1) Select “Rename Disc”. 2) Press [ENTER]. “New Disc Name” screen appears. 1) Select “Protect Disc”. 2) Press [ENTER]. A message appears. Disc Operations Disc Operations New Disc Name : Format Disc Erase Disc Delete Clear Finalize Disc confirm the Protect of this Please Disc.
TROUBLESHOOTING GUIDE If you have followed the instructions and are having difficulty operating the unit, locate the SYMPTOM in the left column below. Check the corresponding POSSIBLE CAUSE and CORRECTIVE ACTION columns to locate and remedy the problem. Power SYMPTOM No power. POSSIBLE CAUSE CORRECTIVE ACTION The power cord is not connected. Insert the power plug into the AC wall outlet. The power is not on. Press the POWER button to turn the power on.
Sound SYMPTOM No sound. Low volume. POSSIBLE CAUSE CORRECTIVE ACTION The TV is turned off. Turn on the TV. The audio cables are not connected. Connect the audio cables into the jacks. The audio equipment is turned off. Turn on the audio equipment connected with the audio cables. The sound volume is low on some DVDs. Adjust the volume control of your equipment. Playback SYMPTOM The disc does not play. POSSIBLE CAUSE CORRECTIVE ACTION No disc is loaded. Load a playable disc. See page E45.
MAINTENANCE WARNING: FOR YOUR PERSONAL SAFETY, BE SURE TO DISCONNECT THE AC POWER CORD BEFORE PROCEEDING WITH ANY MAINTENANCE OR CLEANING. Cleaning the cabinet Use a clean soft cloth moistened with plain lukewarm water and wrung dry. Never use benzol, benzene or other strong chemical cleaners since these could damage the finish of your unit. It is important that no liquid reaches the inside of the unit.
For assistance in obtaining repairs and operational information, please contact the following Toll Free Number: DIAL TOLL FREE: 1-800-813-3435 Weekdays: 7:30 AM - 4:00 PM Central Time Also, you may write to SANYO Manufacturing Corporation, 3333 Sanyo Road, Forrest City, Arkansas 72335. Limited Warranty LABOR 1 YEAR PARTS 1 YEAR CARRY-IN ONLY THIS WARRANTY IS VALID ONLY ON SANYO PRODUCTS PURCHASED FROM A WAL-MART STORE AND USED IN THE UNITED STATES OF AMERICA, EXCLUDING HAWAII AND ALL U.S.
SANYO Electric Co., Ltd.