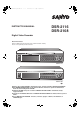
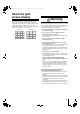
L8HBT_WA(DSR-2116_2108)(GB).book 1 ページ 2009年5月27日 水曜日 午後4時50分 INSTRUCTION MANUAL DSR-2116 DSR-2108 Digital Video Recorder with Multiplexer Function About this manual Before installing and using this unit, please read this manual carefully. Be sure to keep it handy for later reference. DSR-2116 DSR-2108 GB ● Refer to the included CD-ROM for the German, French, Spanish and Italian “INSTRUCTION MANUAL”.
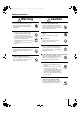
L8HBT_WA(DSR-2116_2108)(GB).book i ページ 2009年5月27日 水曜日 午後4時50分 Table of Contents Safety precautions . . . . . . . . . . . . . . . . . . . . . . . . . . . . . . . . . . . . . ii These precautions must be followed for safety reasons. . . . iii Follow the points outlined below for proper use . . . . . . . . . . vi Main Features . . . . . . . . . . . . . . . . . . . . . . . . . . . . . . . . . . . . . . . . . 1 Main parts replacement timings . . . . . . . . . . . . . . . . . . . . . . . . . . 1 Accessories .
L8HBT_WA(DSR-2116_2108)(GB).book ii ページ 2009年5月27日 水曜日 午後4時50分 Safety precautions CAUTION RISK OF ELECTRIC SHOCK DO NOT OPEN CAUTION: TO REDUCE A RISK OF ELECTRIC SHOCK, DO NOT REMOVE COVER (OR BACK). NO USER-SERVICEABLE PARTS INSIDE. REFER SERVICING TO QUALIFIED SERVICE PERSONNEL. WARNING: To reduce a risk of fire or electric shock, do not expose this product to rain or moisture.
L8HBT_WA(DSR-2116_2108)(GB).book iii ページ 2009年5月27日 水曜日 午後4時50分 Safety precautions These precautions must be followed for safety reasons. Warning b Do not use if the unit emits smoke, strange sounds are heard or odor is emitted. Continued use may cause electrocution and/ or fire. Immediately remove the power plug from the outlet. Once the unit stops emitting smoke, consult the dealership where this unit was purchased or factory shop for repairs. Do not attempt repairs on your own.
L8HBT_WA(DSR-2116_2108)(GB).book iv ページ 2009年5月27日 水曜日 午後4時50分 Safety precautions Warning Caution b Do not use during thunder/thunder storms. Do not use during thunder/thunder storms. Never touch the connection cable during thunder/thunder storms. This may cause electrocution. Contact prohibited b Do not pull on the power cable when removing the power plug from the outlet. Hold the power plug when disconnecting the power cable from the outlet. Pulling on the power cable may damage the cord.
L8HBT_WA(DSR-2116_2108)(GB).book v ページ 2009年5月27日 水曜日 午後4時50分 Safety precautions Caution b Cleaning the internal components b Cautionary points on condensation Consult the dealership where this unit was purchased or factory shop for cleaning internal components. Leaving the unit unused for long periods of time may attract dust to the internal components, which in turn may cause fire and/or breakdowns. Droplets may form on the outside when very cold water is poured into a cup.
L8HBT_WA(DSR-2116_2108)(GB).book vi ページ 2009年5月27日 水曜日 午後4時50分 Safety precautions Follow the points outlined below for proper use b Back up battery. • This unit has got a built-in lithium battery used to back up the clock function. The battery continues to operate the clock even when there is a power disruption. • The life expectancy of the battery is approximately 2 years. If the battery runs out or leaks, the clock resets when the power is turned off.
L8HBT_WA(DSR-2116_2108)(GB).
L8HBT_WA(DSR-2116_2108)(GB).book 2 ページ 2009年5月27日 水曜日 午後4時50分 About the split screen display This manual is common to 2 models. Major differences between these two models are, the number of channel selection buttons available on the front panel and the number of input/output terminals available on the rear panel. As a result, the number of split screens that can be displayed on the monitor is different, as shown below. (DSR-2116) (DSR-2108) Warning The hard disk is a precision instrument.
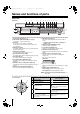
L8HBT_WA(DSR-2116_2108)(GB).book 3 ページ 2009年5月27日 水曜日 午後4時50分 Names and functions of parts Front panel (DSR-2116) 4 5 6 7 8 9 F G H I J L M 1 N 2 3 K 1 Power button and indicator ( ) 2 USB terminal (USB) (Exclusively for 2.0) (P26) To save video, connect a USB memory. 3 Disc drive To save video, insert a DVD-R or CD-R/RW. To open and close the insert tray, open the panel and press the button. 4 LAN indicator (LAN) The indicator blinks when the unit is connected and used through the LAN cable.
L8HBT_WA(DSR-2116_2108)(GB).book 4 ページ 2009年5月27日 水曜日 午後4時50分 Names of each part and connections Rear panel Basic connections • Do not turn this unit on before all the connections are complete. Read the instruction manual of each unit carefully. • Make sure each unit is connected properly as faulty connection may result in the unit emitting smoke and/or being damaged. • Feed additional units with the same power source. Stored data may be lost.
L8HBT_WA(DSR-2116_2108)(GB).book 5 ページ 2009年5月27日 水曜日 午後4時50分 Names of each part and connections Network connection (LAN) LAN connection Internet (DHCP, ADSL) connection b Using the switching hub Use a 10BASE-T/100BASE-TX CAT 5 LAN cable. When controlling the network, connect to hubs such as the switching hub using an Ethernet cable. Connect to the Internet using a router and the like.
L8HBT_WA(DSR-2116_2108)(GB).book 6 ページ 2009年5月27日 水曜日 午後4時50分 Names of each part and connections Connecting to the RS-485 control terminal Remote systems such as system controllers and PTZ dome cameras are connected to the RS-485 control terminal. Check the manufacturer of the units to be connected and connect the units to the appropriate terminal signals (A/B).
L8HBT_WA(DSR-2116_2108)(GB).book 7 ページ 2009年5月27日 水曜日 午後4時50分 Switching the power on / off 4 2 1 2 A Switching the power on 3 • 5 B Switching the power off 1 Connect the power cable to the outlet. Turn on the electricity, the power indicator lights in orange (standby). 2 Press the power button. The power indicator changes to green (running) and initialization starts. During initialization the message "INITIALIZING..." and the firmware version are displayed on a "SANYO" logo screen.
L8HBT_WA(DSR-2116_2108)(GB).book 8 ページ 2009年5月27日 水曜日 午後4時50分 Pre-operation preparation Screen display Upon turning the power on, live video is displayed in the multi screen format. • The screen display can be hidden except for the recording screen display.
L8HBT_WA(DSR-2116_2108)(GB).book 9 ページ 2009年5月27日 水曜日 午後4時50分 Pre-operation preparation 1 2 A Setting the television system and the monitor output If the television system of the camera to be connected and the type of monitor differ, live videos cannot be monitored on the normal screen. Check the specifications of the equipment to be connected and set the system changeover switch on the rear panel. • Do not forget to turn off the power when adjusting the settings.
L8HBT_WA(DSR-2116_2108)(GB).book 10 ページ 2009年5月27日 水曜日 午後4時50分 Pre-operation preparation B 3 1 Select the "GMT AREA" using the control button ({|). 2 Set the time difference with the standard time using the control button (}~). Press the control button (~) twice and select the "SYSTEM", press the ENTER button. The SYSTEM settings screen is displayed.
L8HBT_WA(DSR-2116_2108)(GB).book 11 ページ 2009年5月27日 水曜日 午後4時50分 Pre-operation preparation B 9 C Setting the language (LANGUAGE) Select "CONFIRM" using the control button (}~) and press the ENTER button. The unit automatically restarts, the initializing screen is displayed. Once the initialization is complete and the live screen is displayed, the displayed date and time are updated. 1 Follow steps 1 to 3 of the CLOCK SET procedure.
L8HBT_WA(DSR-2116_2108)(GB).book 12 ページ 2009年5月27日 水曜日 午後4時50分 Monitoring the camera videos D B C A A Single-screen display B Quad-screen display Displays the video of the camera specified using the channel selection button on single-screen. Displays the 4 cameras video connected at once. 1 Example: Displaying camera 2 on single-screen Press the QUAD button. The videos of cameras 1 - 4 are displayed on quad-screen. Press "2" on the camera selection button.
L8HBT_WA(DSR-2116_2108)(GB).book 13 ページ 2009年5月27日 水曜日 午後4時50分 Monitoring the camera videos C Multi-screen display D Camera sequencing Displays the videos of 16 or 9 cameras simultaneously. 1 Press the MULTI button. The videos of camera 1 - 16 are displayed on a multi-16 screen. ☞ In DSR-2108, the only available multi-screen is multi-8 screen. 01 02 03 04 05 06 07 08 09 10 11 12 13 14 15 16 Automatically displays the channel in sequence on a single or quad-screen.
L8HBT_WA(DSR-2116_2108)(GB).book 14 ページ 2009年5月27日 水曜日 午後4時50分 Operating the PTZ dome camera Pan/Tilt, Zoom/Focus operations are possible from this unit when a coaxial superimposed type (COAX) camera is connected, or a PTZ dome camera is connected using the RS-485 control terminal. Operation may not be possible depending on the connected camera.
L8HBT_WA(DSR-2116_2108)(GB).book 15 ページ 2009年5月27日 水曜日 午後4時50分 Operating the PTZ dome camera 3 b Iris/Tour/Sequence operations 1 Select "IRIS/TOUR/SEQUENCE" using the control button ({|) and press the ENTER button. 2 To perform tour operations press the control button ({), to stop tour operations press the ENTER button. 3 To perform sequence operations press the control button (|), to stop sequence operations press the ENTER button. 4 Adjust the aperture using the control button (}~).
L8HBT_WA(DSR-2116_2108)(GB).book 16 ページ 2009年5月27日 水曜日 午後4時50分 Recording 1 This unit allows the following recording modes. Select the recording mode, recording resolution, frame rate and video quality from "RECORD" under the MAIN MENU. (P35) The symbol on the right side of each recording mode (Ex: R) is displayed while recording is in progress. 2 A Real time recording 1 To manually start recording, press the REC/STOP button while monitoring live video.
L8HBT_WA(DSR-2116_2108)(GB).book 17 ページ 2009年5月27日 水曜日 午後4時50分 Recording 3 B CONTINUOUS recording 1 Recording starts automatically when this unit is turned on. "C" is displayed on the screen. The connected cameras are simultaneously recorded. The recording mode can be changed using RECORDING under RECORD settings. Settings, such as image quality, can also be set. (P35) 2% :A CH1 If "FULL ZONE" is selected, the motion setting screen is not displayed.
L8HBT_WA(DSR-2116_2108)(GB).book 18 ページ 2009年5月27日 水曜日 午後4時50分 Recording D ALARM recording An external sensor can be connected to each channel. 1 Connecting an external switch to an external alarm input terminal. Camera (Sold separately) 5 Select "PRE RECORD" using the control button ({|) and select the pre recording as necessary using the control button (}~). 6 Select "POST EVENT RECORD" using the control button ({|) and select the recording time as necessary using the control button (}~).
L8HBT_WA(DSR-2116_2108)(GB).book 19 ページ 2009年5月27日 水曜日 午後4時50分 Recording E SCHEDULE recording 1 Adjusting the following settings using the control button ({|}~). • RESOLUTION • FRAME RATE • CHANNEL • QUALITY 2 Select "RECORDING" using the control button ({|) and select "SCHEDULE" using the control button (}~). • Selecting an identical setting for every day (Example: CONTINUOUS): Move the cursor to "ALL", the display turns red.
L8HBT_WA(DSR-2116_2108)(GB).book 20 ページ 2009年5月27日 水曜日 午後4時50分 Recording E b Copying a set recording schedule to other channels Copying the channel 1 schedule to channel Example 1 3 (COPY FROM) 1 Set the channel 1 schedule and press the EXIT/ STOP button. The RECORD screen is displayed again.
L8HBT_WA(DSR-2116_2108)(GB).book 21 ページ 2009年5月27日 水曜日 午後4時50分 Playing back recorded videos The following recorded videos searching methods are available. b EVENT SEARCH (P22) Search through a recorded video list by setting the date on the calendar display, the camera channel and specify the type of recording.
L8HBT_WA(DSR-2116_2108)(GB).book 22 ページ 2009年5月27日 水曜日 午後4時50分 Playing back recorded videos 1 2 6 7 A EVENT SEARCH 1 5 Press the SEARCH button. The menu screen is displayed. SEARCH EVENT SEARCH TIMELINE SEARCH T/D SEARCH GO FIRST GO LAST LOG BOOKMARK 2 Select "EVENT SEARCH" using the control button ({|) and press the ENTER button. The SEARCH screen is displayed. 3 Select the date you want to search using the control button ({|}~) and press the ENTER button. The cursor moves to CHANNEL.
L8HBT_WA(DSR-2116_2108)(GB).book 23 ページ 2009年5月27日 水曜日 午後4時50分 Playing back recorded videos B TIMELINE SEARCH 1 Press the SEARCH button. The search menu screen is displayed. 2 Select "TIMELINE SEARCH" using the control button ({|) and press the ENTER button. The SEARCH screen is displayed. • If recordings are available, the date is displayed in red. : Indicates that there are recordings in the previous month. : Indicates that there are recordings in the next month.
L8HBT_WA(DSR-2116_2108)(GB).book 24 ページ 2009年5月27日 水曜日 午後4時50分 Playing back recorded videos C T/D SEARCH F LOG 1 Press the SEARCH button. The search menu screen is displayed. 1 Press the SEARCH button. The menu screen is displayed. 2 Select "T/D SEARCH" using the control button ({|) and press the ENTER button. The SEARCH screen is displayed. 2 3 Select the date and time to be played back using the control button (}~) and input a value using the control button ({|).
L8HBT_WA(DSR-2116_2108)(GB).book 25 ページ 2009年5月27日 水曜日 Playing back recorded videos G BOOKMARK Perform the mark operation of the desired live video. The marked event can be selected and displayed from the list (date). (P26, 27) 1 Press the SEARCH button. The menu is displayed. SEARCH EVENT SEARCH TIMELINE SEARCH T/D SEARCH GO FIRST GO LAST LOG BOOKMARK 2 Select "BOOKMARK" using the control button ({|) and press the ENTER button. The BOOKMARK screen is displayed.
L8HBT_WA(DSR-2116_2108)(GB).book 26 ページ 2009年5月27日 水曜日 午後4時50分 Copying recorded video to recording media Necessary video can be selected and copied to USB memory or to a DVD-R, CD-R/RW. A Inserting recording media B Copying live videos Insert the recording media (USB memory) in advance before you perform copy operation. 1 Press the MARK/COPY button at the scene to be copied while monitoring live videos. The copy screen is displayed after the "BOOKMARK OK" message.
L8HBT_WA(DSR-2116_2108)(GB).book 27 ページ 2009年5月27日 水曜日 午後4時50分 Copying recorded video to recording media C Copying a playback video The image to be copied can be selected on still and moving images. 1 5 In response to the confirmation message (Do you want to backup?) select "YES" using the control button (}~). While playing back the recorded video press the MARK/COPY button at the scene to be copied. The video is paused and the BOOKMARK screen is displayed.
L8HBT_WA(DSR-2116_2108)(GB).book 28 ページ 2009年5月27日 水曜日 午後4時50分 Setting the security lock Setting a security lock locks all the operation buttons of this unit. b Setting a security lock 1 Press the EXIT/STOP button for approximately 5 seconds. The password entering screen is displayed. 2% :A 2009/05/03 09:04:54 PASSWORD ---- CH1 2 Enter the "ADMIN PASSWORD" using the channel selection buttons. The factory default password is "1111". 3 Press the ENTER button.
L8HBT_WA(DSR-2116_2108)(GB).book 29 ページ 2009年5月27日 水曜日 午後4時50分 Configuration and function of the Menu settings b LIVE settings (P31) b RECORD settings (P35) b SYSTEM settings (P37) To perform adjustments related to live videos monitoring such as sequencing settings and each camera video adjustments. To perform adjustments related to recordings such as resolution, the recording mode for each channel, video quality, motion and alarm settings.
L8HBT_WA(DSR-2116_2108)(GB).book 30 ページ 2009年5月27日 水曜日 午後4時50分 Configuration and function of the Menu settings 1 2 4 b Basic operations of the MAIN MENU 1 Press the MENU button. The PASSWORD input screen is displayed. 2% :A ---- 5 Input the "ADMIN PASSWORD" using the channel selection button and press the ENTER button. The MAIN MENU screen is displayed. • "1111" is the factory default setting password. 1 2% :A ~ 10 ☞ In DSR-2108, input using channel selection button 1 - 8.
L8HBT_WA(DSR-2116_2108)(GB).book 31 ページ 2009年5月27日 水曜日 午後4時50分 LIVE settings Press the MENU button and enter the ADMIN PASSWORD. The MAIN MENU is displayed, select "LIVE" using the control button ({|}~). MAIN MENU LIVE NETWORK RECORD SYSTEM HDD SET SERVICE A Setting the OSD and OSD CONTRAST Displays information such as the date and camera channel and sets the character contrast on the screen. 1 Select "OSD" using the control button ({|) and select ON or OFF using the control button (}~).
L8HBT_WA(DSR-2116_2108)(GB).book 32 ページ 2009年5月27日 水曜日 午後4時50分 LIVE settings D Setting a CHANNEL To set the video settings on each channel. Select an item for each setting using the control button ({|) and select a setting value using the control button (}~). ● Setting a CHANNEL and the channel designation 1 Select "CHANNEL" using the control button ({|) and select a channel from the following channels using the control button (}~), press the ENTER button.
L8HBT_WA(DSR-2116_2108)(GB).book 33 ページ 2009年5月27日 水曜日 午後4時50分 LIVE settings E F Setting the MON2 (Monitor2)-OUT 2 Select the setting position (4 positions) using the control button (}~). Sets the output conditions of the monitor video terminal (MON2). 3 Select the input terminal number (1 - 16) using the control button ({|). ☞ In DSR-2108, input terminal number (1 - 8). 1 Select "MON2-OUT" using the control button ({|) and press the ENTER button. The MON2-OUT screen is displayed.
L8HBT_WA(DSR-2116_2108)(GB).book 34 ページ 2009年5月27日 水曜日 午後4時50分 LIVE settings F ● Setting the SEQUENCE Sets whether the output video automatically switches to the MON2 terminal. 1 Select "SEQUENCE" using the control button ({|). 2 Set ON/OFF using the control button (}~). ON: Automatically switches OFF: Does not automatically switch ● Setting the SEQUENCE-DWELL TIME If "SEQUENCE" is set to ON, set the switching interval. 1 Select "SEQUENCE-DWELL TIME" using the control button ({|).
L8HBT_WA(DSR-2116_2108)(GB).book 35 ページ 2009年5月27日 水曜日 午後4時50分 RECORD settings Press the MENU button and enter the password. The MAIN MENU is displayed, select "RECORD" using the control button ({|}~). B Setting a CHANNEL To set the recording settings of each channel. Select an item for each setting using the control button ({|) and select a setting value using the control button (}~).
L8HBT_WA(DSR-2116_2108)(GB).book 36 ページ 2009年5月27日 水曜日 午後4時50分 RECORD settings B C Setting the TIMER SET • ALARM (P18) Recording is performed as soon as a sensor device connected to the external alarm input terminal (ALARM IN) of this unit reacts. • SCHEDULE (P19) Recording is performed daily during the set time slot set on the TIMER SET screen in the recording settings. • DISABLE No recording is performed.
L8HBT_WA(DSR-2116_2108)(GB).book 37 ページ 2009年5月27日 水曜日 午後4時50分 SYSTEM settings Press the MENU button and enter the password. The MAIN MENU is displayed, select "SYSTEM" using the control button ({|}~). NETWORK A B C D E F G H I J K L RECORD HDD SET SYSTEM DESCRIPTION HARDWARE VERSION SOFTWARE VERSION STORAGE SIZE IP ADDRESS MAC ADDRESS POWER DISK A USE DISK B USE SERVICE DVR Memo: "POWER" indicates the duration for which the unit has been on.
L8HBT_WA(DSR-2116_2108)(GB).book 38 ページ 2009年5月27日 水曜日 午後4時50分 SYSTEM settings D Setting an ADMIN PASSWORD To set a password to perform menu settings, real time recording, search and playback. The initial value is "1111". Memo: If no USER PASSWORD is set, no password is required when performing search and playback operations. 1 Select "ADMIN PASSWORD" using the control button ({|) and press the ENTER button. The "Current" password input screen is displayed.
L8HBT_WA(DSR-2116_2108)(GB).book 39 ページ 2009年5月27日 水曜日 午後4時50分 SYSTEM settings D E Setting the USER PASSWORD b Restoring the password input 1 Press the MENU button, select SYSTEM and press the ENTER button. 2 Select "ADMIN PASSWORD" using the control button ({|) and press the ENTER button. The "Current" password input screen is displayed. This setting is used to give controlled operational access to administrators and general users.
L8HBT_WA(DSR-2116_2108)(GB).book 40 ページ 2009年5月27日 水曜日 午後4時50分 SYSTEM settings G Setting the DATE FORMAT Refer to "Setting the clock (CLOCK SET)". (P9) H Setting the CLOCK SET Refer to "Setting the clock (CLOCK SET)". (P9) I Setting the RS485 SET To be set when devices, such as a system controller or a SANYO protocol camera, are connected to the RS-485 control terminal. 1 Select "RS485 SET" using the control button ({|) and press the ENTER button. The "RS485 SET" screen is displayed.
L8HBT_WA(DSR-2116_2108)(GB).book 41 ページ 2009年5月27日 水曜日 午後4時50分 SYSTEM settings L Setting a REMOTE CONTROL ID Allows to set an ID number on the supplied remote control and use it as an exclusive remote control when multiple units are connected. The initial value is set to "00" and the remote control display is displayed on the monitor, remote operations are always available.
L8HBT_WA(DSR-2116_2108)(GB).book 42 ページ 2009年5月27日 水曜日 午後4時50分 NETWORK settings Press the MENU button and input the password. The MAIN MENU is displayed, select "NETWORK" using the control button ({|}~). MAIN MENU LIVE RECORD A Setting the PORT When connecting this unit to a multiple unit network, set an individual port number. 1 SYSTEM Select "PORT" using the control button ({|) and press the ENTER button. The "PORT" screen is displayed. The initial value is 5445.
L8HBT_WA(DSR-2116_2108)(GB).book 43 ページ 2009年5月27日 水曜日 午後4時50分 NETWORK settings D Setting the NETWORK TYPE Select "NETWORK TYPE" to be connected, and set each setting. Consult the network manager for all necessary information. 1 Select "NETWORK TYPE" using the control button ({|). 2 Select a type using the control button ({|).
L8HBT_WA(DSR-2116_2108)(GB).book 44 ページ 2009年5月27日 水曜日 午後4時50分 NETWORK settings D E Setting the DDNS b If selecting LAN 1 Select "IP" using the control button ({|) and press the ENTER button. The IP ADDRESS input screen is displayed. Register the domain name and set the DDNS server when using Sanyo’s DDNS service. 1 2 Change the IP number using the control button ({|), move the cursor to the right using the control button (}~) and repeat the operation, and then press the ENTER button.
L8HBT_WA(DSR-2116_2108)(GB).book 45 ページ 2009年5月27日 水曜日 午後4時50分 NETWORK settings 5 Enter the "USER ID" and "PASSWORD" confirmed on the DDNS SERVER SET screen and click the Login button. The domain name registration screen is displayed. Enter the "USER ID" and "PASSWORD" in capital letters. F Setting the SEND E-MAIL An E-mail can be sent to a specified IP address. 1 Select "SEND E-MAIL" using the control button ({|), select "ON" using the control button (}~) and press the ENTER button.
L8HBT_WA(DSR-2116_2108)(GB).book 46 ページ 2009年5月27日 水曜日 午後4時50分 NETWORK settings F G Setting the NTP SET • MAIL TO To set the destination mail address. Example: Allows synchronizing the time using an internet or LAN NTP server. 1 MAIL TO @s a n y o . c o m - - - - - - - - - - - - - - Select "NTP SET" using the control button ({|), select "ON" using the control button (}~) and press the ENTER button. The NTP SET screen is displayed.
L8HBT_WA(DSR-2116_2108)(GB).book 47 ページ 2009年5月27日 水曜日 午後4時50分 HDD SET settings Press the MENU button and input the password. The MAIN MENU is displayed, select "HDD SET" using the control button ({|}~). A Setting the OVERWRITE Allows continuing recording and overwriting old videos once the hard disk capacity is full. When OVERWRITE is set to ON, save required videos to an external memory device.
L8HBT_WA(DSR-2116_2108)(GB).book 48 ページ 2009年5月27日 水曜日 午後4時50分 HDD SET settings C Setting the auto delete function Allows the user to set the storage period for the recording data. Once the storage period is expired the data is automatically deleted. 1 Select "AUTO DELETE" using the control button ({|) and select a setting using the control button (}~).
L8HBT_WA(DSR-2116_2108)(GB).book 49 ページ 2009年5月27日 水曜日 午後4時50分 SERVICE settings Press the MENU button and input the ADMIN password. The MAIN MENU is displayed, select "SERVICE" using the control button ({|}~). MAIN MENU LIVE NETWORK RECORD HDD SET A Setting the SAVE SETUP TO A USB Saving the menu settings of this unit to a device, such as a USB memory. 1 Connect the USB memory to the USB terminal. 2 Select "SAVE SETUP TO A USB" using the control button ({|) and press the ENTER button.
L8HBT_WA(DSR-2116_2108)(GB).book 50 ページ 2009年5月27日 水曜日 午後4時50分 Operations using the Network This unit can be operated from a PC screen by using the supplied network operation software "Sanyo DVR Utility 2000S". Prior to performing network operations make the following preparations. Connection and settings • Network connection: Connect this unit and the PC using a LAN or Internet connection. (P5) • Network settings: Set the network connection settings on the NETWORK screen of this unit.
L8HBT_WA(DSR-2116_2108)(GB).book 51 ページ 2009年5月27日 水曜日 午後4時50分 Operations using the Network To uninstall the software 3 Select the setup type on the [Setup Type] screen and click [Next]. • In general, select "Typical". Depending on the performance of the PC the program may not operate. In that case, re-install "Light". 4 Confirm the program folder in the "Select Program Folder" screen and click [Next].
L8HBT_WA(DSR-2116_2108)(GB).book 52 ページ 2009年5月27日 水曜日 午後4時50分 Connecting to this unit To start this software, double-click the desktop shortcut icon ( ), the main screen is displayed. When connecting a camera to this unit following the procedure below, the camera live video is displayed. b Connecting for the first time 1 Click the connect button on the operation panel. The connection dialog [Connect] is displayed. ☞ In DSR-2108, the multi-screen switch button displays a multi-8 screen.
L8HBT_WA(DSR-2116_2108)(GB).book 53 ページ 2009年5月27日 水曜日 午後4時50分 Main screen structure and function of each part When connected to this unit, the live video of the camera is displayed on the main screen. 2 1 3 2 1 2 4 3 1 3 4 1 Video display area Displays live video or playback video. Can be switched using the operation button on the screen.
L8HBT_WA(DSR-2116_2108)(GB).
L8HBT_WA(DSR-2116_2108)(GB).book 55 ページ 2009年5月27日 水曜日 午後4時50分 Main screen basic operations A Switching the display mode of the screen Allows you to select the display mode for live and playback video. b Single-screen display Click the channel selection button on the operation panel or select one screen and double-click. The video of the specified camera is displayed in single-screen. b Multi-screen display Click the multi-screen display on the operation panel.
L8HBT_WA(DSR-2116_2108)(GB).book 56 ページ 2009年5月27日 水曜日 午後4時50分 Main screen basic operations A B Recording live video b Sequence (camera switch) display b Recording method Click the sequence button on the operation panel while in single, quad-screen, or multi-9 screen display. The video is displayed in sequence in the order of the channel numbers in the present selected display layout. (Multi-9 screen sequence is available in DSR-2116 only.
L8HBT_WA(DSR-2116_2108)(GB).book 57 ページ 2009年5月27日 水曜日 午後4時50分 Main screen basic operations C Freezing the live video E Saving images Stops the live video and allows the user to view the live video as a still image. Allows the user to save live video or playback video displayed on the screen on the PC, as still images. 1 1 Selecting the camera video to be saved.
L8HBT_WA(DSR-2116_2108)(GB).book 58 ページ 2009年5月27日 水曜日 午後4時50分 Main screen basic operations F Operating the PTZ dome camera When the PTZ dome camera is connected to this unit, it can be remotely operated from the PC. 1 Sets the menu using this unit. Set the PTZ CONTROL settings on the SYSTEM screen of the menu settings of this unit. (P14) 2 Displays the live video and specifies the camera to be operated.
L8HBT_WA(DSR-2116_2108)(GB).book 59 ページ 2009年5月27日 水曜日 午後4時50分 Search mode operations When clicking [SEARCH] on the operation panel, the screen display switches to search mode. When in search mode, the display of one part on the operation panel as well as one part of the log window changes. Search and backup operations of video recorded on this unit or on the PC become available. 1 1 2 3 2 2 1 Function of the operation panel 3 1 2 (The example shown is a multi-16 screen display.
L8HBT_WA(DSR-2116_2108)(GB).book 60 ページ 2009年5月27日 水曜日 午後4時50分 Search mode operations A Searching and playing recorded video Video recorded on this unit or on a PC can be searched and played using the date and time. 1 Select the search destination (DVR/PC). Select whether to search the video recorded on the DVR (this unit) or the video recorded on the PC. The search destination can be switched interchangeably by clicking [DVR/PC] on the time scale panel.
L8HBT_WA(DSR-2116_2108)(GB).book 61 ページ 2009年5月27日 水曜日 午後4時50分 Search mode operations B Backing up DVR recorded video DVR (this unit) recorded video can be backed up on the hard disk of a PC in AVI format. Search the recorded video by following the procedure below, specify the video range to be backed up and execute a back up. Refer to steps 1-3 of "Searching and playing recorded video (P60)". 6 Click [BACKUP]. Check the channel selection box of the channels to be backed up in the "AVI Backup" dialog.
L8HBT_WA(DSR-2116_2108)(GB).book 62 ページ 2009年5月27日 水曜日 午後4時50分 Setup menu settings To display the "Setup" screen, click the menu button ( ) on the operation panel. Set the settings concerning the operation conditions of the DVR (this unit) during connection and the network operations on this screen. Clicking menu in the [Setup Menu] window on the left of the screen displays the specified menu screen.
L8HBT_WA(DSR-2116_2108)(GB).book 63 ページ 2009年5月27日 水曜日 午後4時50分 Setup menu settings B Camera designation settings (Site) The connection information registered in the "Connect" dialog at the time of connection is displayed as a list in the "Site" list. Allows the user to add, change, delete the registered information or set a channel name. 1 3 Select the number of channels on the DVR (4/8/16 CH) using the "CH Mode".
L8HBT_WA(DSR-2116_2108)(GB).book 64 ページ 2009年5月27日 水曜日 午後4時50分 Setup menu settings C Event settings (Event) D Event log search, view, save (Log View) Sets the event management method. Event information can be searched and events can be saved to a PC. 1 4 1 2 2 3 1 Log Sets the storage location and allowable size of the event log. 2 Event Set the saving and display conditions for each event using the checkbox.
L8HBT_WA(DSR-2116_2108)(GB).book 65 ページ 2009年5月27日 水曜日 午後4時50分 Setup menu settings E Record settings (Record) F Disk settings (Disk) Sets the recording conditions while in network operations. Recorded video is saved on the hard disk of the PC. Set the capacity and the drive of the PC where the recorded video is saved. 1 1 2 2 3 1 Record Condition Select a recording mode using the radio button. • Always: Recording is performed when the recording button on the operation panel is set to ON.
L8HBT_WA(DSR-2116_2108)(GB).book 66 ページ 2009年5月27日 水曜日 午後4時50分 Remote Setup The menu settings for the DVR unit can be set from a PC, via network. A Remote Setup operating procedure 1 Click the MENU button on the operation panel. The [Setup] screen is displayed. 5 Click [Apply] or [OK]. The "Remote-Setup Success" message is displayed on the [Success] dialog and the setting sent to the DVR. Click [OK] and close the dialog. 1 2 2 3 Click [DVR] at the lower left of the screen.
L8HBT_WA(DSR-2116_2108)(GB).book 67 ページ 2009年5月27日 水曜日 午後4時50分 Remote Setup B Setting the Display To set the live video display conditions. b Common settings (General) b Channel-specific settings These settings apply to all channels. These settings apply to the specified channel only. 1 3 1 5 3 2 24 1 OSD Sets whether to display or not date and time as well as channel number on the screen. • ON: Display • OFF: Do not display 2 Sequence Setting for automatically switching the displayed video.
L8HBT_WA(DSR-2116_2108)(GB).book 68 ページ 2009年5月27日 水曜日 午後4時50分 Remote Setup C Setting the Alarm-Set To set the alarm input/output conditions of the alarm input/output terminals. b Alarm Out b Setting an alarm input terminal Sets whether to output or not alarm signal from this unit. Specify an alarm input terminal number and set the type.
L8HBT_WA(DSR-2116_2108)(GB).book 69 ページ 2009年5月27日 水曜日 午後4時50分 Remote Setup D Setting the Monitor2 To set the output conditions of the monitor video terminal (MON2). 1 2 3 4 5 6 1 MON2 Type Sets the output screen layout of the MON2 terminal. • FULL: Single-screen output • QUAD: Quad-screen output 2 MON2 Event Sets whether to output or not the video of an ALARM recording to MON2 while it is being recorded.
L8HBT_WA(DSR-2116_2108)(GB).book 70 ページ 2009年5月27日 水曜日 午後4時50分 Remote Setup E Setting the Record To set the recording conditions. b Resolution (Common to all channels) Sets the resolution for the recordings. The set value applies to all channels. • QUAD • FULL • HALF b Channel-specific settings These settings apply to the specified channel only. 53 1 2 4 6 7 8 9 F G H J K I 1 Channel designation Channel DSR-2116: 1 -16, DSR-2108: 1 - 8 2 Frame Rate Sets the recording rate.
L8HBT_WA(DSR-2116_2108)(GB).book 71 ページ 2009年5月27日 水曜日 午後4時50分 Remote Setup b Setting the detection frame b Setting the SCHEDULE recording Set the zone where the motion sensor will be active. Set the schedule for the SCHEDULE recording. 1 Set [Motion Zone] to "PARTIAL ZONE". A button is displayed to the right. 1 2 Click the button. The screen for setting the detection frame is displayed. Click the [Timer Set] button. The [Schedule] screen is displayed.
L8HBT_WA(DSR-2116_2108)(GB).book 72 ページ 2009年5月27日 水曜日 午後4時50分 Remote Setup F System settings Settings related to the system and time. b Setting the System 1 2 3 4 5 6 7 1 DVR ID (P37) Sets individual designation to DVRs. 2 Admin Password (P38) This is a password for performing menu settings on the DVR unit. Memo: The default value is "1111". 3 User Password (P39) This setting is used to give controlled operational access to administrators and general users.
L8HBT_WA(DSR-2116_2108)(GB).book 73 ページ 2009年5月27日 水曜日 午後4時50分 Remote Setup G Description This sub menu is accessible from the System settings. Allows to check information on the DVR such as the version information. H Setting the PTZ Control This sub menu is accessible from the System settings. Allows to set the communication environment for remotely operating PTZ dome cameras connected to RS485 terminals.
L8HBT_WA(DSR-2116_2108)(GB).book 74 ページ 2009年5月27日 水曜日 午後4時50分 Remote Setup I Setting the Network To set information about the DVR network. The DVR will be forcibly restarted if a value on this screen is changed. b DDNS settings When using Sanyo's DDNS service, select "SANYO" and input the registered domain name. b Network settings 2 3 1 4 Memo: • Refer to P45 for details on how to register the domain name.
L8HBT_WA(DSR-2116_2108)(GB).book 75 ページ 2009年5月27日 水曜日 午後4時50分 Remote Setup J Setting the Send E-Mail This sub menu is accessible from the Network settings. This setting is used to automatically send a notification e-mail to a specified address when an alarm occurs, for example. The DVR will be forcibly restarted if a value on this screen is changed. K Setting the NTP Allows synchronizing the time using an internet or LAN NTP server.
L8HBT_WA(DSR-2116_2108)(GB).book 76 ページ 2009年5月27日 水曜日 午後4時50分 Operations using the Web browser Supported browsers are Internet Explorer 5.5 SP2 or later. Supported OSs are Windows XP and Vista. 1 2 Start the Web browser (Internet Explorer). b Functions of the main operation panel Input the URL. Input the IP address of the hard disk digital recorder in the browser's address bar. 1 2 3 Input example: 3 Input the password in the Web Page Dialog.
L8HBT_WA(DSR-2116_2108)(GB).
L8HBT_WA(DSR-2116_2108)(GB).book 78 ページ 2009年5月27日 水曜日 午後4時50分 Operations using the Web browser b Saving still images to the PC b Saving moving videos to the PC 1 1 Click the Capture button. The Web Page Dialog is displayed. Click the Download button. The Web Page Dialog is displayed. 2 1 3 4 1 2 5 3 6 2 3 Select the [Channel] 2 to be saved. Click the [OK] 3 button. A still image of the selected channel is saved to the folder specified in [File] 1.
L8HBT_WA(DSR-2116_2108)(GB).book 79 ページ 2009年5月27日 水曜日 午後4時50分 Part names of the remote control Batteries for the remote control are not supplied. Use two AAA batteries. b Inserting batteries in the remote control. 1 Take the battery cover off. REC/STOP ALARM 2 1 3 4 5 6 9 F H I L 1 2 3 4 5 6 7 8 9 ID 0 2 Place the batteries and fit the cover. 10 7 MENU EXIT SERCH MARK PTZ LOCK COPY SEQ QUAD MULTI 8 G J K M N Note: Make sure the batteries are correctly oriented.
L8HBT_WA(DSR-2116_2108)(GB).book 80 ページ 2009年5月27日 水曜日 午後4時50分 Specifications Signal method Conforms to the NTSC/PAL system • NTSC: 60 ips • PAL: 50 ips Video: MPEG4, Audio: G.
L8HBT_WA(DSR-2116_2108)(GB).book 81 ページ 2009年5月27日 水曜日 午後4時50分 Mounting the hard disk (S-ATA) A hard disk may not be installed at the time of purchase. If no hard disk is installed, consult the dealership where the unit was purchased for purchase and installation. Make sure the unit is turned off before installing the hard disk. 1 Remove the unit's cover. 3 Connect the unit's power cable (B) and the supplied S-ATA cable (C) to the hard disk.
L8HBT_WA(DSR-2116_2108)(GB).book 1 ページ 2009年5月27日 水曜日 午後4時50分 MEMO ........................................................................................................................................................................................................... ........................................................................................................................................................................................................... ...............................
L8HBT_WA(DSR-2116_2108)(GB).book 2 ページ 2009年5月27日 水曜日 午後4時50分 MEMO ........................................................................................................................................................................................................... ........................................................................................................................................................................................................... ...............................
L8HBT_WA(DSR-2116_2108)(GB).book 3 ページ 2009年5月27日 水曜日 午後4時50分 MEMO ........................................................................................................................................................................................................... ........................................................................................................................................................................................................... ...............................
L8HBT_WA(DSR-2116_2108)(GB).book 1 ページ 2009年5月27日 水曜日 午後4時50分 SANYO Electric Co., Ltd.