cover_us.
DSR3016gb.fm 1 ページ 2002年7月4日 木曜日 午後4時41分 Contents Network Control Functions . . . . . . . . . . . 3 9. ALARM REC MODE SET . . . . . . . . . . . 15 Basic Specifications for Network Control . . . . 3 PICTURE QUALITY. . . . . . . . . . . . . . . . . . . . . . . . . 15 AUDIO RECORDING . . . . . . . . . . . . . . . . . . . . . . . 15 Network Settings . . . . . . . . . . . . . . . . . . . . . . 3 ALARM RECORDING . . . . . . . . . . . . . . . . . . . . . . . 16 PRE-ALARM RECORDING. . . . . . . . . . . .
DSR3016gb.fm 2 ページ 2002年7月4日 木曜日 午後4時41分 Recording Images . . . . . . . . . . . . . . . . 22 SEARCH . . . . . . . . . . . . . . . . . . . . . . . . 26 Normal recording . . . . . . . . . . . . . . . . . . . . . 22 Basic Search Operations . . . . . . . . . . . . . . 26 Timer recording . . . . . . . . . . . . . . . . . . . . . . 22 Search Menus . . . . . . . . . . . . . . . . . . . . . . . 26 Alarm recording . . . . . . . . . . . . . . . . . . . . . . 22 Search Mode Operations . . . . . . . . . . .
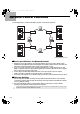
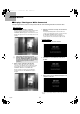
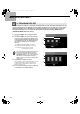
DSR3016gb.fm 3 ページ 2002年7月4日 木曜日 午後4時41分 Network Control Functions Connecting this unit to a network will enable computer control (remote operation). CAMERA CAMERA 1 DVR 2 DVR 3 4 2 CAMERA CAMERA DVR 1 DVR 4 3 (DVR: Digital Video Recorder) ■ Basic Specifications for Network Control 1. Operations such as menu settings, recording and playback can be done on the computer screen.
DSR3016gb.fm 4 ページ 2002年7月4日 木曜日 午後4時41分 Network Control ■ Switching to Control by Computer 1 Start your Web browser. Compatible browsers are Internet Explorer Ver. 5.0 or later. Compatible operating systems are Windows 98, 98ME, 98SE, 2000 and XP. If the highest-level user connects from a different computer while four computers are already connected, the last one of the lowest-level computers to connect is forcibly disconnected and the highest-level user has priority.
DSR3016gb.fm 5 ページ 2002年7月4日 木曜日 午後4時41分 Network Control ■ Displays That Appear While Connected Messages appear on the screen for a short period to indicate control switching and network connection status. Main unit display 3. When the connection is forcibly canceled from the main unit 1. When control is switched to a computer When the web browser is started and the specified procedure is followed, operation switches to the computer and “NETWORK CONTROL” appears on the main unit on-screen display.
DSR3016gb.fm 6 ページ 2002年7月4日 木曜日 午後4時41分 Operating Panel and Operation Permissions Playback buttons 1 Previous event (ID2/3) Used to playback from immediately before an alarm event. 2 P Next event (ID2/3) Used to playback from immediately after the next alarm event. 3 O Speed down (ID2/3) Used to reduce the playback speed by one step. 4 5 6 Used to increase the playback speed by one step. Q R Reverse playback (ID2/3) 1 6 2 Used to play back a recorded image in reverse.
DSR3016gb.fm 7 ページ 2002年7月4日 木曜日 午後4時41分 Settings To use the functions of this unit effectively, the recording conditions and installation environment must be specified beforehand. These setting items are arranged and displayed in two levels consisting of the main menu and sub-menus. Refer to the setting procedures for each menu on the following pages for details on the various setting methods.
DSR3016gb.fm 8 ページ 2002年7月4日 木曜日 午後4時41分 Menu Setting Procedures 1. CLOCK SET This sets the main unit clock to the current time. 1 Select “ Month/Day/Year Hour/Minute” from the menu. The day of the week is selected automatically based on the date. Click [SET] to set the time. 2. DAYLIGHT SAVING/EXT. CLOCK SET This sets daylight saving and adjusts the time for peripheral devices. DAYLIGHT SAVING This sets the start and end times for daylight saving.
DSR3016gb.fm 9 ページ 2002年7月4日 木曜日 午後4時41分 Menu Setting Procedures 3. PROGRAM REC SET When more than one camera is connected to the digital video recorder, the camera rate (unique rec rate for each camera) can be set separately for each camera. In addition, you can make up to four programs that include settings such as the method of combining the images from each recording camera and individual camera rates.
DSR3016gb.fm 10 ページ 2002年7月4日 木曜日 午後4時41分 Menu Setting Procedures 4. RECORDING AREA SET The hard disk in this unit consists of three independent recording areas, each of which has five recording modes. A percentage of the total recording capacity is allocated to each recording area (settings are in units of 1%). Recording area NORMAL RECORDING AREA ALARM RECORDING AREA ARCHIVE AREA 1 Recording mode Notes Normal recording Manual Recording is carried out manually using the O button.
DSR3016gb.fm 11 ページ 2002年7月4日 木曜日 午後4時41分 Menu Setting Procedures 5. RECORDING CONDITIONS SET This sets the overwrite conditions and remaining disk capacity warning criteria for each recording area. NORMAL RECORDING AREA OVERWRITE (Default setting: ON) This specifies whether to stop recording or to continue recording by overwriting images that are currently recorded on the hard disk when the normal recording area has become full. 1 Select [ON/OFF] from the menu.
DSR3016gb.fm 12 ページ 2002年7月4日 木曜日 午後4時41分 Menu Setting Procedures 6. NORMAL REC MODE SET This specifies the recording conditions for normal recording and timer recording. PICTURE QUALITY (Default setting: ENHANCED) This sets picture quality for normal recording. 1 Select a picture quality mode from the menu.
DSR3016gb.fm 13 ページ 2002年7月4日 木曜日 午後4時41分 Menu Setting Procedures REC RATE (Default setting: A 30 FPS) This sets the recording rate for normal recording. 1 Select the recording cycle for normal recording from the menu. A 60, A 30, A 20, A 15, A 10, 7.5, 6, 5, 4.286, 3.75, 3.333, 3, 2.727, 2.308, 2, 1.667, 1.429, 1.25, 1.111, 1, 0.5, 0.333, 0.25, 0.2, 0.1, 0.05, 0.033 (Units: FPS) The image resolution is determined by image quality × REC RATE.
DSR3016gb.fm 14 ページ 2002年7月4日 木曜日 午後4時42分 Menu Setting Procedures 7. TIMER SET This lets you set the conditions for timer recording, such as the timer operating time, separately for each day of the week. 1 2 Select the timer recording conditions for each weekday from the menu. Click [SAVE] to complete the timer settings (or changes). 1 2 3 4 5 6 7 1 2 3 4 5 WEEK Specifies the weekdays for making timer recordings.
DSR3016gb.fm 15 ページ 2002年7月4日 木曜日 午後4時42分 Menu Setting Procedures 8. HOLIDAY SET This menu is used to specify particular days as holidays. The timer recording operation on specified holidays will be the same as that for Sundays. A holiday setting can be made for days such as national holidays and company holidays when the same level of security as for Sundays is required. 1 Select the day to be specified as a holiday from the menu.
DSR3016gb.fm 16 ページ 2002年7月4日 木曜日 午後4時42分 Menu Setting Procedures ALARM RECORDING This specifies whether alarm recording will be carried out or not, and sets the recording cycle and recording conditions when alarm recording is carried out. 1 Select an alarm recording mode from the [ALARM RECORDING] menu (default setting: OFF). • OFF: No alarm recording will be carried out. • ENABLED: Alarm recording is carried out at any time, without regard to timer recording (timer settings).
DSR3016gb.fm 17 ページ 2002年7月4日 木曜日 午後4時42分 Menu Setting Procedures PRE-ALARM RECORDING This specifies whether pre-alarm recording will be carried out or not, and sets the recording conditions when pre-alarm recording is carried out. (See p. 22) 1 Select “ON/OFF” from the [PRE-ALARM RECORDING] menu. • ON: Pre-alarm recording is carried out. • OFF: Pre-alarm recording is not carried out. When [ALARM RECORDING] is set to “OFF”, “**” is displayed and pre-alarm setting cannot be carried out.
DSR3016gb.fm 18 ページ 2002年7月4日 木曜日 午後4時42分 Menu Setting Procedures 10. ALARM DURATION SET The duration of alarm recording can be set separately for each camera. The DURATION setting for each camera that is made using the [ALARM DURATION SET] menu is effective when [DURATION] in the [ALARM RECORDING] menu is set to “INDIV.” (See p. 16) 1 Select the alarm recording duration for each camera from the menu.
DSR3016gb.fm 19 ページ 2002年7月4日 木曜日 午後4時42分 Menu Setting Procedures 12. RS-232C/RS-485 SET This displays information related to the digital video recorder’s interface. ALARM INFO This menu only lets you check the settings; it cannot be used to change the settings. For RS-485 communication, this specifies whether alarm information is to be transmitted or not. CONTROL This shows the type of interface being used to control the digital video recorder. • ON: Alarm information is to be transmitted.
DSR3016gb.fm 20 ページ 2002年7月4日 木曜日 午後4時42分 Menu Setting Procedures 14. NETWORK SET When the digital video recorder is connected to a network, NETWORK SET is used to make settings beforehand from the main unit, but the settings that have been specified from the main unit can also be changed from the computer.
DSR3016gb.fm 21 ページ 2002年7月4日 木曜日 午後4時42分 Menu Setting Procedures 15. HDD SET This displays hard disk information. In addition, if another hard disk has been added and mirroring recording by the digital video recorder has been set to “ON”, you can also set the drive to be given priority for the reading of data. PLAYBACK DRIVE If mirroring recording by the digital video recorder has been set to “ON”, you can select the disk drive from which the recorded data is to be read from menu (3 3).
DSR3016gb.fm 22 ページ 2002年7月4日 木曜日 午後4時42分 Recording Images This digital video recorder can record images being monitored and alarm on the internal hard disk by the methods specified below. In order to record images, the necessary menu settings should be made beforehand in accordance with the installation environment. (See p. 7) ■ Normal recording This is a manual operation for recording live images that are currently being viewed into the normal recording area.
DSR3016gb.fm 23 ページ 2002年7月4日 木曜日 午後4時42分 Viewing Images Live images and recorded images can both be viewed while monitoring is in progress at any time when required. Operations such as switching between live images and recorded images that are being played back and changing the display screen do not have any effect on other operations such as timer recording and alarm recording. ■ Viewing Live Images Click the G button on the operating panel to pause playback.
DSR3016gb.fm 24 ページ 2002年7月4日 木曜日 午後4時42分 Viewing Images ■ Specifying the Number of Display Screens (1 1) If more than one camera is connected to the digital video recorder, multiple camera images can be displayed on the screen in a multi-screen format. To do this, you need to specify the channel numbers for the monitoring cameras that are to be displayed on the monitor screen.
DSR3016gb.fm 25 ページ 2002年7月4日 木曜日 午後4時43分 Viewing Images 1 4 5 1 4 5 6 6 7 8 7 3 3 F 9 2 2 Live mode screen Playback mode screen ■ Image Adjustment 6 NORMAL RECORDING MODE The current normal recording mode is shown for reference. The display screen can be adjusted using the following adjustments. • STOP • RECORDING Select the adjustment values from the menus, and then click [SET].
DSR3016gb.fm 26 ページ 2002年7月4日 木曜日 午後4時43分 SEARCH Five search modes are provided for different recording areas and image search patterns. These let you quickly search for images and play them back. ■ Basic Search Operations 1 Click the L button on the operating panel in live mode (when playback is stopped) to display the [SEARCH] menu. If you click the L button during playback mode, the message “Mode Error” will be displayed. 2 Click to select the required search mode in the [SEARCH] menu screen.
DSR3016gb.fm 27 ページ 2002年7月4日 木曜日 午後4時43分 Search Mode Operations 1. ALARM SEARCH This displays a list of all alarm events recorded in the alarm recording area by alarm number. Alarm images are searched for by alarm number and played back. 1 Select [ALARM SEARCH] from the [SEARCH] menu. 1 2 3 4 A list of alarm events is displayed on the ALARM SEARCH screen in order starting from the most recent recording date.
DSR3016gb.fm 28 ページ 2002年7月4日 木曜日 午後4時43分 Search Mode Operations 3. TIME/DATE SEARCH Images in the normal recording and the alarm recording area can be specified by time and date and played back. 1 Select [TIME/DATE SEARCH] from the [SEARCH] menu. 21 5 6 The TIME/DATE SEARCH screen will appear. 2 Specify the channel (camera number) that you wish to play back in the [CHANNEL] menu. If the multiplexer function has not been used and only one channel is available, [--] will be displayed.
DSR3016gb.fm 29 ページ 2002年7月4日 木曜日 午後4時43分 Search Mode Operations 5. MOTION DETECTION SEARCH If a motion sensor has been set to detect movement in a particular camera view, and images for that view have been saved in the normal recording area or alarm recording area, you can search for those images that have changed as a result of movement by an intruder, for example, and play back those images. 1 Select [MOTION DETECTION SEARCH] from the [SEARCH] menu.
DSR3016gb.fm 30 ページ 2002年7月4日 木曜日 午後4時59分 Saving Recorded Images Recorded images can be copied into the archive area of the hard disk or downloaded to a personal computer. This function is used only for saving important images that have been recorded in the normal recording area and alarm recording area. • Images that are copied will be saved as individual images. Moving pictures are handled by specifying the number of images that need to be copied after the start picture.
DSR3016gb.fm 31 ページ 2002年7月4日 木曜日 午後4時43分 Saving Recorded Images ■ DOWNLOAD TO PC Recorded images can be copied into the archive area of the hard disk or downloaded to a personal computer. 1 1 2 3 4 5 Pause image playback at the image that will be the starting point for downloading. Play back recorded images and pause playback at the image that will be the starting point for downloading.
DSR3016gb.fm 32 ページ 2002年7月4日 木曜日 午後4時43分 Saving Recorded Images * Image Viewer Screen This lets you check the downloaded images. 4 5 6 7 3 2 1 8 I G H 9 F Thumbnail images 1 2 9 TOP This sets the playback speed (cycle). PREV. 1 2 3 4 5 This displays the previous image. 3 R.PLAY This plays back the images in reverse. When the first image is reached, it returns to the last image and continues reverse playback from that image.
DUMMY.
DUMMY.
cover_us4.fm 1 ページ 2002年7月4日 木曜日 午後1時26分 SANYO Electric Co., Ltd.