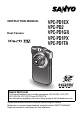
INSTRUCTION MANUAL Dual Camera VPC-PD1EX VPC-PD2 VPC-PD1GX VPC-PD1PX VPC-PD1TA Important note This manual explains how to safely operate the VPC-PD1EX, VPC-PD2, VPC-PD1GX, VPC-PD1PX and VPC-PD1TA. Any information regarding only one of these products will be labeled as such. Please read these instructions carefully before using the camera. Make sure to read and understand the separate booklet “SAFETY MANUAL”. Keep this manual in a safe place for later reference.
Warning TO PREVENT THE RISK OF FIRE OR ELECTRIC SHOCK, DO NOT EXPOSE THIS APPLIANCE TO RAIN OR MOISTURE kFOR AMERICAN USERS The following advisory is included in accordance with the laws of the State of California (USA): WARNING: This product contains chemicals, including lead, known to the State of California to cause cancer, birth defects or other reproductive harm. Wash hands after handling.
kFOR CANADIAN USERS i This Class B digital apparatus complies with Canadian ICES-003. kFOR EU USERS The symbol mark and recycling systems described below apply to EU countries and do not apply to countries in other areas of the world. Your SANYO product is designed and manufactured with high quality materials and components which can be recycled and/or reused.
HOW TO READ THIS MANUAL Symbols used in this manual HINT CAUTION (page xx) iii Points giving some extended instructions or special points to pay attention to. Points that require special attention. Refer to the page indicated for detailed information.
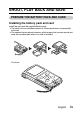
SHOOT, PLAY BACK AND SAVE PREPARE THE BATTERY PACK AND CARD Installing the battery pack and card Install the card and the supplied battery pack. i The card is not an included accessory. Please purchase a commercially sold card. i The camera has an internal memory, which means that you can record and save the recorded data even if no card is installed.
2 Pull out 1 Press 2 Pull out 1 Push in Charging the battery pack 1 2 3 Press the ON/OFF button to turn off the camera. h It is not possible to charge the battery pack while the camera is on. Use the dedicated USB interface cable (supplied) to connect the camera to a computer. Turn on the computer. h Charging begins. h During charging, the multi-indicator is lit red. h When charging is completed, the indicator turns off. h The charging time is approx.
CAUTION During charging... i Do not turn on the camera while the battery pack is charging. It is not possible to charge the battery pack while the camera is on. i Do not turn off the computer while the battery pack is charging. It is not possible to charge the battery pack while the computer is off. i With certain computers, it may be possible to charge the battery pack even when the computer is turned off.
Shooting 1 2 Press the ON/OFF button for at least 1 second to turn the camera on. h If the screen to set the date and time appears, press the [?] button to cancel it. For how to set the date and time, see page 14. [ ] button (Video recording button) ON/OFF button Record. To record a video clip: h Press the [ ] button to begin recording a video clip. h Press the [ ] button again to end the recording. To take a photo: h Press the [ ] button. h A still image is captured.
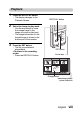
Playback 1 2 3 Press the REC/PLAY button. h The display changes to the Playback Screen. REC/PLAY button Select the image to play back. h Use the arrow keys to move the orange frame to the image you wish to play back. h The image information for the framed image is shown in the bottom part of the monitor. Press the SET button. h The file you selected is played back. h Press the REC/PLAY button. SET button Arrow keys 2010.12.
Deleting files 1 On the screen in step 2, move the orange frame to the file you wish to delete, and press the [?] button. 2 Select “DELETE SINGLE”, and press the SET button. h If you press [G] or [H], the screen to delete a different file will appear. 3 When you are finished deleting files, press the [?] button. When you are finished using the camera... Press the ON/OFF button for at least 1 second to turn the camera off.
Copy data from your camera to the computer Connect your camera to a computer, and copy the desired data to the computer. 1 Turn on the computer, and use the supplied dedicated USB interface cable to connect your camera to the computer. h Connect the cable between the camera’s USB terminal and the computer’s USB connector.
2 Turn on the camera (page 11). h The USB Connection Screen appears on the camera’s monitor. USB CONNECTION CARD READER MTP CANCEL CANCEL 3 4 5 OK Select “CARD READER”, and press the SET button. h The window for automatic playback of XACTI_INT (internal memory) and XACTI (card) opens. h If the Access Menu appears, click the Access Menu [EXIT] button. In the automatic playback window, click [Open folder and display files].
Uploading camera files to a file-sharing website i Your camera’s internal memory contains the Xacti Simple Uploader application with which you can upload camera files to a file-sharing website. i For information on how to use Xacti Simple Uploader, please refer to the Xacti Simple Uploader user’s manual, which can be obtained from the SANYO website. 1 Connect your camera to a computer. 2 Turn on the computer and the camera.
Software operating environment Operating System *3 CPU RAM Video RAM Others *1 *2 *3 for Windows® Video playback *1 Xacti Simple Xacti Simple Uploader *2 Uploader *2 ® Windows 7 Windows®7 Windows®Vista Windows®Vista Windows®XP Windows®XP with standard with standard USB port USB port Core 2 Duo E4400 2.0GHz or Celeron, Pentium4 1GHz or faster faster Core Duo T2600 2.16GHz or faster Core Duo, Core 2 Duo or faster Athlon X2 4600+ 2.
Dismounting the camera CAUTION i To disconnect your camera, be sure to follow the procedure below. Failure to follow this procedure may cause faulty operation of your computer or corrupt the files in your camera. 1 2 Left-click on the icon for safely removing hardware in the task tray. h A list appears showing the devices connected to the computer’s USB connector. Left-click on the camera drive. h The camera can now be disconnected.
CONTENTS HOW TO READ THIS MANUAL ............................................................iii CHECKING THE INCLUDED ACCESSORIES ...................................... 3 How to use the accessories ............................................................ 4 ABOUT THE CARD ............................................................................... 5 Media cards that can be used with this camera .............................. 5 What “card” means in this manual .........................................
APPENDICES FREQUENTLY ASKED QUESTIONS ..................................................34 OVERVIEW OF THE SETUP MENU SCREEN ....................................39 SPECIFICATIONS ................................................................................41 Camera ..........................................................................................41 Camera connectors .......................................................................44 Battery life ...........................................
CHECKING THE INCLUDED ACCESSORIES i Li-ion battery pack: 1 i Dedicated USB interface cable (page v, x): 1 i SAFETY MANUAL (safety precautions booklet) Please read this booklet carefully before using the camera.
How to use the accessories k Handstrap (Please purchase a commercially available handstrap.) i To avoid dropping the camera, it is recommended that you attach a handstrap.
ABOUT THE CARD Media cards that can be used with this camera The type of card that can be inserted into and used with this camera is: i SD Memory Card i SDHC Memory Card i SDXC Memory Card What “card” means in this manual i In this manual, SD Memory Cards, SDHC Memory Cards and SDXC Memory Cards that can be used in this camera are referred to as “card”.
SETUP SETUP PARTS NAMES Front Speaker Flash SETUP Microphone Microphone Lens LED Slot cover Bottom Tripod stand hole Connector lever Strap holder English 6
Rear Multi-indicator Monitor SET button [ ] button (Photo shooting button) [ ] button (Video recording button) Arrow keys [?] button REC/PLAY button ON/OFF button 7 English
ABOUT THE BATTERY AND THE CARD About recharging CAUTION Do not charge the battery pack immediately after the camera has been in continuous use for a long time i The battery pack becomes hot when the camera is used continuously for a long time. If you attempt to charge the battery pack in this state, the multiindicator may flash red and it may not be possible to charge the battery pack. Wait until the battery pack has cooled down before attempting to charge it.
HINT Recharging when connected to the USB terminal i The battery can be recharged while the camera is connected to a computer. i Note, however, that the time it takes to recharge will differ depending on the camera’s operating condition. i Connect the dedicated USB interface cable to the USB connector on your computer. Do not connect it to the USB connector on the monitor or the keyboard, or to the USB hub.
To format a card 1 2 Press and hold the [?] button for at least 1 second. Select “FORMAT” and press the SET button. h The Format Screen appears. Follow the instructions on the screen to format the card. Shooting without a card installed i When a card is installed, images are recorded to and played back from the card. When no card is installed, images are recorded to and played back from the camera’s internal memory.
TURNING THE CAMERA ON AND OFF Turning on the camera 1 Press the ON/OFF button for at least 1 second. ON/OFF button Turning off the camera 1 Press the ON/OFF button for at least 1 second. h The camera turns off. HINT To adjust the operation sounds i If you turn on the camera by pressing the ON/OFF button while holding down the [I] arrow key, the screen to change the operation sounds will appear.
Turning on the camera when the power save (sleep) mode is active In order to preserve battery pack power, the power save (sleep) function will automatically turn off the camera after about 2 minutes of no use during shooting, or about 2 minutes of no use during playback. English 12 SETUP i When the power save mode is active, you can restore the power by any of the following methods: h Press the ON/OFF button. h Press the SET button.
CAUTION If the K icon appears... i When a picture is taken, the date and time it was captured are recorded with it. If the date and time settings have not been completed (page 14), the date and time cannot be recorded with the captured images. For this reason, immediately after the camera is turned on, the “Set date and time” reminder briefly appears, after which the K icon is shown on the Recording Screen.
DATE AND TIME SETTING When the camera is first turned on after purchase, the Clock Set Screen appears. Proceed from step 4 to set the date and time. 1 2 4 5 Press and hold the [?] button for at least 1 second. h The Setup Menu appears. SET button SETUP 3 Press the ON/OFF button to turn on the camera. Use the [I] and [J] arrow keys to select “CLOCK SET”, and press the SET button. h The Clock Set Screen appears. Set the date and time. h To select the desired setting: Press the [G] and [H] arrow keys.
HINT i Under normal conditions, while the battery pack is being replaced, an internal battery will maintain the date and time settings. However, there is a small chance the settings may be lost (the backup will last for about 7 days). It is recommended to check that the date and time settings are still correct after replacing the battery pack and before shooting or recording of any type (follow step 1). To correct the date and time settings 1 Turn on the camera.
ACCESSING THE SETUP MENU SCREEN 1 Press and hold the [?] button for at least 1 second. h The Setup Menu appears. h To cancel the Setup Menu, press the [?] button. SETUP VIDEO STABILIZER OPTICAL ZOOM CLOCK SET LANGUAGE TV OUTPUT FORMAT OK SETUP 2 Turn on the camera (page 11).
3 Press [I] or [J] to select the item you wish to change, and press the SET button. h The Setting Screen for the selected item appears. h To return to the Setup Menu, press the [?] button.
SHOOTING SHOOTING VIDEO CLIP RECORDING 1 2 [ ] button (Video recording button) Press the [ ] button. h Recording begins. h It is not necessary to keep the [ ] button pressed while recording. h When the remaining recording time available for the currently recording clip becomes little, a countdown of the remaining recording time appears on the display. SHOOTING 3 Turn on the camera (page 11). ON/OFF button End the recording. h Press the [ ] button again to stop recording.
HINT To change the video settings 1 With the Recording Screen displayed, press the [H] arrow key. h The screen to change the video settings appears. h To return to the Recording Screen without changing the settings, press the [?] button. VIDEO 1920x1080 30fps SHQ 2 Use the [G] and [H] arrow keys to select a setting, and press the SET button. h The video settings are changed, and you are returned to the recording screen.
SHOOTING SINGLE SHOTS Capture a still image (single-shot). 1 2 Turn on the camera (page 11). [ ] button (Photo shooting button) SHOOTING Press the [ ] button. 1 Press the [ ] button halfway. h The autofocus operates, and the image is focused (focus lock). 2 Continue to gently press the [ ] button all the way. h The shutter releases and the image is captured. h You can view the captured image on the monitor by keeping the [ ] button depressed when you capture the image.
To change the photo settings 1 With the recording screen displayed, press the [G] arrow key. h The screen to change the photo settings appears. h To return to the recording screen without changing the settings, press the [?] button. PHOTO 4000x3000 2 Use the [G] and [H] arrow keys to select a setting, and press the SET button. h The photo settings are changed, and you are returned to the recording screen. To change the flash operation 1 While the Recording Screen is shown, press the [?] button.
English 22 SHOOTING HINT What is the camera focusing on? Target mark i A target mark & on the monitor shows the area the camera is focusing on. i The camera automatically determines the correct focus by measuring from 9 different focus points within the shooting area. If the target mark is at a position that is F3.1 1/4 different from the point you wish to focus on, you can refocus, for Camera shake icon example, by changing the shooting Shutter speed angle.
SHOOT A STILL IMAGE WHILE RECORDING A VIDEO CLIP You can capture a still image (a single-shot) while recording a video clip. 1 Turn on the camera (page 11). 2 Press the [ 3 4 [ ] button (Video recording button) ] button. When you see a scene you’d like to capture as a still image, press the [ ] button. Press the [ ] button to end the video clip recording.
About the recording size of still images i The size of a still image captured during video clip recording depends on the video clip recording size.
MACRO-PHOTOGRAPHY (ZOOM) 1 2 3 Point the camera lens at the subject. Press [I]/[J] Press [I] or [J]. [I]: Zoom in on the subject. [J]: Zoom out. h When the zoom switch is pushed, the zoom bar appears on the monitor. Take the picture. For video clip recording, see page 18. For shooting single shots, see page 20.
SHOOTING WITH THE SELF-TIMER 1 2 While the Recording Screen is shown, press and hold the SET button for at least 1 second. h The screen to select the self-timer operation appears. h To return to the Recording Screen without changing the setting, press the [?] button. HINT To pause or cancel the self-timer function... i If the [ ] button or [ ] button is pressed again before the shutter is released, the self-timer countdown temporarily stops.
PLAYING BACK VIDEO CLIPS AND STILL IMAGES 1 2 3 Press the REC/PLAY button. h The display changes to the Playback Screen. REC/PLAY button Select the image to play back. h Use the arrow keys to move the orange frame to the image you wish to play back. h The image information for the framed image is shown in the bottom part of the monitor. Press the SET button. h The file you selected is played back. h Press the REC/PLAY button. SET button Arrow keys 2010.12.
Video clip playback operation To do this... Normal forward playback Stop playback Pause To play back one image at a time (singleframe step) During playback, press [J]. During playback, press the SET button. Forward playback After pausing playback, press [H]. Reverse playback After pausing playback, press [G]. Forward playback After pausing playback, press and hold [H]. Reverse playback After pausing playback, press and hold [G]. Forward playback During forward playback, press [H].
How to save one frame from a video clip as a still image 1 2 Play back the video clip. Pause the playback at the point you wish to “snap” a photo. Press the [ ] button. HINT The file size for a video clip is very large i Therefore, be aware that if the video clip is uploaded to a computer to be played back, the computer may not be able to play back the video fast enough, making it appear jerky. (The video will always be displayed properly on the camera monitor or a television.
CAUTION During video clip playback, the sound of a motor is audible... i During recording, the sound of the optical zoom movement or autofocus movement was recorded. This is not a malfunction. If no audio is heard... i The audio is not played back when the video clip is played back in the frame-by-frame, slow-motion, fast playback or reverse playback mode.
CONNECTING TO A TV CONNECTING TO A TV CONNECTING TO A TV By connecting the camera to a TV, you can play back the recorded files on the TV. CAUTION Insert and pull out the cable carefully i When connecting the cables, make sure that the cable plugs are correctly oriented and that they match the shapes of the terminal sockets on the devices. Push the plugs in straight when connecting them. If undue force is used to connect a cable, it may permanently damage the connector pins in the terminal socket.
Connecting to the HDMI terminal Use a separately sold or commercially available mini-HDMI cable to connect to a TV.
PLAYING BACK ON A TV i After connecting the camera to the television, switch the TV input to the terminal to which the camera is connected. i The playback method is the same as when viewing images on the camera’s monitor. (Use the TV controls to adjust the volume.) i The same playback procedure as when playing back with the camera is used to play back audio recordings as well.
APPENDICES APPENDICES FREQUENTLY ASKED QUESTIONS If you have a question about the camera operation, you might find the answer in this compilation of frequently asked questions. Question Why doesn’t the power turn on? Why is the battery pack consumed so quickly even after it was fully recharged? Answer Due to cold temperatures, the battery pack temporarily lost its power. The ambient temperature is very low. The battery pack life has expired. Power The battery pack life has expired.
Question Are the settings retained even after the camera is turned off? Which resolution setting should I use? Answer — — Shooting Monitor 35 When used in cold weather, why does the image seem to leave traces as it moves? Why does the displayed image contain some red, blue and green dots, or why are black spots visible? English Condition due to the monitor characteristics. Action The settings are retained even after the camera is turned off.
Viewing images Answer The subject was too bright. Why is there no image (z is shown)? This may happen when trying to play back images stored on a card from a different digital camera. If the subject moves or the camera is moved during recording, a distorted image may sometimes occur. Due to the characteristics of the camera, magnified images appear less clear.
Viewing images Connecting to a TV Misc. Question Why is there a motor-like sound during video clip playback? Why is there no sound? Why does the “Insufficient card memory” or “Insufficient internal memory” message appear? Why does the “Card is protected” message appear? Why can’t the camera be operated? A problem such as inability to record or play back occurs. 37 English Answer The sound of the camera’s mechanical action was recorded. The volume on the TV is set to the minimum.
Question Can I use my camera abroad? Misc. Why does the “System error” message appear? Answer — A problem has occurred within the camera or card. English 38 APPENDICES Action When the camera is connected to a TV, you can switch the camera’s video output to NTSC or PAL. If you have questions about accessories etc., please consult with a dealer near you for advice. Check the following items: 1 Remove the card and then install it again. 2 Remove the battery pack and then install it again.
OVERVIEW OF THE SETUP MENU SCREEN The Setup Menu appears when you press and hold the [?] button for at least 1 second while the camera is on. Use the arrow keys to select the desired parameter, and press the SET button to display the setting screen for the specified parameter. The Setup Menu is canceled when the [?] button is pressed.
1 Photo stabilizer h Compensate for camera shake during video clip recording. 2 OPTICAL ZOOM h Select whether or not to enable the optical zoom during video clip recording. 3 CLOCK SET setting h Set the camera’s clock. 4 LANGUAGE setting h Select the language in which the monitor messages are displayed.
SPECIFICATIONS Camera Recorded image file format Data storage media Image sensor/ camera effective number of pixels 41 English Still images: JPEG format (DCF, DPOF, Exif 2.2 compliant) Note: Designed mainly by the Japan Electronics and Information Technology Industries Association (JEITA), DCF (Design rule for Camera File system) is standard for digital still camera image files to provide interoperability between digital photography devices for the images stored on removable memory cards.
Still image shooting mode (recording resolution) Video clip recording mode (recording resolution) White balance Lens Shutter speed Sensitivity Minimum subject illumination 35 mm film camera conversion Still image shooting: 36 mm to 108 mm (Optical zoom 3×) Video clip recording: 37 mm to 111 mm (Optical Zoom 3×) Programmable AE APPENDICES Exposure control type Light-measuring mode Range Digital zoom w: 4000 × 3000 pixels (approx. 12 million pixels) v: 3648 × 2736 pixels (approx.
Image stabilizer Video: Electronic Still image: Multi-calculation electronic Monitor 2.0 inch Low-temperature polysilicon TFTcolor screen LCD, Approx. 150,000 dots Flash working GN = 5.5 range Approx. 50 cm (19.69 in.) to 3.5 m (11.48 ft.) (wide) Approx. 60 cm (23.62 in.) to 1.9 m (6.23 ft.) (tele) Flash modes Auto-flash, forced flash, flash off, red-eye reduction Focus Auto (9-point AF) Self-timer Approx.
Camera connectors USB terminal mini HDMI terminal Dedicated regrouped jack USB 2.0 High Speed Video output Total number of scan lines (effective number of scan lines): 750p (720p)/1125i (1080i)/525p (480p) Audio output: L-PCM 48 kHz sampling Battery life Shooting Still image shooting mode Video clip recording mode Playback Approx. 170 images: CIPA standard (when a SanDisk 2 GB SD Memory Card is used) Approx. 65 minutes: Recorded in Y mode Approx.
Possible No. of Images/Possible Shooting Time/ Possible Recording Time Shooting/ recording mode Resolution setting Still image mode w v u 1 t Video clip mode Y " & ) Internal Memory 21 images 25 images 50 images 124 images 124 images 53 sec. 1 min. 8 sec. 1 min. 8 sec. 3 min. 16 sec. SD Memory Card 8 GB 16 GB 2,000 images 2,390 images 4,690 images 11,300 images 11,300 images 1 hr. 26 min. 1 hr. 52 min. 1 hr. 52 min. 5 hr. 18 min.
Concerning the multi-indicator The camera’s multi-indicator will light, flash, or be off, depending on the different camera operations. Multi-indicator status Lit Slow Flashing Camera status Connected to a computer Charging Slow/Fast Fast Very fast Battery charge error or rise in internal temperature During sleep mode Connected to a computer Connected to a TV Accessing card Supplied Li-ion battery pack Weight DB-L80 3.
Others Mac OS is a trademark of Apple Inc., registered in the U.S. and other countries. Microsoft and Windows are registered trademarks of Microsoft Corporation in the USA and other countries. Intel and Pentium are registered trademarks of Intel Corporation (USA). In this manual, the Microsoft® Windows® 2000 operating system, Microsoft® Windows® XP operating system, Microsoft® Windows® Vista operating system, and Microsoft® Windows® 7 operating system are collectively referred to as “Windows”.
CAUTION i It is forbidden to copy this manual, whole or in part, without prior written permission. i All images and illustrations given in this manual are for explanation purposes and may differ slightly from that of the actual product. Also, actual specifications are subject to change without prior notice and therefore may differ from the contents of this manual.
SANYO Electric Co., Ltd.