DVD-L77 DVD/VIDEO CD/CD Player with stereo radio and 6.
Thank you for choosing SANYO. Please read this manual carefully to obtain maximum benefits from your product. Before attempting to connect, operate or adjust this player, please read these instructions completely. Table of contents ILLUSTRATION OF THE CONTROLS/JACKS ON THE MAIN UNIT .............................................................................................2-3 MAIN UNIT REMOTE CONTROL UNIT BASIC CONNECTION ...................................................................................
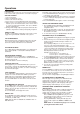
Illustration of the Controls/Jacks On the Main Unit Main unit 21 22 23 15 1 3 5 7 9 10 11 12 13 14 8 6 4 2 24 25 26 27 28 33 16 17 18 19 15 20 29 30 34 34 32 1. FUNCTION CONTROL 2. BAND CONTROL 3. VOLUME CONTROL 4. TUNING CONTROL 5. COLOR/BRIGHT ADJUSTMENT BUTTON 6. FAST FORWARD BUTTON 7. PREVIOUS BUTTON 8. PLAY/PAUSE BUTTON 9. NEXT BUTTON 10. BASS BOOST BUTTON 11. CD DOOR 12. CD DOOR OPENING TAB 13. FAST REWIND BUTTON 14. STOP BUTTON 15. SPEAKERS 16. MIC 1 SOCKET (OPTIONAL) 17.
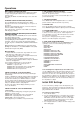
Remote control unit DISPLAY SETUP MUTE 1 2 3 4 5 6 7 8 14 15 16 P/N 1 2 A-B 17 REPEAT 3 1/ALL MENU 4 0 SUBTITLE 5 6 7 8 9 10 11 12 13 9 CLEAR TITLE 18 +10 PLAY STOP 19 20 21 SELECT AUDIO PAUSE/STEP F.BWD F.FWD ANGLE ZOOM SLOW 22 PREV PROGRAM NEXT SEARCH 23 24 25 26 1. PAL/NTSC/AUTO button 2. REPEAT A-B button 3. REPEAT 1/ALL button 4. MENU button 5. SUBTITLE button 6. PLAY button 7. TITLE button 8. AUDIO button 9. PLAY/STEP button 10. F.BWD button 11. F.
Basic connection Ensure that this player and other equipment that you might choose to connect to the unit are in standby or off mode. Disconnect the AC power cords before commencing connection. Do not block ventilation holes of any piece of the equipment and arrange them so that air can circulate freely. Read through the instructions before connecting other equipment. Ensure that you observe the color coding when connecting audio and video cables. Locate away from moisture.
Optional audio connections Connecting to a decoder with Dolby Digital (AC-3/DTS) processing (optional) When DVD recorded in Dolby Digital/DTS are played, Dolby digital/DTS bitstream is output from the player's OPTICAL digital audio output connector or COAXIAL digital audio output connector. When the player is connected to a Dolby Digital/DTS decoder , you can enjoy theater-quality audio in your home.
Optional audio connections Notes when connecting the optical digital audio cable (optional) Remove the dust protection cap from the optical digital audio output and connect the cable firmly so that the configurations of both the cable and the connector match. Keep the dust protection cap to protect against dust. Always reattach the cap when not using the connector.
Remote control unit preparation A Battery installation A Insert the battery while observing the correct (+) and (-) polarities as illustrated at right. Service life of batteries The life of a battery normally lasts for about one year although this depends on how often, and for what operations, the remote control unit is used. If the remote control unit fails to work even when it is operated near the player, replace the battery. Use one size CR2025 battery.
Operations PREPARATION If applicable: Power-on the TV set and select video input mode. Power-on the audio system which is connected to the player. GETTING STARTED 1. Turn on the player. 2. Raise the hinged disc cover. 3. Place a disc onto the disc tray. 4. Close the cover screen and playback starts automatically. 5. When a menu screen appears on the move the navigation buttons or press the numeric buttons on the remote control to select a preferred track number, then press SELECT button to start playback.
Operations MULTI-ANGLE VIEWING (DVD ONLY) Press ANGLE button during playback to display the number of angles being played and then select a desired angle to view the scene. Note: Only the DVDs shot with multi-angle scenes have this function. CHANGING SUBTITLE LANGUAGE (DVD ONLY) Press SUBTITLE button during playback, the subtitle language shown on the screen will change as a response to each press; When the desired language appears, release the button to view the subtitle in that language.
Initial DVD settings 1.SYSTEM SETUP SYSTEM SETUP 2.3 SUBTITLE LANG- Select preferred subtitle language (DVD only, need disc software support). TV SYSTEM SCREEN SAVER TV TYPE PASSWORD RATING DEFAULT Options: ENGLISH/SPANISH/PORTUGUESE/ITALIAN/ FRENCH/GERMAN/DUTCH/JAPAN. 2.4 MENU LANG - Select preferred disc menu language (DVD only, need disc software support). EXIT SETUP Options: ENGLISH/SPANISH/PORTUGUESE/ITALIAN/ FRENCH/GERMAN/DUTCH/JAPAN. 1.1 TV SYSTEM - It is used to select the TV mode.
RADIO OPERATION TO PLAY THE RADIO 1. Turn the FUNCTION switch to the RADIO position; the POWER Indicator will light up. 2. Select the desired band with the BAND switch. 3. Tune to the desired station by rotating the TUNING control (move the control back and forth until you get the clearest sound). 4. The built-in AM antenna and external FM TELESCOPIC ANTENNA are directional. = When receiving an FM broadcast, fully extend the TELESCOPIC ANTENNA and position for the best reception.
Troubleshooting Before requesting service for this player, check the chart below for a possible cause of the problem you are experiencing. Some simple checks or a adjustment on your part may eliminate the problem and restore proper operation. Remedy Symptom (Common) No power. Insert the AC power plug securely into the power outlet. The player is automatically set to the standby The player is automatically set to the standby mode after approx. 30 minutes in the mode.
Disc handling and product maintenance Handling precautions Hold the disc by the edges so the surface will not be soiled with fingerprints. Fingerprints, dirt and scratches can cause skipping and distortion. Do not write on the label side with a ball-point pen or other writing utensils. Do not use record cleaning sprays, benzine, thinner or static electricity prevention liquids. Be careful not to drop or bend the disc. Do not install more than 1 disc on the disc tray.
WARRANTY WARRANTY APPLICATION New, unused SANYO Audio products purchased through a SANYO authorized dealer in Canada are warranted against manufacturing defects in materials and workmanship for ONE YEAR from the date of purchase by the original retail purchaser for non-commercial use. This warranty only applies in favour of the original retail purchaser of the warranted product. SANYO CANADA INC.’S RESPONSIBILITY During the warranty period, SANYO Canada Inc.