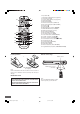
INSTRUCTION MANUAL DWM-2600 DVD Home Theater System REMOTE CONTROL RB-TS780 TM SANYO’S HELP-LINE Call the toll-free number below if you have any difficulties operating this product. 1-800-813-3435 (Weekdays: 7:30 AM - 4:00 PM Central Time) Please Read This Manual. Because DVD is a new technology, we recommend that you read this manual carefully before connecting your DVD Home Theater System and operating it for the first time. Keep the manual in a safe place for future reference.
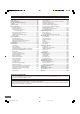
CONTENTS Accessories ......................................................................... E2 Safety Certification ............................................................. E3 For Safe and Efficient Operation ....................................... E3 Controls ............................................................................... E4 Remote Control ................................................................... E4 Basic Connections ........................................................
CAUTION This symbol indicates that dangerous voltage constituting a risk of electric shock is present within this unit. RISK OF ELECTRIC SHOCK DO NOT OPEN CAUTION: TO PREVENT THE RISK OF ELECTRIC This symbol indicates that there are important operating and maintenance instructions in the literature accompanying this unit. SHOCK, DO NOT REMOVE COVER (OR BACK). NO USER-SERVICEABLE PARTS INSIDE. REFER SERVICING TO QUALIFIED SERVICE PERSONNEL.
SAFETY CERTIFICATION Note: This equipment has been tested and found to comply with the limits for a Class B digital device, pursuant to Part 15 of the FCC Rules. These limits are designed to provide reasonable protection against harmful interference in a residential installation. This equipment generates, uses and can radiate radio frequency energy and, if not installed and used in accordance with the instructions, may cause harmful interference to radio communications.
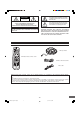
CONTROLS 1 2 3 11 1. 2. 3. 4. 5. 6. Loading slot Eject button (q) FL display Remote sensor (IR) Volume control (VOLUME) Power button (z/ON) 10 4 9 8 5 7 6 7. 8. 9. 10. Headphone jack (PHONES) Play button (a) Stop button (n) Preset tuning, Skip/Next/Previous buttons (f - PRESET + e) 11. Function button (FUNCTION) REMOTE CONTROL 1. Power button (z/ON) 2. Number and other function buttons These buttons are used as number buttons and as function buttons of each name.
31 8 30 6. Eject button (q) 7. Return button (RETURN) (See page E30.) 8. Clear button (CLEAR) 9. Test tone button (TEST) (See page E14.) 10. Trim button (TRIM) 11. Menu button (MENU) 12. Directional arrow buttons (o, a, p, b) 13. On-screen display button (ON SCREEN) 14. Play button (a) 15. Stop button (n) 16. Skip/Next/Previous buttons (f, e) 17. Subtitle On/Off button (S.T.ON/OFF) 18. Subtitle change button (S.T.CH) 19. Repeat button (REPEAT) 20. A-B repeat button (A-B REP) 21. Last memory button (L.
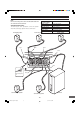
BASIC CONNECTIONS Note: Do not connect the power cord to a 120VAC 60Hz outlet until all connections have been made. Speaker Connections To achieve proper stereo reproduction, connect the speaker wires without shorting to adjacent wires as shown below.
Speaker Placement Need help? Call 1-800-813-3435 Front right speaker Center speaker Front left speaker Surround right speaker Subwoofer Place it near the front speaker. Surround left speaker Center speaker Front left speaker The center speaker and front right/left speakers have build-in magnetic stray field compensation. They may be placed close to a TV without affecting the color purity. Place the front left/right speakers either side of the TV. Place the center speaker directly above the TV.
Conventional TV Connection Important Information: To connect the unit to a TV, TV must have a Video input jack (RCA-type) at least. You cannot connect it to an antenna terminal of TV. Using VIDEO OUT jack Connect the Video cable with yellow connectors (supplied) between the VIDEO OUT jack of the unit and the VIDEO INPUT jack on the TV.
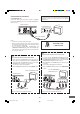
Using RF Modulator If your TV does not have a Video input jack and has an antenna terminal only, please purchase the *RF Modulator (not supplied). (*Please consult your audio/video dealer.) 1 Example: Unit, TV and RF Modulator connections RF Modulator A/V INPUT JACKS Partial back panel TV ANT. IN TO TV CHANNEL VIDEO R-AUDIO-L 3 4 4 VHF/UHF ANTENNA IN 3 2 To VIDEO OUT jack (Yellow) 1. Connect the antenna cable (not supplied) to the ANT. IN terminal of the RF Modulator. 2.
Progressive-scan TV Connection Your TV must be capable of handling progressive scanning and have component video input capability. Blue Red 1 Green *Component video cable (not supplied) 2 R L AUDIO INPUT Y PB Red Blue Green To AC 120V, 60Hz PR COMPONENT VIDEO INPUT *Please consult your local audio/video dealer. TV with progressive-scan capability 1. Connect to the component video input jacks. (The VIDEO OUT or S-VIDEO OUT jack connection is not necessary.) 2.
Antenna Connections Additional Connection Examples CAUTION: When installing an outdoor antenna, follow the installation instructions in the attached “IMPORTANT SAFETY INSTRUCTIONS”. To enjoy your TV sounds If your TV has the audio output jacks, connect an audio cable (not supplied) from the audio output jacks of the TV to the VIDEO (AUDIO) IN 1 jacks.
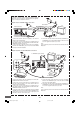
BEFORE OPERATION Common Operation q (Eject) FUNCTION VOLUME a (Play) z/ON Turning the power on and off Press [z/ON] to turn the power on. • “HELLO” appears briefly on the FL display. (After connecting the power cord, when you press [z/ON] for the first time, the volume-reset feature automatically sets the initial volume level.) When the power cord is connected to the AC outlet, the unit will respond to commands from the remote control.
Selecting Surround Mode Press [SURROUND] to select the surround mode. Each time the button is pressed, the surround mode changes as follows: AUTO SURR v 5.1ch SURR v 2.1ch ST v AUTO SURR… SURROUND Function FL display Description DVD/CD AUTO SURR The unit selects the surround mode automatically depending on the disc. • If a DVD disc is encoded with Dolby Digital 5.1 channel, it is played back with Dolby Digital 5.1 channel surround sound. Not all DVD discs are encoded with Dolby Digital 5.
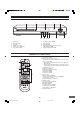
Adjusting the Speaker Volume Balance This unit is set to the standard level before shipping from the factory. You may not need any adjustment. However, depending on the size of the room and the placement of the speakers, you may benefit from a fine adjustment. In this case, follow the steps below. Please use the remote control when the test tone sounds. Note: Do not connect the headphones. 3, 6 1 4 1. Press [FUNCTION] to select the “DVD/CD” function. 5 2. Press [n] to stop playback completely. 2 3.
PLAYABLE DISCS The following types of discs can be played on this unit. CAUTION: • Disc type and logo mark • DVD-Video TM • • Audio CD Region Number • Region number (Regional restriction code) is built-in to the unit and DVD video discs. Region number “1” or “ALL” of DVD video discs can be used on this unit. 1 • ALL • • DVD Video Disc DVD video discs are divided into titles, and the titles are subdivided into chapters.
DISC PLAYBACK Preparations Important Note: • • Turn on the TV and select the video input source. Refer to your TV’s owner manual. • VIDEO 1 • TV • • Select the playback picture size according to the aspect ratio of the TV. (See “Setting Display” in “INITIAL SETTINGS” on page E33.) 4:3 LB (Letterbox) • This instruction manual explains the basic instruction of this unit using the remote control unit.
Basic Playback When operation buttons are pressed, that operation is displayed on the TV screen. The display disappears after several seconds. 1. Press [z/ON] to turn the power on. 2. Press [FUNCTION] to select the “DVD/CD” function. 3 2 4 1 3. Push the disc (label facing up) gently into the loading slot until automatic loading begins, then release the disc. • “LOADING” ---> “READING” appears on the FL display.
Stopping Playback [DVD] • Press [n] once during playback. “Resume n” appears briefly on the TV screen. When you press [a], playback starts automatically from the point where you stopped. “a” appears briefly on the TV screen. Note: Some discs may not resume playback. • Press [n] twice during playback. “n” appears briefly on the TV screen and playback stops completely. When you press [a], playback starts from the beginning of the disc. [CD] • Press [n] once during playback. The unit stops completely.
Selecting a DVD Menu Notes: • The operation may differ depending on the disc used. • Selecting a menu may not be possible on some discs. 1. Press [MENU]. The main menu screen will appear. 1 2 Note: Press [MENU] again to resume playback. 3 2. Press [4], [5], [b] or [a] (or the number buttons) to select the desired menu. 3. Press [ENTER] The selected menu playback starts. Selecting a Top Menu [DVD] Notes: • The operation may differ depending on the disc used.
Title Search [DVD] 1. Press [SEARCH MODE] once during playback or in the stop mode. The title search screen appears on the TV screen. Example: 2 CLEAR -- /28 Title Search 2. Press the number button(s) to enter the title number. Example: To select Title No.3, press [3]. To select Title No.10, press [1], then [0]. To select Title No.24, press [2], then [4]. Note: If you make a mistake, press [CLEAR]. 3 1 3. Press [a]. Playback starts from the selected title. Chapter Search [DVD] Time Search [CD] 1.
Fast Playback Fast forward playback Press [c] repeatedly to select the fast speed forward playback. [DVD] c 1 v c 2 v c 3 v c 4 (4 steps) [CD] c 1 v c 2 (2 steps) a (Play) Press [a] to return to normal playback. Fast reverse playback Press [d] repeatedly to select the fast speed reverse playback. [DVD] d 1 v d 2 v d 3 v d 4 (4 steps) [CD] d 1 v d 2 (2 steps) d c Press [a] to return to normal playback. Important Note: Note: The sound is muted during fast playback in DVD.
Picture Zoom (Pin Point Zoom) [DVD] 1. Press [ZOOM] while holding [SHIFT] down during normal/ slow playback or still picture. The pin point guide appears on the TV screen. ZOOM 2 1, 3, 4 1 2 3 4 5 6 7 8 9 SHIFT The guide divides the screen into nine, and the number shows the point. 2 Note: If you quit the screen, press [ZOOM] while holding [SHIFT] down. 2. To select the point, do one of the following: • Press [o], [a], [p] or [b], and press [ENTER]. • Press the number button. • • • 3.
Repeat Playback Important Note: Press [REPEAT] during playback (or programmed or random playback) of the title (or track) you want to repeat. Each time the button is pressed, the repeat mode will be changed as follows. “ ” may appear on the TV screen during operation. This icon means that the function is not available on the disc now.
Random Playback [CD] 1. Press [PROGRAM/RANDOM] once in the stop mode. • “Random” appears on the TV screen. 1 2. Press [a] to begin random playback. The unit will automatically select tracks at random. Notes: • To stop random playback, press [n]. • The A-B REP and SEARCH MODE modes do not work during Random Playback. n (Stop) 2 Programmed Playback [CD] Up to 20 selections can be programmed. 1 Programming procedure 1. Press [PROGRAM/RANDOM] twice in the stop mode.
Selecting Subtitle Language [DVD] This operation works only with discs on which multiple subtitle languages are recorded. 1. Press [S.T.ON/OFF] during playback. The subtitle language mark appears. (Example: If “ Off” appears, press the button again. 1/3 en) 1 2 2. Press [S.T.CH] repeatedly until the desired subtitle language appears on the TV screen. Example: 3/3 fr French After few seconds, “ Important Note: ” disappears. “ ” may appear on the TV screen during operation.
Selecting On-Screen Information For improvement, on-screen displays subject to change without notice. Press [ON SCREEN] repeatedly to show the disc information (Title, Chapter, Title elapsed playing time, Language, etc.). Example for DVD: 1. Press [ON SCREEN] during playback. Example for Audio CD: 1. Press [ON SCREEN]. Chapter remaining playing time Title elapsed playing time Track elapsed playing time 02:29 00:08:20 00:01:45 2. Press [ON SCREEN] again. Track elapsed playing time 2.
TVGuardian® OPERATION Before Setting • • • • In this instruction manual, the language in on-screen display is English. If you change the language (see page E33), please follow the selected language in on-screen display. Initial setting is “CC2” on this unit. Please set “CC2” or “C2” (Closed caption on channel 2) on your TV first. For more details, please refer to your TV’s owner manual. When “TVG Mode” is set, the subtitle language may not appear. TVG works only the discs with closed caption.
How It Works After Setting TVGuardian®: IMPORTANT INFORMATION: When a disc supporting closed caption is played, it mutes the entire phrase instead of just the swear word and displays the modified text, by design. It turns the sound back on when the phrase is completed. • • • Examples: The phrase “Get the hell out.”, is muted and “Get Out.”, is displayed. The phrase “Move you’re a—!”, is muted and “Move your tail!”, is displayed.
MP3 CD OPERATION Before Starting MP3 CD Playback This unit can play back the CD that has recorded music data, MP3 files. • The file system is ISO9660 Level 1 and Level 2. • If the CD has both audio CD tracks and MP3 files, only audio CD tracks are played. • It would take 30 seconds or more for this unit to read MP3 files depending on its structure. • This unit can recognize up to 256 files or folders per disc. The CD with 257 files or folders and over is not available to this unit.
Stopping Playback Press [n] during playback. “n” appears briefly on the TV screen and playback stops completely. 3 q n (Eject) 2 (Stop) 5 Pause 1 Press [k] during playback. • “k” appears briefly on the TV screen. Note: The sound is muted. q (Eject) RETURN 1 Press [a] to return to normal playback. File Skip Skipping forward Press [e] during playback to skip to the next file. “e” appears briefly on the TV screen.
PICTURE DISC OPERATION Preparation 1. Press [z/ON] to turn the power on. z/ON 2. Press [FUNCTION] to select the “DVD/CD” function. q (Eject) ZOOM ANGLE KODAK Picture CD Playback With KODAK Picture CD, it’s easy to turn film into pictures you can email from your PC and view on this unit! Just bring your film in for processing, and check the box for KODAK Picture CD.
• • • • • If you start the slide show from the file list... 1) Press [o], [a], [p] or [b] to move the highlighted box to the desired file. 2) Press [ENTER] (or [a]) to start the slide show. The file list appears after the last picture has displayed. If you press [TOP MENU], the thumbnail pictures appear. FUJICOLOR CD can be used. This unit can recognize up to 256 files or folders per disc. The CD with 257 files or folders and over is not available to this unit.
INITIAL SETTINGS Once the initial settings have been completed, the unit can always be operated under the same conditions. The settings will be retained in the memory until they are changed, even if the power is turned off. Setting Display Notes: • In this instruction manual, the language in on-screen display is English. If you change the language, please follow the selected language in on-screen display. • You cannot switch audio sound track languages if there is only one language recorded on the disc.
Setting Audio The sound from speakers can reach the listening position at different times depending the speaker placements. You can allow for this difference by changing the delay time of the center and surround speakers. You also can change the Dynamic Range Control (DRC). 1. Press [SETUP] in the stop mode. The setup screen appears. 2. Press [a] to select “Audio”. 3. Press [ENTER]. “Audio” screen appears. Audio DRC Center Delay Surr.
Setting Parental Note: If you set “TVG Mode”, “TVG CC” or “TVG CC Ch”, set them first before steps 6 and 7. See “Setting TVGuardian®” on page E27. 7 CLEAR 1. Press [SETUP] in the stop mode. The setup screen appears. 2. Press [a] to select “Parental”. 6 1, 9 3. Press [ENTER]. “Parental” screen appears. 2 3, 5, 8 4 Language Password Level TVG Mode TVG CC TVG CC Ch Audio Display Parental 8. Press [ENTER]. The password is now set. ---Off Off Off CC2 Password Level TVG Mode TVG CC TVG CC Ch 4.
Language Code List Enter the appropriate code number for the initial settings “Audio”, “Subtitle” and “DVD Menu” on page E33.
ENJOYING VIDEO SOURCES 1. Press [FUNCTION] to select “VIDEO 1” or “VIDEO 2”. 2. Follow the instructions supplied with TV or other compatible/ video component. CAUTION: Do not push a disc into the loading slot during VIDEO 1 or VIDEO 2 operation. Pushing the disc may damage the disc and the unit. LISTENING TO THE RADIO To turn the unit on and listen to the last received station, press [TUNE/BAND] on the remote control. CAUTION: Do not push a disc into the loading slot during reception of radio broadcasts.
Manual presetting 1. Tune in the station to be preset as described in “Automatic/ Manual Tuning”. 2 2. Press [PROGRAM/RANDOM]. “P - -” blinks. Number buttons 3. While “P - -” is blinking, press [PRESET +] or [- PRESET] to select the channel to be preset. • The number buttons on the remote control can also be used. • In this example, the channel is “9”. 4 4. While it is blinking, press [ENTER]. • In this example, “103.1 MHz” FM station is preset on FM channel 9. 3 Number buttons 5.
SLEEP TIMER OPERATION The sleep timer automatically switches off the power after a preset time has elapsed. The volume will gradually be reduced (fade-out) during the 1 minute period before the unit turns off. There are 4 time periods available: 30, 60, 90, and 120 minutes. Press [SLEEP] repeatedly while holding [SHIFT] down to select the desired sleep time. “SLEEP” appears, and the selected time blinks on the FL display.
SYMPTOM POSSIBLE CAUSE No sound. CORRECTIVE ACTION Volume control is set to minimum. Turn up the volume. The wrong function is selected. Select the correct function. Faulty speaker connections. Connect the speaker wires firmly to the speaker terminals. (See page E6.) DTS disc is played back. Press the ON SCREEN button to see if “DTS sound” is not selected. If “DTS sound” is selected, change the sound. (See page E25.) Sound is heard from only one speaker. Faulty connection of speaker wires.
SPECIFICATIONS Amplifier Section Tuner Section Main Amplifier (Stereo mode) Continuous minimum sine wave RMS power output per channel into 8 ohms at 1kHz with no more than 10% total harmonic distortion ................. 50 Watts Main Amplifier (Dolby Digital mode) Continuous minimum sine wave RMS power output per channel into 8 ohms at 1kHz with no more than 10% total harmonic distortion (with Center/Surround/Subwoofer amplifier off) ................
For assistance in obtaining repairs and operational information, please contact the following Toll Free Number: DIAL TOLL FREE: 1-800-813-3435 Weekdays: 7:30 AM - 4:00 PM Central Time Also, you may write to SANYO Manufacturing Corporation, 3333 Sanyo Road, Forrest City, Arkansas 72335. Limited Warranty LABOR 1 YEAR PARTS 1 YEAR CARRY-IN ONLY THIS WARRANTY IS VALID ONLY ON SANYO PRODUCTS PURCHASED FROM A WAL-MART STORE AND USED IN THE UNITED STATES OF AMERICA, EXCLUDING HAWAII AND ALL U.S.
SANYO Electric Co., Ltd. Printed in China -E43DWM-2600 Page E1-E43.p65 43 03.12.