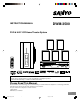
INSTRUCTION MANUAL DWM-3500 DVD & Hi-Fi VCR Home Theater System SANYO'S HELP-LINE Call the toll-free number below if you have any difficulties operating this product. 1-800-813-3435 (Weekdays: 7:30 AM - 4:00 PM Central Time) Please Read This Manual. Because DVD is a new technology, we recommend that you read this manual carefully before connecting your DVD & Hi-Fi VCR Home Theater System and operating it for the first time. Keep the manual in a safe place for future reference.
SAFETY PRECAUTIONS CAUTION: The apparatus should not be exposed to water (dripping or splashing) and no objects filled with liquids, such as vases, should be placed on the apparatus. FCC WARNING: This equipment may generate or use radio frequency energy. Changes or modifications to this equipment may cause harmful interference unless the modifications are expressly approved in the instruction manual.
IMPORTANT SAFETY INSTRUCTIONS CAUTION: PLEASE READ AND OBSERVE ALL WARNINGS AND INSTRUCTIONS IN THIS OWNER’S MANUAL AND THOSE MARKED ON THE UNIT. RETAIN THIS BOOKLET FOR FUTURE REFERENCE. This set has been designed and manufactured to assure personal safety. Improper use can result in electric shock or fire hazard. The safeguards incorporated in this unit will protect you if you observe the following procedures for installation, use, and servicing.
15. Power Lines An outside antenna system should not be located in the vicinity of overhead power lines or other electric light or power circuits, or where it can fall into such power lines or circuits. When installing an outside antenna system, extreme care should be taken to keep from touching such power lines or circuits as contact with them might be fatal. 23. Disc Tray Keep your fingers well clear of the disc tray as it is closing. It can cause personal injury. 24.
CONTENTS SAFETY PRECAUTIONS ..................................................... E1 IMPORTANT SAFETY INSTRUCTIONS ............................... E2 CONTENTS .......................................................................... E4 ACCESSORIES .................................................................... E5 PRECAUTIONS .................................................................... E5 CONTROLS .......................................................................... E6 Front Panel ........
ACCESSORIES Powered subwoofer cable (Din 9-pin cable) Wireless remote control Front right speaker cable (Black and Red) Front left speaker cable (Black and White) AM loop antenna Center speaker cable (Black and Green) Surround right speaker cable (Black and Gray) FM indoor antenna lead wire Video cable Surround left speaker cable (Black and Blue) 75 ohm antenna coaxial cable Note: The speaker cables are packed in the speaker package.
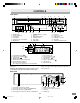
CONTROLS Front Panel 1 2 3 4 5 6 7 VCR DVD VCR/DVD AM/FM 8 9 POWER REC VIDEO IN EJECT L-AUDIO IN-R 17 16 15 14 7. 8. 9. 10. 11. 12. POWER button Cassette loading slot VCR indicator DVD indicator VCR/DVD mode selector button AM/FM button FL Display 1 13 d/c (PRESET +/–) buttons Disc tray OPEN/CLOSE button VOLUME control PLAY button STOP button 2 PRESET + VOLUME 3 OPEN/CLOSE PLAY 12 11 13. 14. 15. 16. 17. 18.
REMOTE CONTROL Controls 2 3 1 6. RETURN button (E56 ~ 59) 7. AM/FM button (E20, 61, 62) 8. VCR control buttons AUDIO OUT button (E36) INPUT button (E20, 37) TIMER REC button (E34) ZERO RETURN button (E30) COUNTER RESET button (E30) CLOCK/COUNTER button (E30) REC/OTR (Recording/One-touch Timer Recording) button (E31, 33, 37) TAPE SPEED button (E31, 33, 37) TV/VCR button (E17, 24, 32) 9. CLEAR/CANCEL button (E19, 34, 35, 42, 43, 47, 49, 59) 10.
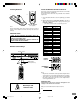
Inserting Batteries To Set the Remote Control Code for TV 1 This remote control can operate the basic functions of TVs made by the manufacturers listed below. To enter the remote control code for your brand of TV, follow the steps below. 2 1. In the chart below, find the code corresponding to your brand of TV. 2. While holding down [(TV CONTROL) POWER], enter the 2digit code using the number buttons [0–9], then release [(TV CONTROL) POWER]. • The remote control is now set to operate your TV.
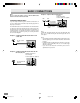
BASIC CONNECTIONS Example 3: Separate VHF and UHF antennas Combiner 75/300 ohm inputs 75 ohm output (not supplied) VHF UHF Note: Do not connect the power cord to a 120V AC 60Hz outlet until all connections have been made. TV Antenna Connections 300 ohm twin lead (flat) wire If you are using an antenna system, follow these instructions. If you are a cable (CATV) subscriber, skip ahead to page E12 for the proper connections.
Basic TV Connections Audio/Video Connection After you have connected the antenna to the main unit, you must connect the main unit to the TV. Below are 3 common methods of connecting your main unit to a TV. Find the type of TV you are using and follow the connection diagram. This main unit has a single 75 ohm output for connection to a TV. If your TV has separate VHF and UHF antenna inputs (Examples 2 and 3 below), use a splitter to connect the main unit to the TV for VHF and UHF reception. 1.
Optional, Preferred TV Connections Note: You can ONLY watch DVD playback through the connections shown below. S-Video connection Component video connection 1. Connect the DVD OUTPUT S-VIDEO jack on the main unit to the S-video input jack on the TV using the S-video cable (not supplied). 1. Connect the DVD OUTPUT COMPONENT jacks on the main unit to the corresponding input jacks on the TV using the component video cables (not supplied). 2.
CATV (CABLE TV) Connections IMPORTANT: Many cable companies offer services permitting reception of extra channels including pay or subscription channels. The main unit has an extended tuning range and can be tuned to most cable channels without using a cable company supplied converter box, except for those channels which are intentionally scrambled. If you subscribe to a special channel which is scrambled, you must have a descrambler box for proper reception.
Incoming cable Main unit DVD/VCR OUTPUT VHF/UHF AM LOOP VIDEO Splitter Converter/ Descrambler VHF/UHF IN (ANT) A AUDIO OUT (6–CHANNEL) R A/B switch IN ( ANT ) FM 75Ω L AUDIO TV Allows: • Recording of one channel while watching another. • Using the programmable timer to record only the channel selected at the converter box. • Recording of all channels through the converter box. B OUT 3 CH 4 CH ( TV ) Prevents: • Watching scrambled channels while recording another channel.
Speaker Connections Speaker wire color Black and White Black and Red Black and Green Black and Blue Black and Gray To achieve proper stereo reproduction, connect the speaker wires without shorting to adjacent wires as shown below. Note: Do not connect the power cord to a 120V AC 60Hz outlet until all connections have been made.
Speaker Placement Need help? Call 1-800-813-3435 Front right speaker Center speaker Front left speaker Surround right speaker Powered subwoofer Place it near the Front speaker. Surround left speaker The supplied speakers have built-in magnetic stray field compensation. They may be placed close to a TV without affecting the color purity. The five speakers are all the same and can be used for Front left, Center, Front right, Surround left, and Surround right speakers.
AM/FM Antenna Connections CAUTION: FM antenna The FM indoor antenna lead wire is sufficient to receive most local FM signals. 1. Unwind the antenna lead wire. 2. Twist the end of the wire and pull it off. When installing an outdoor antenna, follow the installation instructions in “IMPORTANT SAFETY INSTRUCTIONS” on page E2. FM outdoor antenna (not supplied) 75-ohm coaxial cable (not supplied) 3. Connect it to the rear FM 75 Ω terminal. See the illustration on the right. 4.
ADJUSTING THE CLOCK Auto Clock Setting The Auto Clock feature enables the automatic clock setting and updating, and also to set the Time Zone and Daylight Saving Time by receiving XDS (Extended Data Service) information carried on the channel signal. POWER VCR Preparation: You must set the antenna connection before the AC cord plug is inserted into the AC outlet. TV/VCR Auto clock setting WAIT 30 MINUTES! when the power switch is off, after the connections of the antenna and the power plug.
Daylight saving time setting You can set the Daylight saving time automatically or manually. 1. Repeat the steps 1 ~ 2 on page E17 and press [4] or [5] to select “DAYLIGHT SAVING TIME”, then press [ENTER]. SYSTEM SETUP CLOCK SET LANGUAGE/IDIOMA/LANGUE NO NOISE BACKGROUND ON OFF ON OFF AUTO CLOCK STANDARD TIME DAYLIGHT SAVING TIME 〈4/5/ENTER/MENU〉 2. Press [4] or [5] to select one of the options, then press [ENTER].
Manual Clock Setting You must set the date and time for timer recordings. VCR Preparation: • Turn ON the TV and set to the video input mode. • Press [VCR] to select the VCR mode. (The VCR indicator on the front panel will light.) DISPLAY Example: Setting the clock to “8:30 AM” March, 26 (WED), 2003. CLEAR/ CANCEL 1. Press [SETUP/MENU]. The “MENU” screen appears on the TV screen.
BEFORE OPERATION Common Operation POWER VCR VOLUME AM/FM INPUT POWER REC VIDEO IN CHANNEL EJECT VCR/DVD L-AUDIO IN-R - AM/FM STOP PRESET + VOLUME DVD OPEN/CLOSE PLAY ÐVOLUME+ POWER VCR/DVD AM/FM PLAY a SOUND ENTER BASS BOOST 4 5 Turning the power on and off Press [POWER] to turn the power on. (After connecting the power cord, when you press [POWER] for the first time, the volume-reset feature automatically sets the initial volume level.
Selecting Surround Mode Press [SURROUND] to select the surround mode. “AUTO” appears on the FL display. SURROUND Each time the button is pressed, the surround mode changes as follows: AUTO v Surr (Surround) v HALL v LIVE v 2ch v AUTO ... Function FL display Description DVD AUTO The unit selects the surround mode automatically depending on the disc. Dolby Digital (not encoded with Dolby Surround Sound) “s D” appears on the FL display. Dolby Digital is a discrete 5.
Adjusting the Speaker Volume Balance Adjusting the Speaker and Subwoofer Level This unit is set to the standard level before shipping from the factory. You may not need adjustment. But, depending on the size of the room and the placement of the speakers, you may need a fine adjustment. In this case, follow the steps below. Please use the remote control at the listening point. 1, 10 ENTER 3, 4, 6, 7 4, 5 2, 5, 8 8 1, 11 1. Press [SETUP/MENU].
Changing the Delay Time The sound from speakers can reach the listening position at different times depending the speaker placements. You can allow for this difference by changing the delay time of the center and surround speakers. 8. Press [4] or [5] to select the center speaker delay time. (“0ms”, “1ms”, “2ms”, “3ms”, “4ms” and “5ms”) Center speaker delay time If D1< =D2, set the delay time to “0ms”. If D1>D2, set the delay time as follows: Difference between D1 and D2 1 foot (Approx. 30.
Setting the Video Channel Setting the Language To view playback of a recorded tape or DVD disc, or to watch a program selected by the VCR’s channel selector, the TV must be set to channel 3 or 4 (video channel). You can choose from three different languages (English, Spanish, and French) for the on-screen displays. When a TV is connected with the 75 ohm coaxial cable only. 1, 5 4,5 ENTER 1 2 1. Press [SETUP/MENU].
VCR Tuner Setting The built-in VCR is equipped with a channel memory feature which allows channels to skip up or down to the next channel set into memory, skipping over unwanted channels. Before selecting channels, they must be programmed into the VCR’s memory. In addition to normal VHF and UHF channels, this VCR can receive up to 125 Cable TV channels. To use this VCR with an antenna, set the TV/CATV menu option to the TV mode. When shipped from the factory, this menu option is in the CATV mode.
To ADD/DELETE Channels Noise Elimination You can add the channels you want or delete the channels you do not want manually. When you don’t want to receive a weak signal broadcast, the Blue back screen can be obtained by selecting the NO NOISE BACKGROUND “ON”. Preparation: • Turn ON the TV and set to the video input mode. • Press [VCR] to select the VCR mode. (The VCR indicator on the front panel will light.) 1. Press [SETUP/MENU]. The “MENU” screen appears on the TV screen.
VIDEO CASSETTE TAPE PLAYBACK Loading and Unloading a Cassette Tape To prevent accidental erasure Use only video cassette tapes marked Remove the erase prevention tab with a screwdriver. and . Loading Push the center of the tape until it is automatically inserted. Erase prevention tab To record again Cover the hole with a piece of adhesive tape. Insert the cassette tape with its labeled side facing up and the erase prevention tab positioned at your left. An inverted cassette tape cannot be inserted.
Basic Playback Preparation: • Turn ON the TV and set to the video input mode. • Press [VCR] to select the VCR mode. (The VCR indicator on the front panel will light.) VCR DVD 1. Load a prerecorded tape. (When loading a cassette tape without the erase prevention tab, playback will start automatically.) a (Play) 2. Press [a]. • Playback will start. • “a” will appear on the TV screen for approximately 4 seconds. n (Stop) d c To stop playback Press [n].
Special Playback Picture Search Tracking Reverse picture search function: Press [d] x 1 or x 2 during the playback. Forward picture search function: Press [c] x 1 or x 2 during the playback. To return to playback: Press [a]. 4, 5 a k d PICTURE SEARCH SPEED PRESS ONCE PRESS TWICE 3X 5X 7X 9X 9X 15 X SP (Standard Play) LP (Long Play) SLP (Super Long Play) MENU ENTER SPEED SEARCH TIMES TAPE SPEED SETUP/ Ð/+ (Play) c SLOW ATR Still Picture Repeat playback Press [k] during playback.
ZERO RETURN Function Video Index Search System This function makes tape-rewinding stop at the counter 00:00:00 position automatically. This function enables you to locate the beginning of any recording made on the VCR. Preparation: • Turn ON the TV and set it to the video input mode. • Press [VCR] to select the VCR mode. (The VCR indicator on the front panel will light.) Recording an INDEX mark The Index Search function automatically records an INDEX mark on the tape whenever a recording is initiated.
RECORDING Recording a TV Program Recording and viewing the same TV program Preparation: • Turn ON the TV and set to the video input mode. • Press [VCR] to select the VCR mode. (The VCR indicator on the front panel will light.) VCR DVD 4 5 4. Press the number buttons [0–9] or [CH] +/– to select the channel to be recorded. In the TV mode 1–9 Press [0] and then [1]–[9] as required. Example: To select “2”, press [0][2]. 10–69 Press 2 digits in order. Example: Press [2][2] for “22”.
To stop recording Press [n] to stop recording. “n” will appear on the TV screen for approximately 4 seconds. To stop recording temporarily Press [k] to avoid recording unwanted material. Press it again to continue the recording. “m k” will appear on the TV screen for approximately 4 seconds. DISPLAY Notes: • The pause function will be released after 5 minutes to prevent damage to the tape or the VCR. The VCR will change to the STOP mode. • You can select a recording channel in the recording pause mode.
One-touch Timer Recording (OTR) The One-touch Timer Recording feature provides a simple and convenient way to make a timed recording. VCR Preparation: • Turn ON the TV and set to the video input mode. • Press [VCR] to select the VCR mode. (The VCR indicator on the front panel will light.) DVD 4 Example: One-touch Timer Recording for 30 minutes. 5, 6 2 1. Load a cassette tape with the erase prevention tab intact. The unit will automatically turn on. 4 n (Stop) 2.
Timer Recording Timer recording can be programmed on-screen with the remote control. The built-in timer allows automatic unattended recording of up to 8 programs within 1 month. VCR Preparation: • Set the clock correctly (see pages E17 ~ E19). • Press [VCR] to select the VCR mode. (The VCR indicator on the front panel will light.) • Load a cassette tape with the erase prevention tab intact. • Press the [DISPLAY] button to verify that the time and date are correct (see page E32).
Timer recording special case Weekly (e.g. WKL-TU: each Tuesday) or daily (e.g. MO-SA: Monday to Saturday) Timer recording. Follow the procedure of timer recording on the previous page. On step 4, press [4] or [5] repeatedly until the desired setting appears. Then press [ENTER]. When you press [5] repeatedly, the indicator at DATE will change as follows, in this case the day is Friday. The current day (Friday) SU-SA (Sunday to Saturday) Confirmation/Cancellation of the Timer recording 1.
Stereo Recording and Playback Separate Audio Program (SAP) The VHS Hi-Fi audio system permits high fidelity recording of MTS STEREO TV broadcasts. Your VCR is fitted with a SAP broadcast system which enables you to switch to a separate audio program when viewing a selected channel. This function applies only when the program is broadcast in multi-languages through the SAP broadcast system.
Duplicating a Video Tape Recording a DVD/CD Disc If you connect the VCR to another VCR or camcorder, you can duplicate a previously recorded tape. Make all connections before turning on the power. You can record disc material in DVD, Audio CD, etc. onto a Video tape with this VCR. Connection with second Video recorder Preparation • • • • Playback VCR To VIDEO OUT Turn ON the TV and select the corresponding video input. Load a cassette tape with the erase prevention tab intact. Load a DVD/CD disc.
PLAYABLE DISCS The following types of discs can be played on this unit. Disc type and logo mark Recorded content Disc size Audio + Video DVD Video Maximum playing time 5 inches (12 cm) Approx. 4 hours (Single sided disc) Approx. 8 hours (Double sided disc) 3 inches (8 cm) Approx. 80 minutes (Single sided disc) Approx.
DISC PLAYBACK Preparations Important Note: • • • Turn on the TV and select the video input source. Select the playback picture size according to the aspect ratio of the TV. (See “Setting Picture” in “INITIAL SETTINGS” on page E57.) 4:3 (Letterbox): 4:3 (Panscan): 16:9 • (Wide screen): • • This instruction manual explains the basic instruction of the main unit using the remote control unit. Some DVD video discs have different functions that may not be explained in this instruction manual.
Stopping Playback • n STOP Press [n] (or [n STOP]) once during playback. “ ” appears briefly on the TV screen. When you press [a] (or [PLAY a]), playback starts automatically from the point where you stopped. “a” appears on the TV screen. PLAY a POWER REC VIDEO IN CHANNEL EJECT VCR/DVD L-AUDIO IN-R - AM/FM STOP PRESET + VOLUME OPEN/CLOSE PLAY Note: Some discs may not resume playback. • Press [n] (or [n STOP]) twice during playback.
Selecting a DVD Menu Notes: • The operation may differ depending on the disc used. • Selecting a menu may not be possible on some discs. 1. Press [DVD MENU] while holding [SHIFT] down. The main menu screen will appear. 1 2. Press [4], [5], [b] or [a] (or the number buttons) to select the desired menu. 3. Press [ENTER] or [a]. The selected menu playback starts. 2 3 3 Selecting a Title Menu [DVD] Notes: • The operation may differ depending on the disc used.
Title Search [DVD] 1. Press [JUMP] while holding [SHIFT] down during playback or in the stop mode. The “Jump” screen appears on the TV screen. 1 3 Jump Time Title Chapter /Enter/0 9/Clear/Jump 2. Press [4] or [5] to select the Title. CLEAR/ CANCEL 3. Press the number button(s) to enter the title number. Example: To select Title No.3, press [3]. To select Title No.10, press [1], then [0]. To select Title No.24, press [2], then [4]. Note: If you make a mistake, press [CLEAR/CANCEL].
Time Search [CD] 1. Press [JUMP] while holding [SHIFT] down during playback or in the stop mode. The “Jump” screen appears on the TV screen. 1 3 Jump Time Track /Enter/0 9/Clear/Jump CLEAR/ CANCEL 2. Press [4] or [5] to select the Time. 4 2 3. Press the number button(s) to enter the time. Example: 2 minutes 5 seconds Press [2], [0] and [5]. 42 minutes 39 seconds Press [4], [2], [3] and [9]. Note: If you make a mistake, press [CLEAR/CANCEL]. 4. Press [ENTER].
Fast Playback d c Fast forward playback Press [c] repeatedly to select the fast speed forward playback. Each time the button is pressed, the speed is changed. POWER REC c v ca v caa v caaa (4 steps) VIDEO IN CHANNEL EJECT L-AUDIO IN-R VCR/DVD - AM/FM STOP PRESET + VOLUME OPEN/CLOSE PLAY Press [a] to return to normal playback. Fast reverse playback PLAY a Press [d] repeatedly to select the fast speed reverse playback. Each time the button is pressed, the speed is changed.
Frame by Frame Advance Playback [DVD] Press [k] during still picture. • “ ” appears on the TV screen. ZOOM SHIFT Each time the button is pressed, the picture advances one frame. Press [a] to return to normal playback. Notes: • The sound is muted. • Frame playback is operated forward only. 4, a, 5, b Picture Zoom [DVD] 1. Press [ZOOM] while holding [SHIFT] down during normal/ slow/fast playback or still picture. The central part of the picture is magnified, and “ 1” appears on the TV screen.
Normal Repeat Playback [DVD] 1. Press [PLAY MODE] while holding [SHIFT] down during playback or stop mode. The “Play Mode” screen (“Repeat”) appears. Repeat Off PLAY MODE SHIFT /Enter/Play Mode 2. Press [b], [a] or [ENTER] once or twice to select “Chapter” or “Title”. Repeat: Chapter Repeat: Title Repeat: Off ENTER Repeat of chapter being played Repeat of title being played Normal playback mode 5, b, a The selected repeat mode may work. 3.
Random Playback [CD] [MP3] [WMA] [JPEG] 1 3. Press the number buttons to select the track number. Example: To select Track No.3, press [3]. To select Track No.10, press [1], then [0]. To select Track No.24, press [2], then [4]. Notes: • If you make a mistake, press [CLEAR/CANCEL]. • To quit the “Play Mode” screen, press [PLAY MODE] while holding [SHIFT] down. 4. Press [5] to move the highlighted box down.
Selecting Subtitle Language [DVD] This operation works only with discs on which multiple subtitle languages are recorded. 1. Press [SUBTITLE] while holding [SHIFT] down during playback. The subtitle language mark appears on the TV screen. (Example: 2/3 Spa) If “ Off” appears, press the button again. 1, 2 Off 2. Press [SUBTITLE] while holding [SHIFT] down repeatedly until the desired subtitle language appears on the TV screen. Example: 1/3 Eng English After few seconds, “ ” disappears.
Selecting On-Screen Information MARKER SHIFT Example for DVD: Press [DISPLAY] repeatedly to show the disc information (Title, Chapter, Title elapsed playing time, Language, etc.). DISPLAY CLEAR/ CANCEL 1. Press [DISPLAY] during playback. Title total time Title elapsed playing time ENTER 00:08:20 01:12:33 4,5 2. Press [DISPLAY] again. Title total time Marking Desired Scenes [DVD] [CD] Title elapsed playing time The unit stores the points that you want to watch (or listen it) again.
MP3/WMA CD OPERATION MP3/WMA CD Playback Before Starting This unit can play back the CD that has recorded music data, MP3 or WMA (Windows Media Audio) files. • The file system is ISO9660 Level 1 and Level 2. • If the CD has both audio CD tracks and MP3/WMA files, only audio CD tracks are played. • It would take 30 seconds or more for this unit to read MP3/ WMA files depending on its structure. • This unit can recognize up to 200 files or 50 folders per disc.
File (Track) Skip Skipping forward Press [e] during playback to skip to the next file. “e” appears on the TV screen. Each time the button is pressed, a file is skipped. 5 Skipping backward Press [ f] during playback to skip back to the beginning of the file currently play. “f” appears on the TV screen. Press the button again immediately to skip back to the beginning of the previous file. 4 4, 6 5 PLAY MODE SHIFT 4. Press [b] or [a] or [ENTER] to select folder. 5.
PICTURE DISC OPERATION KODAK Picture CD Playback OPEN/ CLOSE ZOOM ANGLE With KODAK Picture CD, it’s easy to turn film into pictures you can email from your PC and view on this unit! Just bring your film in for processing, and check the box for KODAK Picture CD. You’ll get back your prints and negatives as usual - plus you’ll get a special CD that contains your pictures along with software that lets you view, enhance, share, and print your pictures from your computer and view them on this unit.
JPEG CD Playback ZOOM ANGLE You can also view digital images from JPEG files on disc created by your computer. • It would take 30 seconds or more for this unit to read the JPEG files depending on its structure. • Some JPEG files cannot be played back depending on the recording conditions. OPEN/ CLOSE TOP MENU DVD MENU SHIFT To play the picture one by one 1. Load the disc with the label facing up on the disc tray. (Please refer to “MP3/WMA CD OPERATION” on page E50.
TVGuardian® OPERATION TVGuardian® Technology embedded into the main unit will filter foul language from pre-recorded movies which have CC (Closed Caption). Words detected by TVG® will be muted from the program audio channel, and a version of the phrase, with the foul language converted to a suitable replacement word, can be displayed on the TV screen.
DVD SPEAKER MUTE Setting 1. Press [SETUP/MENU] repeatedly until the “MENU” screen appears on the TV screen. MENU TIMER REC SET AUTO REPEAT ON SETUP/ MENU ENTER 4 5 OFF 2. Press [5] or [4] to select “TVGuardian SETUP”, then press [ENTER]. 3. Press [4] or [5] to select “DVD SPEAKER MUTE”, then press [ENTER]. TVGuardian SETUP DVD SPEAKER MUTE :CENTER CC DISPLAY :OFF TVG MODE :OFF 4. Press [5] or [4] to select the setting option, then press [ENTER].
INITIAL SETTINGS Once the initial settings have been completed, the unit can always be operated under the same conditions. The settings will be retained in the memory until they are changed, even if the power is turned off. Notes: • In this instruction manual, the language in on-screen display is English. If you change the language, please follow the selected language in on-screen display. • You cannot switch audio sound track languages if there is only one language recorded on the disc.
Setting Picture RETURN 1. Press [SETUP/MENU] in the stop mode or No disc. The setup screen appears. Language Picture Sound Parental Other SETUP/ MENU 4, a, 5, b 2. Press [a] to select “Picture”. 3. Press [5] or [ENTER]. The Picture screen (“Tv Screen”, “Display”, “JPEG Interval” and “Select Files”) appears. “Tv Screen” is selected. ENTER 7. Press [5] to select “Display”. 8. Press [a] or [ENTER] to select “On” or “Off”.
Setting Sound Used to adjust the sound level between the powerful sound and the faint sound. 1. Press [SETUP/MENU] in the stop mode or No disc. The setup screen appears. RETURN Language Picture Sound Parental Other 2. Press [a] to select “Sound”. SETUP/ MENU 3. Press [5] or [ENTER]. The Sound screen (DRC) appears. (DRC: Dynamic Range Control) 4, a, 5, b ENTER 4. Press [a] or [ENTER]. The submenu (“Std” and “TV”) appears. 5. Press [4] or [5] to select your desired sound type.
Setting Parental Some discs are specified not suitable for children. Such discs can be limited not to play back with the unit. Number buttons 1. Press [SETUP/MENU] in the stop mode or No disc. The setup screen appears. RETURN Language Picture Sound Parental Other CLEAR/ CANCEL SETUP/ MENU 2. Press [a] to select “Parental”. 3. Press [5] or [ENTER]. The Parental screen (“Password” and “Parental”) appears.
LANGUAGE CODE LIST Enter the appropriate code number for the initial settings “Menu”, “Subtitle” and “Audio” language on page E56”.
LISTENING TO THE RADIO Preparation: Press [POWER] to turn on the unit. POWER REC Automatic/Manual Tuning VIDEO IN CHANNEL EJECT L-AUDIO IN-R VCR/DVD - AM/FM STOP PRESET + PLAY 1. Press [AM/FM] to select FM or AM. 2. Automatic tuning Press [TUNE] + or – for at least 1 second to tune in a station. The unit will scan up or down the band and receive the next receivable station. Press the button again to continue. Manual tuning Press [TUNE] + or – briefly until the desired frequency is displayed.
Manual presetting 1. Press [AM/FM] to select FM or AM. POWER REC 2. Tune in the station to be preset as described in “Automatic/ Manual Tuning”. VIDEO IN CHANNEL EJECT VCR/DVD L-AUDIO IN-R - AM/FM STOP 3. Press [SETUP/MENU]. “Preset number” blinks. AM/FM 4. While “preset number” is blinking, press [PRESET] + or – to select the channel to be preset. • The number buttons on the remote control can also be used. • In this example, the channel is “9”.
TROUBLESHOOTING GUIDE If you have followed the instructions and are having difficulty operation the unit, locate the SYMPTOM in the left column below. Check the corresponding POSSIBLE CAUSE and CORRECTIVE ACTION columns to locate and remedy the problem. SYMPTOM CORRECTIVE ACTION POSSIBLE CAUSE No power. • The power cord is disconnected. • Plug the power cord into the wall outlet securely. The power is on, but the DVD/VCR does not work. • No tape is inserted. • No disc is inserted.
SYMPTOM CORRECTIVE ACTION POSSIBLE CAUSE The remote control does not work properly. • The remote control is not pointed at the remote • Point the remote control at the remote sensor of the main unit. (See page E8.) sensor of the main unit. • The remote control is too far from the main unit. • Operate the remote control within 23 feet (7 meters). • There is an obstacle in the path of the remote • Remove the obstacle. control and the main unit.
MAINTENANCE WARNING: FOR YOUR PERSONAL SAFETY, BE SURE TO DISCONNECT THE AC POWER CORD BEFORE PROCEEDING WITH ANY MAINTENANCE OR CLEANING. Cleaning the Cabinet Use a clean soft cloth moistened with plain lukewarm water and wrung dry. Never use benzol, benzene or other strong chemical cleaners since these could damage the finish of your unit. It is important that no liquid reaches the inside of the unit.
SPECIFICATIONS General Inputs Power requirements: AC 120V, 60Hz Power consumption: 23 Watts Dimensions (W x H x D): Approx. 16.9" x 3.9" x 12.5" (430 x 99 x 318 mm) Weight: Approx. 10.4 lbs (4.7 kg) Operating temperature: 5°C to 40°C (41°F to 104°F) Operating humidity: Less than 80 % RH Color signal system: NTSC VIDEO INPUT (RCA): 1.0 Vp-p (75 Ω) AUDIO INPUT (RCA): –8 dB (50 kΩ) ANTENNA INPUT: Antenna or CATV input (75 Ω) Outputs S-VIDEO OUT: Y: 1.0 Vp-p (75 Ω) C: 0.
For assistance in obtaining repairs and operational information, please contact the following Toll Free Number: DIAL TOLL FREE: 1-800-813-3435 Weekdays: 7:30 AM - 4:00 PM Central Time Also, you may write to SANYO Manufacturing Corporation, 3333 Sanyo Road, Forrest City, Arkansas 72335. Limited Warranty LABOR 1 YEAR PARTS 1 YEAR CARRY-IN ONLY THIS WARRANTY IS VALID ONLY ON SANYO PRODUCTS PURCHASED FROM A WAL-MART STORE AND USED IN THE UNITED STATES OF AMERICA, EXCLUDING HAWAII AND ALL U.S.