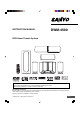
INSTRUCTION MANUAL DWM-4500 DVD Home Theater System TM SANYO’S HELP-LINE Call the toll-free number below if you have any difficulties operating this product. 1-800-813-3435 (Weekdays: 7:30 AM - 4:00 PM Central Time) Please Read This Manual. Because DVD is a new technology, we recommend that you read this manual carefully before connecting your DVD Home Theater System and operating it for the first time. Keep the manual in a safe place for future reference.
CONTENTS Accessories ......................................................................... E2 Safety Certification ............................................................. E3 For Safe and Efficient Operation ....................................... E3 Warning for Transmitter ..................................................... E4 Controls ............................................................................... E5 Multi-Brand TV Remote Control .........................................
CAUTION This symbol indicates that dangerous voltage constituting a risk of electric shock is present within this unit. RISK OF ELECTRIC SHOCK DO NOT OPEN CAUTION: TO PREVENT THE RISK OF ELECTRIC This symbol indicates that there are important operating and maintenance instructions in the literature accompanying this unit. SHOCK, DO NOT REMOVE COVER (OR BACK). NO USER-SERVICEABLE PARTS INSIDE. REFER SERVICING TO QUALIFIED SERVICE PERSONNEL.
SAFETY CERTIFICATION Note: This equipment has been tested and found to comply with the limits for a Class B digital device, pursuant to Part 15 of the FCC Rules. These limits are designed to provide reasonable protection against harmful interference in a residential installation. This equipment generates, uses and can radiate radio frequency energy and, if not installed and used in accordance with the instructions, may cause harmful interference to radio communications.
WARNING FOR TRANSMITTER Important Information! In-plant radio stations, and special low-power radio stations for movable body identification used for production lines and amateur radio stations as well as industrial, scientific and medical equipment (such as microwave ovens) use the same frequency band used by this unit. 1. Before using this unit, make sure that no in-plant radio stations or special low-power radio stations for movable body identification or amateur radio stations are operated nearby. 2.
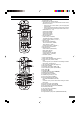
CONTROLS Main unit (DVD Receiver) 12 3 4 Sub-woofer (Powered speaker) 5 6 7 8 9 10 11 1. Remote sensor (IR) 2. Function button (FUNCTION) 3. Volume buttons (- VOL +) 4. Power button (z/ON) 5. Display 6. Disc door 7. Play button (a) 8. Stop button (n) 9. Skip/Next/Previous/Preset tuning buttons (f/e, -PRESET +) 10. Open/Close button (q) 11. S-video and Component video out select switch (VIDEO OUT SELECT, right side) (See pages E13 and E15.) 1. Frequency switch (FREQUENCY, back side) (See page E12.
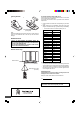
MULTI-BRAND TV REMOTE CONTROL 1. Power button (z/ON) 2. Number and other function buttons These buttons are used as number buttons and as function buttons of each name. • When using as a number button, press the appropriate button directly. • When using as a function button of each name, press the appropriate button while holding the SHIFT button down. Number buttons (1 – 9, 0) Angle button (ANGLE) Zoom button (ZOOM) Audio button (AUDIO) Sleep button (SLEEP) 3.
Inserting batteries To set the remote control code for TV 1 This remote control can operate the basic functions of TVs made by the manufacturers listed below. To enter the remote control code for your brand of TV, follow the steps below. 2 1. In the chart below, find the code corresponding to your brand of TV. 2. While holding down [TV POWER], enter the 2-digit code using the number buttons [0 - 9], then release [TV POWER]. • The remote control is now set to operate your TV.
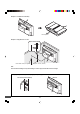
BASIC CONNECTIONS Do not connect the power cord to a 120V AC 60Hz outlet until all connections have been made. System Cable Connection Main unit (DVD Receiver) System cable Sub-woofer (Powered speaker) System cable from Main unit (DVD Receiver) System cable to Sub-woofer (Powered speaker) Attach the ferrite core.
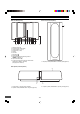
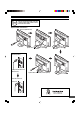
Example: To use Main unit horizontally Toward you Example: To hang Main unit on a wall Approx. 3/16 inch (5mm) Round head screw (not supplied) Approx. 5.4 inch (144mm) Note: Take care when installing it. It may cause damage or serious injury should it fall from its mountings. To unplug the system cable, pull out the plug (2) while pressing (1) down.
Note: Do not connect the power cord to a 120V AC 60Hz outlet until all connections have been made. Speaker Connections To achieve proper stereo reproduction, connect the speaker wires without shorting to adjacent wires as shown below.
Speaker Placement Front right speaker Center speaker Front left speaker Sub-woofer (Powered speaker) Place it near the front speaker. However, do not place it in front of the TV. Rear speaker (Powered speaker) Center speaker The front (left and right) and center speakers have built-in magnetic stray field compensation. They may be placed close to a TV without affecting the color purity.
Using the Rear Speaker in Wireless Mode Using the Rear Speaker in Wired Mode 1. Set the SPEAKER switch of the rear speaker to the INTERNAL position. Because the rear speaker is the wireless type, it is not necessary to connect the assistant speaker cable under normal connections. If noise is caused to the rear speaker when used in wireless mode, change the setting of the FREQUENCY switch on both sub-woofer and rear speaker (Refer to the left column).
Conventional TV Connection Important Information: To connect the unit to a TV, TV must have a Video input jack (RCA-type) at least. You cannot connect it to an antenna terminal of TV. Using VIDEO OUT jack Connect the Video cable with yellow connectors (supplied) between the VIDEO OUT jack of the sub-woofer and the VIDEO INPUT jack on the TV. Sub-woofer (Powered speaker) To VIDEO INPUT jack TV To VIDEO OUT jack (Yellow) Video cable (supplied) Notes: • Please refer to your TV instruction manual.
Using RF Modulator If your TV does not have a Video input jack and has an antenna terminal only, please purchase the *RF Modulator (not supplied). (*Please consult your audio/video dealer.) Example: Sub-woofer, TV and RF Modulator connections RF Modulator TV Sub-woofer (Powered speaker) To VIDEO OUT jack (Yellow) 1. Connect the antenna cable (not supplied) to the ANT. IN terminal of the RF Modulator. 2.
Progressive-scan TV Connection Your TV must be capable of handling progressive scanning and have component video input capability. Note: Please follow the steps before turning on the power. 1. Connect to the component video input jacks. (The VIDEO OUT or S-VIDEO OUT jack connection is not necessary.) *Component video cable (not supplied) Red Red Blue Green Blue Green Sub-woofer (Powered speaker) *Please consult your local audio/video dealer. TV with progressive-scan capability 2.
FM Antenna Connection Additional Connection Examples CAUTION: When installing an outdoor antenna, follow the installation instructions in the attached “IMPORTANT SAFETY INSTRUCTIONS”. To enjoy your TV sounds If your TV has the audio output jacks, connect an audio cable (not supplied) from the audio output jacks of the TV to the AUX jacks.
BEFORE OPERATION Common Operation Turning the power on and off Main unit (DVD Receiver) Press [z/ON] to turn the power on. • “HELLO” appears briefly on the display. (After connecting the power cord, when you press [z/ON] for the first time, the volume-reset feature automatically sets the initial volume level.) When the power cord is connected to the AC outlet, the unit will respond to commands from the remote control. To turn the power off, press [z/ON] again. • “GOOD-BYE” appears briefly on the display.
Selecting Surround Mode Press [SURROUND] to select the surround mode. Each time the button is pressed, the surround mode changes as follows: 5.1 AUTO v 5.1 SURR v 2.1ch v DIRECT v 5.1 AUTO… Function FL display Description DVD/CD 5.1 AUTO The unit selects the surround mode automatically depending on the disc. • If a DVD disc is encoded with Dolby Digital 5.1 channel, it is played back with Dolby Digital 5.1 channel surround sound. Not all DVD discs are encoded with Dolby Digital 5.
Adjusting the Speaker Volume Balance This unit is set to the standard level before shipping from the factory. You may not need any adjustment. However, depending on the size of the room and the placement of the speakers, you may benefit from a fine adjustment. In this case, follow the steps below. Please use the remote control when the test tone sounds. Note: Do not connect the headphones. 1. Press [FUNCTION] to select “DVD/CD”. 2. Press [n] to stop playback completely. 3.
PLAYABLE DISCS The following types of discs can be played on this unit. CAUTION: • Disc type and logo mark • DVD-Video TM • • Audio CD Region Number • Region number (Regional restriction code) is built-in to the unit and DVD video discs. Region number “1” or “ALL” of DVD video discs can be used on this unit. 1 ALL • • • Only the above types of discs can be played on this unit. DVD-ROM, CD-ROM, SVCD, CVD, VCD, etc. cannot be played.
DISC PLAYBACK Preparations Important Note: • • Turn on the TV and select the video input source. Refer to your TV’s owner manual. • VIDEO 1 • TV • • Select the playback picture size according to the aspect ratio of the TV. (See “Setting Display” in “INITIAL SETTINGS” on page E34.) 4:3 LB (Letterbox) • This instruction manual explains the basic instruction of this unit using the remote control unit.
Basic Playback When operation buttons are pressed, that operation is displayed on the TV screen. The display disappears after several seconds. 1. Press [z/ON] to turn the power on. 2. Press [FUNCTION] to select “DVD/CD”. 3. Press [q]. “OPEN” appears on the display and the disc door opens. 4. Place the disc (label facing toward you) on the disc turntable until it clicks. Label facing toward you CAUTION: Never touch the lens! 5. Press [q] to close the disc door.
Stopping Playback • Press [n] once during playback. “Resume n” appears briefly on the TV screen. When you press [a] (Play), playback starts automatically from the point where you stopped. “a” appears briefly on the TV screen. Note: Some discs may not resume playback. • Press [n] twice during playback. “n” appears briefly on the TV screen and playback stops completely. When you press [a] (Play), playback starts from the beginning of the disc.
Title Search [DVD] 1. Press [SEARCH MODE] once while holding [SHIFT] down during playback or in the stop mode. The title search screen appears on the TV screen. Example: 2. Press the number button(s) to enter the title number. Example: To select Title No.3, press [3]. To select Title No.10, press [1], then [0]. To select Title No.24, press [2], then [4]. Note: If you make a mistake, press [CLEAR]. 3. Press [ENTER] or [a] (Play). Playback starts from the selected title. Chapter Search [DVD] 1.
Fast Playback Fast forward playback Press [c] repeatedly to select the fast speed forward playback. [DVD] c 1 v c 2 v c 3 v c 4 (4 steps) [CD] c 1 v c 2 (2 steps) Press [a] (Play) to return to normal playback. Fast reverse playback Press [d] repeatedly to select the fast speed reverse playback. [DVD] d 1 v d 2 v d 3 v d 4 (4 steps) [CD] d 1 v d 2 (2 steps) Press [a] (Play) to return to normal playback. Note: The sound is muted during fast playback in DVD.
Viewing from a Desired Camera Angle (Multi-Angle) [DVD] Some DVD video discs may contain scenes which have been shot simultaneously from a number of different camera angles. The jacket or case of discs that are recorded with angles will be marked. Example: 3 Note: The recorded angles differ depending on the disc used. 1. Play the disc that is recorded with angles. 2. Press [ANGLE] repeatedly while holding [SHIFT] down until the desired angle appears.
Random Playback [CD] 1. Press [PROGRAM/RANDOM] once in the stop mode. • “Random On” appears on the TV screen. • “RND” blinks on the display. 2. Press [a] (Play) to begin random playback. • “RND” remains lit on the display. The unit will automatically select tracks at random. Note: To stop random playback, press [n]. Programmed Playback [CD] Up to 20 selections can be programmed. Programming procedure 1. Press [PROGRAM/RANDOM] twice in the stop mode. • “Program Mode” screen appears on the TV screen.
Selecting Subtitle Language [DVD] This operation works only with discs on which multiple subtitle languages are recorded. Press [S.T.CH] repeatedly during playback until the desired subtitle language appears on the TV screen. Example: 3/3 Fre French After few seconds, the display disappears. • If the subtitle language is not necessary, press [S.T.CH] to select “ Off”. Notes: • In some cases, the subtitle language is not changed to the selected one.
TVGuardian® OPERATION Before Setting • • • • Initial setting is “CC Channel CC2” on this unit. Please set “CC2” or “C2” (Closed caption on channel 2) on your TV first. For more details, please refer to your TV’s owner manual. When “TVG” is set, the subtitle language may not appear. TVG works on the discs with closed caption. See page E20. Setting TVGuardian® 1. Press [SETUP] in the stop mode. The setup screen appears. 6. Press [ENTER]. The submenu appears. 2. Press [a] to select “Parental”. 3.
11. Press [p] or [o] to select “On” or “Off”. 12. Press [ENTER]. The submenu is set. 13. Repeat steps 9 ~ 12 to set other items. 14. Press [p] to select “CC Mode” (Closed caption mode). 15. Press [ENTER]. The submenu (“Off”, “On Mute” and “Continuous”) appears. 20. After step 19, you must set the parental lock as shown below. (For more details, please refer to “Setting Parental” on page E37.) 1) Press [p] to select “Level”. 2) Press [ENTER] repeatedly to select the parental lock level.
MP3/WMA CD OPERATION Before Starting MP3/WMA CD Playback This unit can play back the CD that has recorded music data, MP3 or WMA (Window Media Audio) files. • Select “DVD/CD” function. • The file system is ISO9660 Level 1 and Level 2. • If the CD has both audio CD tracks and MP3/WMA files, only MP3/WMA files are played. • It would take 30 seconds or more for this unit to read MP3/ WMA files depending on its structure. • This unit can recognize up to 1500 files and/or 150 folders per disc.
PICTURE DISC OPERATION Example: (JPEG CD) Before Starting You can view digital images from KODAK Picture/JPEG files. • Select “DVD/CD” function. • The file system is ISO9660 level 1 and level 2. • If the CD has both audio CD tracks and JPEG files, only JPEG files are played. • It would take 30 seconds or more for this unit to read JPEG files depending on its structure. • This unit can recognize up to 1500 files and/or 150 folders per disc. • JPEG CDs may not be played in the recorded order.
INITIAL SETTINGS Once the initial settings have been completed, the unit can always be operated under the same conditions. The settings will be retained in the memory until they are changed, even if the power is turned off. Notes: • In this instruction manual, the language in on-screen display is English. If you change the language, please follow the selected language in on-screen display. • The disc information takes priority in various setting.
5. Setting TV type Select the playback picture size according to the aspect ratio of the TV. 1) In “Display” screen, press [5] or [4] to select “TV Type”. Setting Display 1. Press [SETUP] in the stop mode. The setup screen appears. 2. Press [a] to select “Display”. 3. Press [ENTER]. “Display” screen appears. “TV System NTSC” is highlighted. 2) Press [ENTER]. The submenu appears. 5] to skip “TV System NTSC”. 4. Press [5 Note: Because, “NTSC” is used for TV System in North America.
6. Setting progressive mode 1) In “Display” screen, press [5] to select “Progressive”. 2) Press [ENTER]. The submenu appears. Note: If “Progressive” is not selected... First, press [z/ON] to turn the power off. Then, confirm that the VIDEO OUT SELECT switch is set to the COMPONENT position. (See page E15.) Next, press [z/ON] again to turn the power on, and press [SETUP] to open the setup screen. 3) Press [5] or [4] to select the progressive mode (“On” or “Off”). 4) Press [ENTER]. The submenu is set.
Setting Audio The sound from speakers can reach the listening position at different times depending the speaker placements. You can allow for this difference by changing the delay time of the center and surround speakers. You also can change the Dynamic Range Control (DRC). 1. Press [SETUP] in the stop mode. The setup screen appears. 2. Press [a] to select “Audio”. 3. Press [ENTER]. “Audio” screen appears. 4. Press [ENTER] to select “Audio DRC”. The submenu (“On” and “Off”) appears. 5.
6. Press [ENTER]. The password is now set. Setting Parental Note: If you set “TVGuardian”, set it first. See “Setting TVGuardian®” on page E29. 1. Press [SETUP] in the stop mode. The setup screen appears. Note: If you do not set it, Parental Control does not work, and it returns to the initial settings. 2. Press [a] to select “Parental”. 3. Press [ENTER]. “Parental” screen appears. 7. Press [SETUP]. The setup screen disappears.
Language Code List Enter the appropriate code number for the initial settings “Audio”, “Subtitle” and “DVD Menu” on page E33.
LISTENING TO THE RADIO (FM ONLY) To turn the unit on and listen to the last received station, press [TUNER] on the remote control. PROGRAM /RANDOM Number buttons Preparation Press [FUNCTION] to select “FM TUNER”. Note: This unit doesn't have “AM TUNER”. FM MODE TUNER Automatic/Manual Tuning Automatic tuning Press [TUNE] + or - for at least 1 second to tune in a station. The unit will scan up or down the band and receive the next receivable station. Press the button again to continue.
ENJOYING OTHER SOURCES 2. Follow the instructions supplied with TV or other compatible/ video component. 1. Press [FUNCTION] to select “AUX”. SLEEP TIMER OPERATION The sleep timer automatically switches off the power after a preset time has elapsed. The volume will gradually be reduced (fade-out) during the 1 minute period before the unit turns off. There are 4 time periods available: 30, 60, 90, and 120 minutes. To check the remaining sleep time Press [SLEEP] once while holding [SHIFT] down.
SYMPTOM No sound. POSSIBLE CAUSE CORRECTIVE ACTION Volume control is set to minimum. Turn up the volume. The wrong function is selected. Select the correct function. Faulty speaker connections. Connect the speaker wires firmly to the speaker terminals. (See page E10.) DTS disc is played back. Press the ON SCREEN button to see if “DTS sound” is not selected. If “DTS sound” is selected, change the sound. (See page E28.) Sound is heard from only one speaker. Faulty connection of speaker wires.
SPECIFICATIONS DVD Receiver (DWM-4500) DVD Video Player Signal format: NTSC color Laser: Semiconductor laser, wavelength 650/790 nm Wow and flutter: Below measurable level General Power requirements: AC 120 V, 60 Hz Power consumption: 76 W Dimensions (W x H x D): Approx. 6.1" x 1.8" x 16" (154 x 415 x 407 mm) Weight: Approx. 20.5 lbs (9.3 kg) FM Tuner Frequency range: 87.9 MHz ~ 107.9 MHz (200 kHz steps) Usable sensitivity: 20.2 dBf (mono) Inputs/Outputs SYSTEM: System cable terminal FM ANT.
For assistance in obtaining repairs and operational information, please contact the following Toll Free Number: DIAL TOLL FREE: 1-800-813-3435 Weekdays: 7:30 AM - 4:00 PM Central Time Also, you may write to SANYO Manufacturing Corporation, 3333 Sanyo Road, Forrest City, Arkansas 72335. Limited Warranty LABOR 1 YEAR PARTS 1 YEAR CARRY-IN ONLY THIS WARRANTY IS VALID ONLY ON SANYO PRODUCTS PURCHASED FROM A WAL-MART STORE AND USED IN THE UNITED STATES OF AMERICA, EXCLUDING HAWAII AND ALL U.S.