INSTRUCTION MANUAL DWM-450 DVD Video Player ON OPEN/CLOSE z q SLOW PAUSE/STEP PREV STOP NEXT f n SEARCHMODE e REV P L AY FWD d a c 1 2 3 4 5 7 8 k 6 9 PROGRAM 0 +10 AUDIO SUBTITLE RANDOM Z O O M SETUP MENU ENT TOP MENU REPEAT RETURN A-B ANGLE ON SCREEN REMOTE CONTROLLER RB-SL50 SANYO’S HELP-LINE Call the toll-free number below if you have any difficulties operating this product. 1-800-813-3435 (Weekdays: 7:30 AM - 4:00 PM Central Time) Please Read This Manual.
CONTENTS Picture Zoom [DVD] ................................................. E20 Viewing from a Desired Camera Angle (Multi-Angle) [DVD] .................................................. E20 Repeat Playback ...................................................... E21 Designated Range Repeat Playback (A-B Repeat) .. E21 Random Playback [CD] ............................................ E22 Programmed Playback [CD] ..................................... E22 Selecting Subtitle Language [DVD] ....................
This symbol indicates that dangerous voltage constituting a risk of electric shock is present within this unit. CAUTION RISK OF ELECTRIC SHOCK DO NOT OPEN This symbol indicates that there are important operating and maintenance instructions in the literature accompanying this unit. CAUTION: TO PREVENT THE RISK OF ELECTRIC SHOCK, DO NOT REMOVE COVER (OR BACK). NO USER-SERVICEABLE PARTS INSIDE. REFER SERVICING TO QUALIFIED SERVICE PERSONNEL.
15. Outdoor Antenna Grounding – If an outside antenna or cable system is connected to the product, be sure the antenna or cable system is grounded so as to provide some protection against voltage surges and built-up static charges.
SAFETY CERTIFICATION This unit is made and tested to meet exacting safety standards. It meets UL and FCC requirements and complies with safety performance standards of the U.S. Department of Health and Human Services. CAUTION: Changes or modifications not expressly approved by Sanyo may void the user’s authority to operate this equipment. Note: This equipment has been tested and found to comply with the limits for a Class B digital device, pursuant to Part 15 of the FCC Rules.
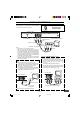
CONTROLS Front Panel 1 1. 2. 3. 4. 5. 2 3 Disc tray Open/Close button (q) Disc-in indicator (DISC IN) Play indicator (PLAY) Remote sensor (IR) 4 5 6 7 8 9 10 6. Skip/Next/Previous buttons (f, e) 7. Stop button (n) 8. Play button (a) 9. Power button (z/ON) 10. Power indicator Back Panel 1 VIDEO OUT COMPONENT VIEDO OUT Pr L Y R Pb COAXIAL 2 AUDIO OUT S-VIDEO OUT 3 4 1. Component video output jacks (COMPONENT VIDEO OUT) 2. Coaxial digital output jack (COAXIAL) 3.
REMOTE CONTROL 1 ON 1. 2. 3. 4. 5. 6. 7. 8. 9. 10. 11. 12. 13. 14. 15. 16. 17. 18. 19. 20. 21. 22. 23. 24. 25. 26. 27.
BEFORE CONNECTION IMPORTANT INFORMATION: • To connect this unit to a TV, TV must have a set of Audio/Video composite input jacks (RCA-type). You cannot use an antenna terminal to connect this unit. If your TV has only an antenna terminal, please purchase the TV with Audio/Video input jacks or the RF modulator. Do not connect the unit to a VCR directly. The playback picture will be distorted because DVD video discs are copy-protected.
BASIC CONNECTIONS Connecting to a Conventional TV (Example 1) Need help? Call 1-800-813-3435 Connect the DVD video player to your TV. DVD video player L Y R Pb COAXIAL AUDIO OUT S-VIDE O OUT (White) L (Red) R To AC 120V, 60Hz VIDEO OUT COMPONENT VIEDO OUT Pr AUDIO VIDEO INPUT 1 To AUDIO OUT jacks Using the S-VIDEO OUT jack Note: Please follow the steps before turn on the power. 1. If your TV has the S-video input jack, connect the DVD video player with the S-video cable (not supplied).
Using RF Modulator If your TV does not have a Video input jack and has an antenna terminal only, please purchase the *RF Modulator (not supplied). (*Please consult your audio/video dealer.
Connecting to a TV with Progressive-scan Capability (Example 2) Your TV must be capable of handing progressive scanning and have component video input capability.
ADDITIONAL CONNECTION EXAMPLES Connecting to an Audio System and TV (Example 3) Connect the DVD video player to an Audio System and a TV. DVD video player L Y R AUDIO OUT (White) L COAXIAL S-VIDEO OUT To VIDEO OUT jack (Yellow) (Red) R Pb To AC 120V, 60Hz VIDEO OUT COMPONENT VIEDO OUT Pr To video input (Yellow) AUDIO VIDEO INPUT 1 To AUDIO OUT jacks *Audio cable (not supplied) Notes: • Please refer to the instruction manual of your Audio System and TV.
Notes: • For VIDEO connection, please refer to “BASIC CONNECTIONS”. • Please refer to the instruction manual of your amplifier. • When you connect the DVD video player to your amplifier, be sure to turn off the power and disconnect both units from the wall outlet until all the connections have been made.
Connecting to an Amplifier with Dolby Pro Logic Decoder (Example 6) To AUDIO INPUT jacks Amplifier with Dolby Pro Logic Decoder *Audio cable (not supplied) Center speaker To AUDIO OUT jacks L Y Surround left speaker R Pb COAXIAL AUDIO OUT Front right speaker Front left speaker VIDEO OUT COMPONENT VIEDO OUT Pr S-VIDEO OUT Note: Please refer to your amplifier instruction manual. Subwoofer Surround right speaker *Please consult your local audio/video dealer.
PLAYABLE DISCS The following types of discs can be played on the unit. CAUTION: • Only the above types of discs can be played on this unit. DVD-ROM, CD-ROM, VCD, CVD, etc. cannot be played. This unit can play back the DVD-R that has recorded movie data as well. However, some DVD-Rs cannot be played back depending on the recording conditions. The DVD-R that has no movie data cannot be played back. This unit is to be used exclusively with the NTSC color system. PAL system discs cannot be used with the unit.
BASIC OPERATION Preparations Basic Playback • • Notes: • Do not touch the disc tray while it is moving. • Never place anything except a disc on the disc tray. Foreign objects can damage the unit. • Do not apply excessive force to the disc tray. • Only one disc must be placed on the disc tray at a time. Turn on the power (TV, Audio System, AV amplifier, etc.). Select the video input source on your television. (Please refer to your TV instruction manual.
4. Press [q] (or [ q OPEN/CLOSE] on the remote control) again. • The disc tray closes. Note: Some discs may start playback automatically. Stopping Playback [DVD] • Press [n STOP] (or [n] on the unit) once during playback. “RESUME n” appears briefly on the TV screen. The PLAY indicator blinks on the front panel. 5. Press [a PLAY] (or [a] on the unit) to start playback. • The PLAY indicator lights on the front panel. • “a” appears briefly on the TV screen.
Selecting a DVD Menu Notes: • The operation may differ depending on the disc used. • Selecting a menu may not be possible on some discs. Need help? Call 1-800-813-3435 1. Press [MENU]. The main menu screen will appear. Note: Press [MENU] again to resume playback. 2. Press [4], [5], [b] or [a] (or the number buttons) to select the desired menu. 1 2 3 4 5 6 7 8 +10 0 9 PROGRAM AUDIO SUBTITLE RANDOM Z O O M 3. Press [ENT]. The selected menu playback starts.
Title or Chapter Search [DVD] Important Note: 1. Press [SEARCH MODE] once during playback or in the stop mode. The title/chapter search screen appears on the TV screen. Example: TITLE 01 / 28 CHAPTER 015 / 035 “ ” may appear on the TV screen during operation. This icon means that the function is not available on the disc now. ON OPEN/CLOSE z 2. Press [a] or [b] to select “TITLE” or “CHAPTER”. q SLOW k PREV 3. Press the number button(s) to enter the title or chapter number.
Fast Playback Fast forward playback Press [FWD c] repeatedly to select the speed of the fast forward playback. ON c 1 v c 2 v c 3 v c 4 (4 steps) OPEN/CLOSE z SLOW Press [a PLAY] to return to normal playback. REV Fast reverse playback Press [REV d] repeatedly to select the speed of fast reverse playback.
Picture Zoom [DVD] Press [ZOOM] during playback. 1” The central part of the picture is magnified, and “ appears on the TV screen. • Each time you press [ZOOM], the zoom mode will be changed as follows: d a 1 2 3 4 5 6 7 8 c 9 PROGRAM 0 +10 AUDIO SUBTITLE RANDOM Z O O M 1v 2v 3v SETUP OFF MENU 4, a, 5, b ENT • ZOOM Press [4], [a], [5] or [b] to change the zoom point. TOP MENU To return to the original screen, select “ OFF”.
Repeat Playback Press [REPEAT] during playback (or programmed playback) of the title (or track) you want to repeat. Each time the button is pressed, the repeat mode will be changed as follows.
Random Playback [CD] 1. Press [RANDOM] in the stop mode. • “RANDOM ON” appears briefly on the TV screen. ON OPEN/CLOSE z q SLOW k 2. Press [a PLAY] to start random playback. The unit will automatically select tracks at random. STOP PLAY Notes: To stop random playback, press [n STOP] and [RANDOM]. “RANDOM OFF” appears briefly.
Selecting Subtitle Language [DVD] This operation works only with discs on which multiple subtitle languages are recorded. SLOW k 1. Press [SUBTITLE] during playback. The subtitle language mark appears. 01/03: EN) (Example: OFF” appears, press the button again. If “ PREV STOP f n e REV P L AY FWD d a NEXT c 1 2 3 4 5 6 7 8 9 PROGRAM 2. Press [SUBTITLE] repeatedly until the desired subtitle language appears on the TV screen.
Selecting On-Screen Information For improvement, on-screen displays subject to change without notice. Press [ON SCREEN] repeatedly to show the disc information (Title, Chapter, Title elapsed playing time, Language, etc.). Example for CD: 1. Press [ON SCREEN] during playback. Example for DVD: 1. Press [ON SCREEN] during playback.
TVGuardian® OPERATION Before Setting • • • In this instruction manual, the language in on-screen display is English. If you change the language (see page E31), please follow the selected language in onscreen display. Initial setting is “CC2” on this unit. Please set “CC2” or “C2” (Closed caption on channel 2) on your TV first. For more details, please refer to your TV instruction manual. When “TVG MODE” is set, the subtitle language may not appear. Setting TVGuardian SLOW k PREV ® 1.
How It Works After Setting TVGuardian®: When a disc supporting closed caption is played, it mutes the entire phrase instead of just the swear word and displays the modified text, by design. It turns the sound back on when the phrase is completed. Examples: The phrase “Get the hell out”, is muted and “Get Out.”, is displayed. The phrase “Move you’re a !”, is muted and “Move your tail!”, is displayed. IMPORTANT INFORMATION: • Use a TV with closed caption capability and set the function to “On”.
MP3 CD OPERATION Before Starting MP3 CD Playback This unit can play back the CD that has recorded music data, MP3 files. • The file system is ISO9660 Level 1 and Level 2. • If the CD has both audio CD tracks and MP3 files, only audio CD tracks are played. • It may take 30 seconds or more for this unit to read MP3 files. It depends on its structure. • This unit can recognize up to 256 files or folders per disc. The CD with 257 files or folders and over is not available to this unit.
Pause Press [k PAUSE/STEP] during playback. • “k” appears on the TV screen. • The PLAY indicator blinks on the unit. Note: The sound is muted. ON OPEN/CLOSE z PREV q SLOW k The [a PLAY] to return to normal playback. PREV NEXT STOP f n e REV P L AY FWD d a c File Skip 1 2 3 Skipping forward 4 5 6 Press [NEXT e] during playback to skip to the next file. “e” appears briefly on the TV screen.
PICTURE DISC OPERATION KODAK Picture CD Playback With KODAK Picture CD, it’s easy to turn film into pictures you can email from your PC and view on this DVD video player! Just bring your film in for processing, and check the box for KODAK Picture CD. You’ll get back your prints and negatives as usual - plus you’ll get a special CD that contains your pictures along with software that lets you view, enhance, share, and print your pictures from your computer and view them on this DVD video player.
JPEG CD Playback Picture Zoom You can also view digital images from JPEG files on disc created by your computer. • It would take 30 seconds or more for this unit to read the JPEG files depending on its structure. • Some JPEG files cannot be played back depending on the recording conditions. 1. Press [k PAUSE/STEP] at the desired picture (KODAK Picture CD or JPEG CD). 2. Press [ZOOM] to select “ ”. 3. Press [FWD c] or [REV d] to select the desired picture size. 1.
INITIAL SETTINGS Once the initial settings have been completed, the unit can always be operated under the same conditions. The settings will be retained in the memory until they are changed, even if the power is turned off. Notes: • In this instruction manual, the language in onscreen display is English. If you change the language, please follow the selected language in on-screen display. • You cannot switch audio sound track languages if there is only one language recorded on the disc.
Setting Display 1. Press [SETUP] in the stop mode. “SETUP” screen appears. SETUP REV P L AY FWD d a c 1 2 3 4 5 6 7 8 9 PROGRAM 0 +10 AUDIO SUBTITLE RANDOM Z O O M LANGUAGE SETUP MENU SETUP DISPLAY 4, a, 5, b DIGITAL OUT ENT ENT PARENTAL TOP MENU RETURN TVG REPEAT A-B ANGLE 2. Press [5] to select “DISPLAY”. 6. Press [ENT]. The TV type is set. 3. Press [ENT]. “DISPLAY” screen appears. 7. Press [b] to skip back to “TV TYPE”. DISPLAY 8. Press [SETUP] to close the screen.
7. Press [b] to skip back to “DOLBY DIGITAL”. Setting Digital Out If the COAXIAL (Coaxial digital output) jack is connected to the amplifier, you must set as follows: 1 2 3 4 5 6 7 8 8. Repeat steps 2 - 7 to set other items (“MPEG” and “96kHz LPCM” ). MPEG (Moving Picture Expert Group): If your amplifier has MPEG2 Decoder, select “BITSTREAM”. If not, select “LPCM”.
Setting Parental Note: The PASSWORD is set to “0000” before shipping from the factory. 1 2 3 4 5 6 7 8 9 Number PROGRAM 0 +10 1. Press [SETUP] in the stop mode. “SETUP” screen appears. AUDIO SUBTITLE RANDOM Z O O M SETUP MENU SETUP 4, a, 5, b ENT 2. Press [5] to select “PARENTAL”. ENT 3. Press [ENT]. “PARENTAL” screen appears. TOP MENU REPEAT ANGLE 15. Enter the same password in the box. PARENTAL 16. Press [ENT]. The parental lock level is set. “PARENTAL” screen returns.
TROUBLESHOOTING GUIDE If you have followed the instructions and are having difficulty operating the unit, locate the SYMPTOM in the left column below. Check the corresponding POSSIBLE CAUSE and CORRECTIVE ACTION columns to locate and remedy the problem. SYMPTOM No power. POSSIBLE CAUSE CORRECTIVE ACTION No power plug connection at the AC wall outlet. Insert the power plug into the AC wall outlet. The power is on, but the player does not work. No disc is loaded. Load a disc. No picture.
SYMPTOM POSSIBLE CAUSE CORRECTIVE ACTION The operation or display is not normal. The unit must be reset. 1. Disconnect the power cord. 2. Reconnect the power cord. 3. Resume operation. The remote control does not work properly. The batteries in the remote control are weak, or installed incorrectly. Check the battery polarity (+ or –). Replace the batteries. (See page E6.) The remote control is not aimed at the remote sensor window. Aim the remote control at the remote sensor window. (See page E6.
For assistance in obtaining repairs and operational information, please contact the following Toll Free Number: DIAL TOLL FREE: 1-800-813-3435 Weekdays: 7:30 AM - 4:00 PM Central Time Also, you may write to SANYO Manufacturing Corporation, 3333 Sanyo Road, Forrest City, Arkansas 72335.