
User's Manual


12
INSTALLATION
1. Removing the packaging materials and tapes
Remove all transportation packaging materials and tapes.
Open the doors and ventilate the unit. If the outside
panels are dirty, clean them with a diluted neutral
dishwashing detergent. (Undiluted detergent can damage
the plastic components. For the dilution, refer to the
instruction of the detergent.) After the cleaning with the
diluted detergent, always wipe it off with a wet cloth. Then
wipe off the panels with a dry cloth.
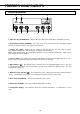
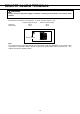
2. Adjusting the leveling foot
Extend the leveling feet by rotating them counterclockwise
to contact them to the floor. Ensure the unit is level.
3. Fixing the unit
Two fixtures are attached to the rear of the frame. Fix the
frame to the wall with these fixtures and rope or chain.
4. Ground (earth)
The ground (earth) is for preventing the electric shock in the
case of the electrical insulation is somehow degraded.
Always ground the unit at the time of installation.
WARNING
Use a power supply outlet with ground (earth) to prevent electric shock. If the power supply outlet is
not grounded, it is necessary to install a ground by qualified engineers.
Never ground the unit through a gas pipe, water main, telephone line or lightning rod. Such
grounding may cause electric shock in the case of an incomplete circuit.
START-UP OF UNIT
Follow the procedures for the initial and consequent operations of the unit.
1. Connect the unit to dedicated power supply and turn on the power switch. Do not put any product in
the unit at this time.
2. Set the desired temperature.
3. Confirm that the chamber temperature is at the desired temperature.
4. When you are satisfied that the unit is working correctly, begin slowly placing product into the chamber
to minimize the temperature rise.
Operation after power failure
The set value is memorized by nonvolatile memory. Accordingly, the freezer resumes the operation with
setting before power failure.
Leveling foot
Power switch
Fixture