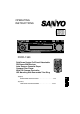
OPERATING INSTRUCTIONS FXCD-1350 Fold Down Design Full Panel Detachable FM Stereo/AM Receiver Auto Reverse Cassette Player Compact Disc Player With CD Changer Controller ISO Mounting with Removable Trim Ring (English) OPERATING INSTRUCTIONS . . . . . . . . . . . . . . . . . . . 1~29 GB (Español) LIBRITO DE INSTRUCCIONES . . . . . . . . . . . . . . . . .
SANYO MOBILE AUDIO MODEL FXCD-1350 LIMITED WARRANTY OBLIGATIONS In order to obtain warranty service, the product must be delivered to and picked up from an Authorized Sanyo Factory Service Center at the user's expense, unless specifically stated otherwise in this warranty. The names and addresses of Authorized Sanyo Service Center may be obtained by calling the toll-free number listed below.
English CONTENTS COMPACT DISC CARE. . . . . . . . . . . . . . . . . . . . . . . . . . . . . . . . . . . . . . . . . . . . . . . . . . . . . . . 3 REMOTE CONTROLLER . . . . . . . . . . . . . . . . . . . . . . . . . . . . . . . . . . . . . . . . . . . . . . . . . . . . . 5 DIGITAL DISPLAY . . . . . . . . . . . . . . . . . . . . . . . . . . . . . . . . . . . . . . . . . . . . . . . . . . . . . . . . . . . 7 DETACHABLE FRONT PANEL . . . . . . . . . . . . . . . . . . . . . . . . . . . . . . . . . . . . . . . .
COMPACT DISC CARE Dirt, dust, scratches and warpage can cause a deterioration in the sound or intermittent skipping some tracks during play. • This unit has been designed to play compact discs bearing the identification logo shown on the left. Discs bearing other types of identification logos may not play properly. • Playback may not be possible due to the characteristics of the CD recorder or the CD-R/RW used, or due to scratches or dirt on the CD.
Benzene Thinner Cleaning spray • Never use chemicals such as record cleaning sprays, antistatic sprays or fluids, benzene or thinner to clean compact discs. These chemicals will permanently damage the plastic surface of the disc. • When not using the disc player for extended periods, remove the compact disc and return it to the plastic storage case. This will protect the disc from dust and exposure to the sun. • Mixed-mode CDs This product can only play audio tracks on mixed-mode CDs.
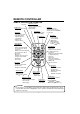
REMOTE CONTROLLER REMOTE CONTROLLER OPERATION Not used BAND button Change reception band PRESET (+) Button • Radio mode: Select a registered station • CD-CH mode: DISC change SCN button • Radio mode: Scan a preset station • CD/CD-CH mode: Play introduction to current DISC • TAPE mode: Play introduction TAPE Button Switch to TAPE mode Switch DIRECTION PWR Button Power ON/OFF .
BATTERY INSTALLATION Install a lithium battery (CR2025) with the poles facing the correct direction. Positive pole faces upward. BATTERY REPLACEMENT TIMING When battery power is depleted, the buttons may not be operable. If the remote controller does not operate, replace the battery and check the operation. CAUTIONS REGARDING BATTERY Be sure to follow the instructions to prevent battery leakage, over-heating, ignition, or explosion. WARNING • Do not expose the battery to flame.
DIGITAL DISPLAY Repeat Play BASS mode Sound mode Shuffle Play CD-CH AM Band FM Bands Disc Number, Preset Channel, ATP Channel Disc in Tape playing Radio Frequency, Time, direction CD Track Number, Metal Error Signs, Play Audio Control Scan Play Selection, Auto Travel no CD, no Tape, Automatic Music Preset (ATP) Sound Mode Display Select System (AMSS) -7-
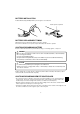
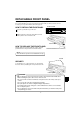
DETACHABLE FRONT PANEL The front panel is designed to be removable for antitheft purposes. It is recommended that you remove and carry the front panel with you when you leave your car. A carrying case is provided with the unit for this purpose. HOW TO DETACH THE FRONT PANEL OPEN BUTTON 1 Press the open button to open the door. 2 Pull the right side of the panel, then pull the left side of the panel to remove it from the unit.
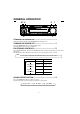
GENERAL OPERATION 3 57 4 1 2 6 TURNING THE POWER ON ........................................ 1 when ACC is on. TURNING THE POWER OFF ...................................... 1 Press the POWER button to stop the current operation. Install the front panel and press the POWER button The button dims when the power is off (ACC on). ELECTRONIC CONTROLS .........................................
BASS CONTROL....................................................... 3 Press the SOUND button for more than 1.5 second to switch ON/OFF of the BASS mode. When the BASS mode is on, “BASS” is displayed and the bass enhances. RADIO SELECTION BUTTON (BAND) ......................... 4 Press the BAND button to switch from CD player, CD changer or tape mode to radio. Each time the button is pressed, the function changes as shown below.
RADIO OPERATION 4 1 5 3 2 SELECTING RADIO MODE ........................................ 1 Press the BAND button to switch from CD player, CD changer or tape mode to the radio. Each time the BAND button is pressed, the selected band changes as shown below. FMI FMII FMIII AM RADIO TUNING ........................................................ 2 • Automatic tuning ............ Press the > or < button for more than 0.5 second until it beeps twice if the beep tones are on.
ATP (AUTO TRAVEL PRESET) OPERATION ................ 4 The Auto Travel Preset function searches for and memorizes the 6 strongest stations in one of the two bands (FM, AM) in the order of signal strength. This feature is useful when you are driving in an unfamiliar location and want to memorize local stations without changing the standard preset stations. A total of 12 stations (6 FM and 6 AM) can be programmed. • To set the stations............................... 1 Select the desired band.
TAPE OPERATION 4 1 6 7 5 11 10 9 8 LOADING AND EJECTING THE TAPE ......................... 1, 2, 3 to open the door. Insert a cassette into the tape slot and the tape player will start. Press the eject button to eject a tape. Press the OPEN button CAUTION • Only cassette tapes that play no longer than 90 minutes should be used. Tapes exceeding 90 minutes are thin and may easily break. SELECTING TAPE MODE ..........................................
LOCATING THE BEGINNING OF A PROGRAM (AMSS) .................................................................... 6, 7, 8 This system is equipped with a function that allows you to skip forward or backward to locate the beginning of a particular selection on the tape. (Automatic Music Select System : AMSS) . "AMSS" is displayed. to skip forward up to 9 selections from the current location on the tape. e.g.) With "AMSS" displayed, press button three times. "F3" is displayed.
CD OPERATION 4 1 6 5 7 8 9 LOADING AND EJECTING THE CD ............................ 1, 2, 3 to open the door. Insert a disc into the CD slot and the CD player will start. Press the eject button to eject a disc. Press the OPEN button 2 3 CAUTION • This CD player is not designed for 8 cm CDs. Please do not use an 8 cm CD nor 8 cm CD adaptor. • If the unit is already loaded with a CD, please do not attempt to insert another disc, which may result in damage to both of the discs and the unit.
SKIPPING TRACKS ................................................... 5, 6 Press the > button to skip to the beginning of the next track. Press the < button to skip to the beginning of the track currently playing. Press the < button twice to skip to the beginning of the previous track. Press and hold the > or < button for more than 0.5 seconds to search quickly (with sound) in the forward or reverse direction. When the button is released, the CD resumes normal play. SHUFFLE MODE .....................
CD CHANGER OPERATION THE UNIT CAN BE USED TO CONTROL THE FUNCTIONS OF THE COMPATIBLE SANYO CD CHANGERS. (If a CD changer switch is equipped, always set it to "1".) 1 5 4 6 7 8 3 2 9 SELECTING CD CHANGER MODE ............................. 1 Press the CD/TAPE/CD-CH button to switch from radio, tape or CD player mode to CD changer mode. SELECTING A DISC .................................................. 2, 3 Press the DISC + button Press the DISC - button to select the next disc.
REPEAT MODE ......................................................... 7 • Repeat tracks ...................................... Press the RPT button to play the current track repeatedly. The RPT indicator lights. • Repeat discs ......................................... Press the RPT button for more than 1.5 seconds to play the current disc repeatedly. The RPT indicator blinks. To cancel the track repeat or disc repeat mode, press the RPT button or eject the magazine.
ERROR SIGNS CD Player If a problem should occur while operating the built-in CD player, one of the following error signs may be displayed: Symptom E01 E07 E99 Cause Solution Abnormal CD mechanism function. Press the eject button. Turn the power off and then on again. If it is not corrected, contact the place of purchase. The disc was inserted incorrectly. Insert the disc properly. The disc is dirty. Clean the disc. The disc is defective. Use another disc.
CLOCK 1 3 2 4 DISPLAY MODE CHANGE.......................................... 1 The display on the unit can be changed by pressing DISP button . Press the DISP button to switch between the clock and audio display. When a radio, tape and CD function is performed while the time display is selected, the audio display will appear for 5 seconds, then the display will return to the time mode. ADJUSTING THE TIME ..............................................
HINTS FOR PROPER AND SAFE OPERATION • Condensation Moisture can condense on the optical lens of the CD player during humid or rainy days, or after the car heater is turned on. If this occurs the disc player may not function properly. To remedy the situation, remove the disc from the unit and wait approximately one hour. This should allow the moisture to evaporate and restore normal operation. • Temperature Consideration The unit may not operate correctly in extremely hot or cold temperatures.
TROUBLESHOOTING Sometimes a simple operational error or a mistake in the wiring can appear to be a problem with the unit. Before having the unit serviced, refer to the troubleshooting chart below. Symptom The compact disc does not play when inserted into the unit. Cause Solution The volume control is turned down. Turn up the volume control. The power connections are not wired correctly. Check the +12V and ground connections. No sound is coming out. The speaker code connection is incomplete.
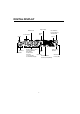
ACCESSORIES AND HARDWARE Mounting Bracket (Half Sleeve) x 1 Rear Strap (Brace) x 1 Removable Trim Ring x1 Screw 5 x 14 x1 Unlock Levers x2 INSTALLATION 1. BEFORE INSTALLATION When mounting the unit in a car, keep the unit as level as possible. If the unit must be mounted at an angle, due to the design of the vehicle, make sure the unit does not tilt by more than 30°.
2. ISO MOUNTING WITH REMOVABLE TRIM RING When mounting the unit into a DIN-standard cutout (182 × 53 mm) in the dashboard or console, attach the provided Removable Trim Ring to the unit. DASHBOARD OR CONSOLE 182 mm AUDIO UNIT 53 mm REMOVABLE TRIM RING 3. INSTALLATION PROCEDURES DASHBOARD OR CONSOLE 5 x 14 HEX BOLT 182 mm REAR STRAP (BRACE) 53 mm REMOVABLE TRIM RING MOUNTING BRACKET (HALF SLEEVE) AUDIO UNIT 1. 2. 3. 4.
4. Installation to TOYOTA/NISSAN Vehicles Install the unit using the existing TOYOTA/NISSAN Mounting Bracket and Screws. Use mounting holes in the unit chassis. "T" or "N" is engraved next to each mounting hole. Use "T" holes for Toyota vehicles and "N" holes for Nissan vehicles. TOYOTA/NISSAN Mounting Bracket Screw CAUTION ONLY USE M5 x 6 SCREW (NOT INCLUDED WITH THIS UNIT) AS ILLUSTRATED ABOVE. USE OF ANY OTHER SCREW OR HARDWARE MAY RESULT DAMAGE TO HEAD UNIT.
UNIT REMOVAL AUDIO UNIT (A) (B) (A) (B) UNLOCK LEVERS (C) 1. Press the open button to open the door. 2. Pull the right side of the front panel, then pull the left side of the panel to remove it from the unit. 3. Insert the unlock levers into the slots as illustrated in (A). Note The jagged side of the unlock lever should face outward. 4. Slide both levers outward as illustrated in (B) and pull to remove the audio unit as illustrated in (C).
ELECTRICAL CONNECTIONS 1. ANTENNA SOCKET ANTENNA PLUG 4-speaker System (White) (White/Black) (Gray) (Gray/Black) (Green) (Green/Black) (Violet) (Violet/Black) 2-speaker System Front Left Speaker 2. 3. 4. 5. 6. 7.
Notes • When using a two-speaker installation, the Green, Green/Black, Violet, Violet/Black wires, which are used for a four-speaker installation, are not used. The ends of these wires must be covered with electrical tape to prevent them from shorting to the unit or the vehicle chassis. • When using a two-speaker installation, set the FADER control to the center position. • When fuse replacement is necessary remove the blown fuse by using pliers. Then install the new 15 amp. fuse.
SPECIFICATION FM TUNER SECTION Frequency Range . . . . . . . . . . . . . . . . . . . . . . . . . . . . . . . . . . . . . . . . . . . . . . . . . . 87.5MHz–107.9MHz Usable Sensitivity . . . . . . . . . . . . . . . . . . . . . . . . . . . . . . . . . . . . . . . . . . . . . . . . . . . . . . . . . . . . . . 15dBf 50dB Quieting Sensitivity . . . . . . . . . . . . . . . . . . . . . . . . . . . . . . . . . . . . . . . . . . . . . . . . . . . . . . . . . 30dBf Frequency Response (±3dB) . . . . . . . . . . . . . .
Printed in Malaysia 21605 Plummer Street Chatsworth, CA91311 1ED6P10A18800 Rev.